Corpse Decomposition
Updated May 23, 2026
Technical documentation and user guide.
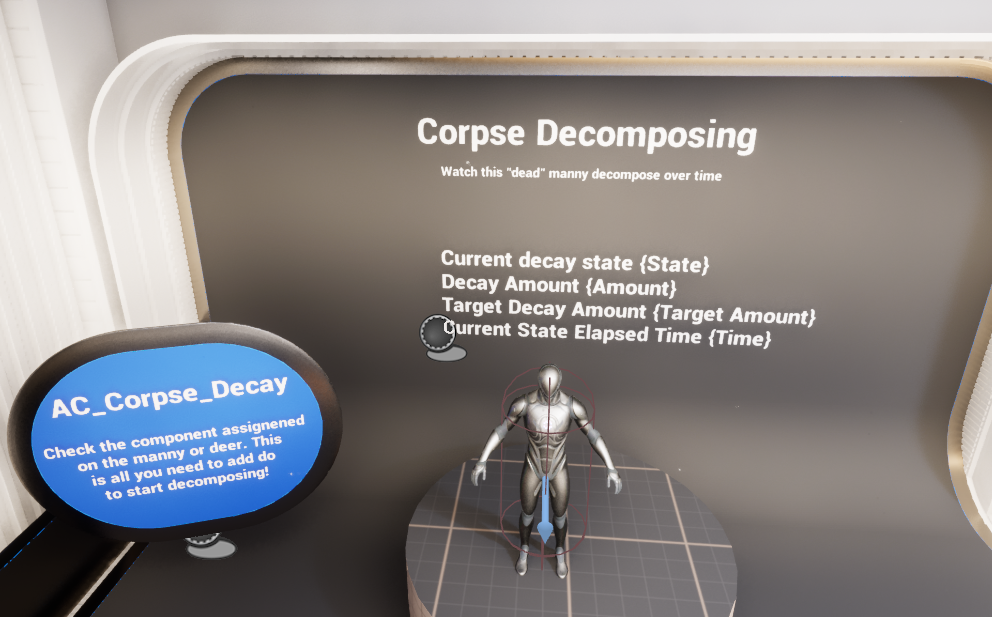
Demo overview: humanoid corpse decomposition display with live state readout.
Introduction
The Corpse Decomposition System is a component-driven Blueprint framework that lets a dead actor visually decay over time. The supplied implementation supports staged progression through named decay states, runtime interpolation of decomposition amount, optional mesh swaps, optional static mesh spawning, optional material changes, and optional Niagara / audio events tied to a state.
At a high level, the system works by attaching a decomposition component to the actor that should rot. That component owns the runtime state, reads a per-state authoring mapping, decides how long the current stage should last, updates the visual decompose amount over time, and advances to the next enum state when the current one is complete.
For shared setup guidance, see the Migration Guide and Integration Guide. Use the System Atlas to look up functions, variables, events, components, and ownership references. Use this page for Corpse Decomposition-specific setup, runtime behavior, extension points, and integration notes.
- Tracks staged progression through Fresh Kill, Bloat, Rotting, Decomposing, and Skeleton.
- Supports multiple start paths: Begin Play, manual event, or a bound On Die event.
- Can apply visual change gradually through material layering and a decompose amount mask.
- Can switch to a different skeletal mesh or spawn a static mesh at a chosen decay stage.
- Can spawn Niagara and sound assets as part of a stage transition.
- Uses a reusable material-layer workflow so artists can retune decomposition visuals without rewriting gameplay logic.
Adding Corpse Decomposition to an Actor
The live implementation shown in the Blueprint screenshots is built around AC_CH_Corpse_Decomposition. This component is added to the actor that should decompose, and it becomes the owner of the full decomposition lifecycle for that specific corpse or character.
- Add AC_CH_Corpse_Decomposition to the actor, character, AI pawn, or corpse actor that should rot.
- Make sure the component can resolve the correct skeletal mesh. If your project uses a child skeletal mesh instead of the primary character mesh, enable Use child skeletal mesh.
- Populate Decay State Mapping so each required E_Decay_State entry has authored state data.
- Choose a start mode: Start decomposing on beginplay, Start Decomposing On Die, or trigger the manual initialize event yourself.
- If you want material-driven decomposition, make sure the target mesh/material setup uses the supplied layered material workflow or an equivalent setup that accepts the same runtime parameter changes.
- Test progression in the demo or on a placed actor before wiring the system into full gameplay death flow.
Why place it on the owning actor?
- The component needs direct access to the actor’s mesh, current materials, optional child mesh, and any death event the actor already exposes.
- Runtime state such as Current Decay State, Current Decay Amount, and Current State Elapsed Time belongs to a specific corpse, not to a global manager.
- Keeping it actor-owned makes it easier to bind to an Attribute Manager or custom death event and start decomposition only when that exact actor dies.
- Mesh swapping, static mesh spawning, Niagara attachment, and audio playback are all simpler when the feature lives beside the actor it is modifying.
Details Panel / Important Variables
The component exposes a clear set of authoring and runtime variables. The tables below group them the same way they appear in the provided Blueprint screenshot.
| Group | Field | Description |
|---|---|---|
| Components | Spawned Static Mesh | Reference to a static mesh component spawned by the system for a given decay stage. |
| Components | Poseable Mesh To Copy To | Reference used when pose / corpse state needs to be preserved or copied to another representation. |
| Components | Using this skeletal mesh | The skeletal mesh component currently chosen as the source mesh for decomposition. |
| Components | Niagara Component | Runtime Niagara component added to the owner for stage-based FX. |
| Components | Current sound playing | Runtime audio component reference used when a stage triggers a sound. |
| Settings | Decay State Mapping | Main authoring container keyed by E_Decay_State. Each entry contains the state’s duration, visual amount, swap/spawn flags, and FX payloads. |
| Settings | Start decomposing on beginplay | If enabled, the component initializes materials and starts decomposition as soon as gameplay begins. |
| Settings | Start Decomposing On Die | If enabled, the component binds to a death event path and begins decomposition when the owner dies. |
| Settings | Use child skeletal mesh | When enabled, the component searches child skeletal mesh components and uses that result instead of the first/default mesh. |
| State | Current Lerp Alpha | Runtime interpolation value used while blending toward the current stage target. |
| State | Current Decay Amount | Live decompose amount currently applied to the corpse visuals. |
| State | Target Decay Amount | The amount the current state is trying to reach before the next progression step. |
| State | Current State Duration | Randomized duration chosen for the active state from its float range. |
| State | Current Decompose Timer | Timer handle used to drive update cadence. |
| State | Previous Decay Amount | Cached previous amount useful for interpolation and transition logic. |
| State | Current State Elapsed Time | How long the owner has been in the current state. |
| State | Decompose Pose Amount | Runtime amount used when pose or mesh deformation needs to follow the decompose pass. |
| Initialization | Initialized | Whether the dynamic material instance setup has already been created. |
| Initialization | Current Decay State | The actor’s current E_Decay_State value. |
| Cache | Current Material Mapper | Runtime cache used to identify which material slot or mapping entry is currently being touched. |
| Cache | Default Decomposable Mesh | Default skeletal mesh asset used when initializing decomposition materials. |
| Cache | Created Material Instances | Array cache of the dynamic material instances created during initialization. |
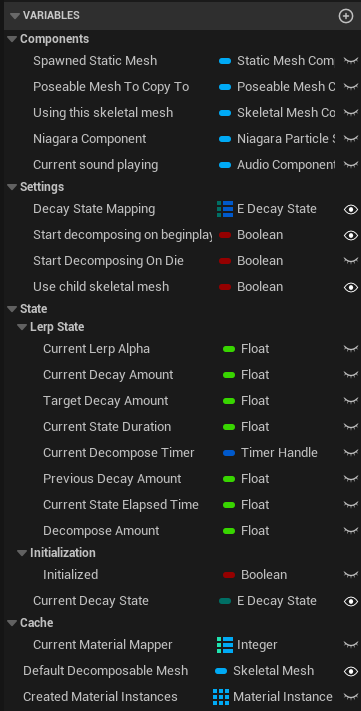
Component variables shown in the supplied Blueprint screenshot.
Enums Explained
The supplied enum is E_Decay_State. Its order matters because the Advance Decay State function visibly increments to the next enum entry and then restarts decomposition for that new state.
| Enum | Typical meaning | Common use in the system |
|---|---|---|
| Fresh Kill | Immediate post-death look. | Starting state for a newly dead actor; often minimal visual change. |
| Bloat | Early body swelling / first visible change. | Useful for early material change or mild FX. |
| Rotting | More obvious tissue decay. | Often where the visual layer becomes significantly stronger. |
| Decomposing | Heavy advanced breakdown. | A good stage for stronger deformation, tinting, or FX. |
| Skeleton | Final stripped-down state. | Typical point for a skeleton mesh swap or static prop handoff. |
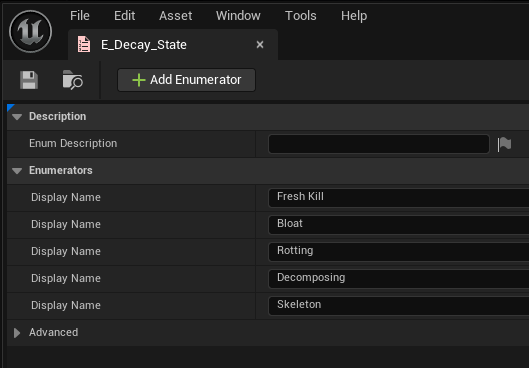
E_Decay_State as provided in the supplied screenshots.
Structures Explained
F_Decay_State_Details
F_Decay_State_Details is the authoring payload for each decay stage. It tells the component how long the stage should last and what content should be changed or spawned when that stage becomes active.
| Field | Purpose | Practical use |
|---|---|---|
| Decay State Duration | Float range used to randomize how long the state lasts. | Primary control for speeding up or slowing down decomposition. |
| Should Swap Mesh | State-specific skeletal mesh reference/flag. | Use when a later stage should swap to a different body mesh, such as a skeleton or damaged carcass mesh. |
| Should Spawn Static Mesh | State-specific static mesh reference/flag. | Use when a stage should spawn a prop-like version of the corpse rather than continuing as the same skeletal setup. |
| Decompose Amount | Target value for the visual decomposition amount. | Controls how far the current material-based decomposition should progress in that state. |
| Should Swap Material | Material replacement payload. In the screenshot this appears to be a slot index -> material instance style mapping. | Use when a state should replace one or more material slots. |
| Niagara To Spawn | Niagara system asset to spawn for the state. | Use for flies, gas, vapour, insects, dust, or similar decay FX. |
| Sound to Spawn | SoundBase asset to play for the state. | Use for ambient corpse sound, gas release, insect loops, or one-shot transition cues. |

F_Decay_State_Details fields as shown in the provided structure screenshot.
Decay State Mapping Explained
Decay State Mapping is the main design-time control point for the system. It is the place where E_Decay_State entries are mapped to F_Decay_State_Details payloads.
- If the current state cannot be found in the mapping, the provided graph indicates the system treats the state as invalid and stops progressing that pass.
- When a valid state is found, the component reads the state details, sets Target Decay Amount, randomizes Current State Duration from the float range, and branches into stage-specific actions such as mesh swap, static mesh spawn, Niagara, and sound.
- Because the map is keyed by E_Decay_State, the easiest way to author different creature types is often to keep the same enum but change the payload values, meshes, and material instances per actor or per component preset.
In practice, this means most tuning work happens in one place: the state mapping.

State resolution graph: the current state is looked up in the mapping, target values are set, duration is randomized, and state-specific outputs are fired.
Functions to Use
The Blueprint screenshots expose a mixture of public entry points, internal driver functions, and utility helpers. Even when some of these are implementation-facing rather than player-facing, they still define the system’s working contract and are the most important functions to understand when integrating or extending the feature.
Core initialization / start functions
| Function | Purpose | When to use it |
|---|---|---|
| Event Begin Play | Entry point for automatic setup. | Used when the component should initialize at runtime start. |
| Initialize Materials | Creates dynamic material instances from the chosen decomposable mesh and caches them. | Must succeed before material-driven decompose values can be pushed cleanly. |
| Start Decomposing | Main driver for beginning or re-beginning the current state pass. | Called after init and again when states advance. |
| Event: Manually Initialize Start Decomposing | Manual entry point shown in the graph. | Use when the actor should start decomposing from custom game logic rather than Begin Play. |
| Manually Initialize Start Decomposing At Stage | Sets Current Decay State first, then begins decomposition. | Useful for spawning an already-decayed corpse or previewing a later stage directly. |
| On Die_Event | Death-bound event shown in the graph. | Used when decomposition should start only after the owner dies. |
| Set Decomposing Variables And Execute According to State | Collapsed graph shown in the screenshots that resolves the mapping, sets target values, randomizes duration, and returns state-specific execution paths. | Core internal step whenever a state starts. |
Update / progression functions
| Function | Purpose | Notes |
|---|---|---|
| Update Decompose | State update driver. | Used to progress current amount / elapsed time during the active state. |
| Decompose | Main runtime visual progression path. | The name suggests the place where the visual amount is actually applied. |
| Event Update Decay State | Update-side event shown in the graph. | Used when the state has completed and needs to move on. |
| Advance Decay State | Increments the enum to the next E_Decay_State and then calls Start Decomposing again. | This makes enum ordering important. |
Mesh / actor spawning functions
| Function | Purpose |
|---|---|
| Switch Skeletal Mesh | Applies a state-driven skeletal mesh change. |
| Spawn Static Mesh | Spawns a static mesh representation for the state. |
| Spawn Niagara | Spawns or activates Niagara FX for the state. |
| Spawn sound | Spawns or plays the configured sound for the state. |
Utility functions
| Function | Purpose | What the screenshot indicates |
|---|---|---|
| Find Skeletal Mesh to Use | Resolves the mesh the system should operate on. | If Use child skeletal mesh is enabled, the function searches descendants and returns the first valid skeletal mesh component; otherwise it uses the main/character mesh path. |
| Advance Decay State | Progression helper. | Visible enum increment followed by a Set Current Decay State and Start Decomposing. |
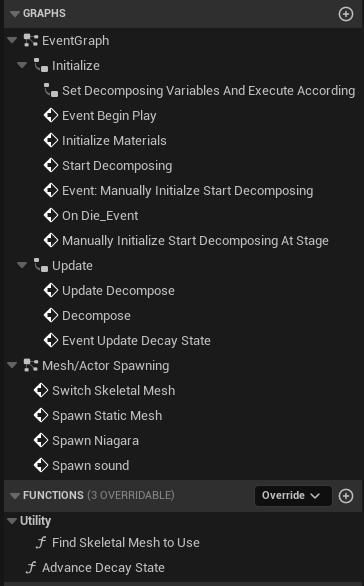
Graph/function list visible in the supplied component screenshot.

Find Skeletal Mesh to Use: when Use child skeletal mesh is enabled, the function searches child components and returns the first skeletal mesh component.

Advance Decay State visibly increments the enum and immediately restarts the decomposition pass for the new state.
Events, Start Modes, and State Flow
The provided implementation supports three practical start modes: automatic Begin Play start, manual event start, and death-triggered start.
- Begin Play mode is useful for preview actors in a demo level or pre-decayed world props.
- Manual initialize mode is useful when another system decides when the body should start rotting.
- On Die mode is the gameplay-friendly path for living characters that only become valid decomposition targets once they are dead.
The screenshots show this flow clearly:
- Begin Play runs a sequence.
- The component resolves which skeletal mesh should be used.
- If Start decomposing on beginplay is enabled, it initializes materials and starts decomposing.
- If Start Decomposing On Die is enabled and a valid Attribute Manager is found, it binds On Die_Event to the death event.
- When decomposition starts, the component resolves the current state from Decay State Mapping, sets target values, randomizes duration, and executes stage-specific actions.
- The update path drives Current Decay Amount and Current State Elapsed Time until the stage is complete.
- When the stage completes, Advance Decay State moves to the next enum entry and Start Decomposing is called again.
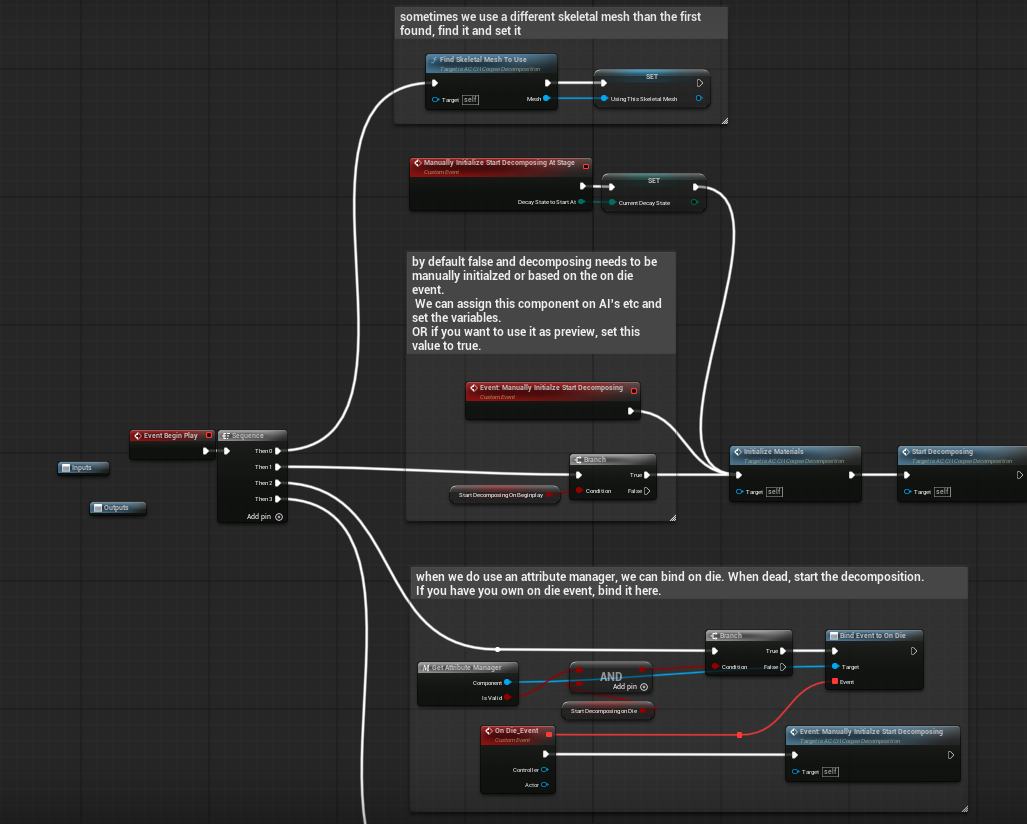
Initialization graph showing Begin Play setup, manual start path, and On Die binding path.
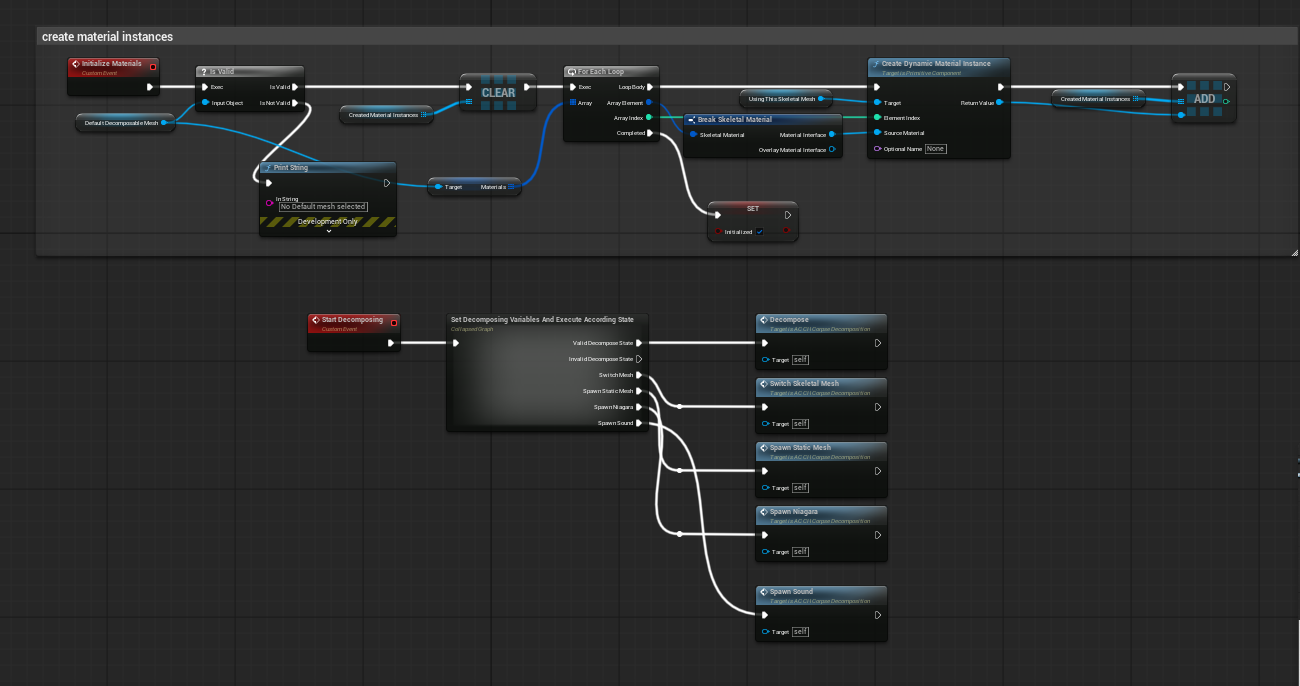
Start Decomposing calls into the state-resolution graph and then into Decompose / swap / spawn actions.
| Important integration behaviour Because the On Die path is event-driven, the corpse must remain in the world long enough after death for decomposition to become visible. If another system instantly destroys or despawns the actor, you will need a corpse actor, ragdoll actor, or delayed cleanup flow. |
Material Setup Explained
The visual side of the feature is built around a material-layer workflow. The screenshots show a reusable base material, a decomposition material function, a decomposition layer, a blend, and layer instances that expose artist-facing parameters.
| Asset | Role in the setup |
|---|---|
| M_Decomposed_Layer_Base | Base material that uses Material Attribute Layers. This is the root material that other layers and blends are plugged into. |
| MF_Decomposition | Core function that blends incoming material attributes with decomposition output using Decompose Amount, and can also apply vertex/world position offset. |
| ML_Decompose_Layer | Reusable decomposition layer containing the actual texture and parameter logic for the rotten surface look. |
| MLI_Decompose_Layer | Layer instance used to expose and tune the visual parameters for a specific decomposition look. |
| MLB_Decompose_Blend | Blend that mixes top and bottom material layers using the decomposition value and optional push-back behaviour. |
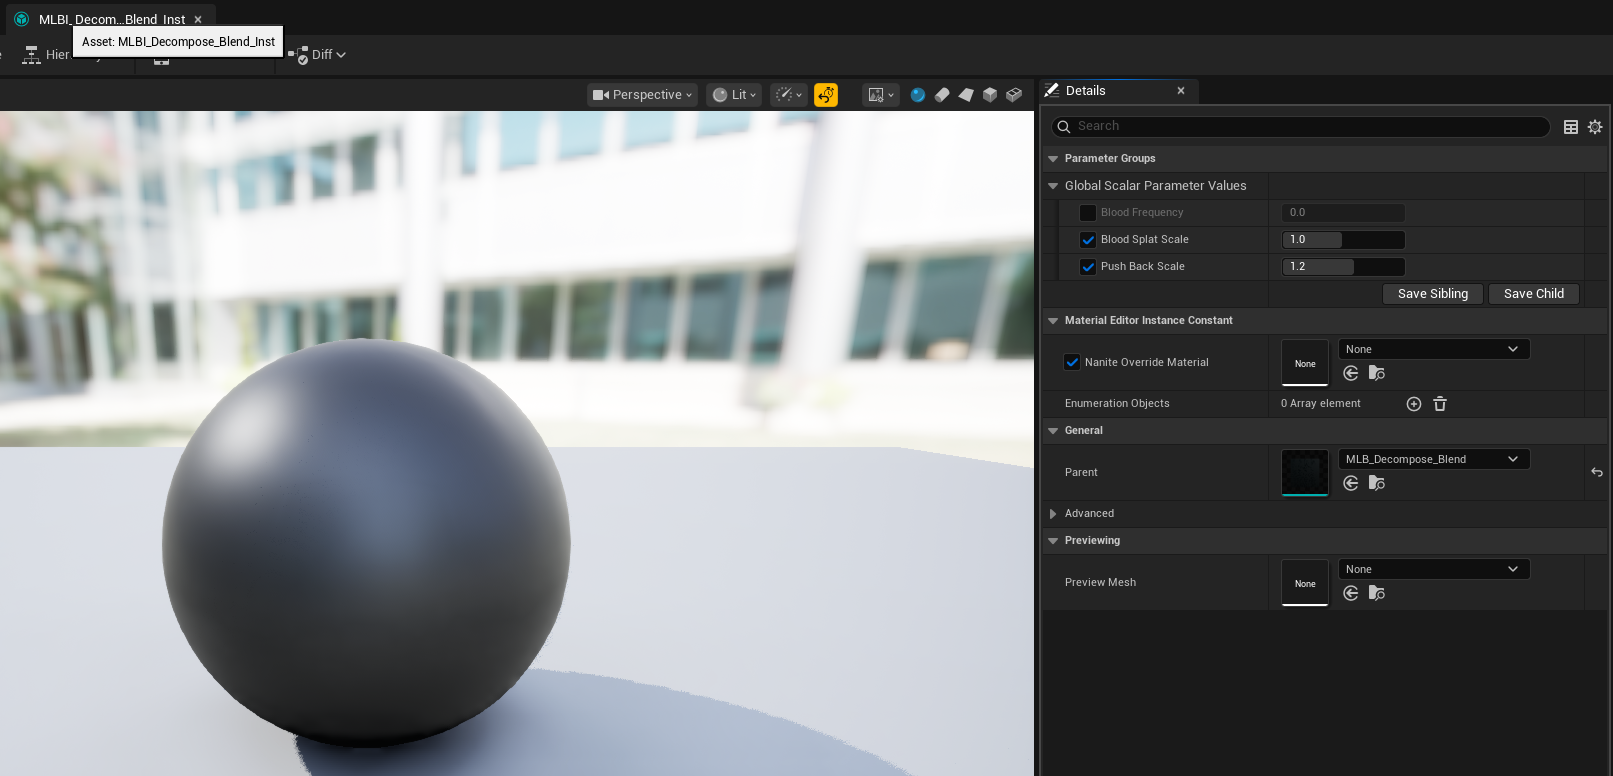
| MLBI_Decompose_Blend_Inst | Blend instance that exposes scalar tuning values such as Blood Frequency, Blood Splat Scale, and Push Back Scale. |
| Deer_Layered / ML_Red_Deer / MLI_Red_Deer_Doe / MLI_Decomposed_Layer_Deer_Doe_Skinny | Example deer material assets used in the demo content to prove the same framework can be applied to animals as well as humanoids. |
The screenshots also show clean folder separation for the layer base, layer instances, and layer blend assets, which is useful when handing the system off to technical artists.
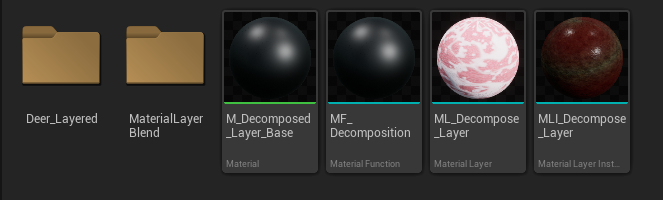
Material-side folder structure supplied for the decomposition setup.
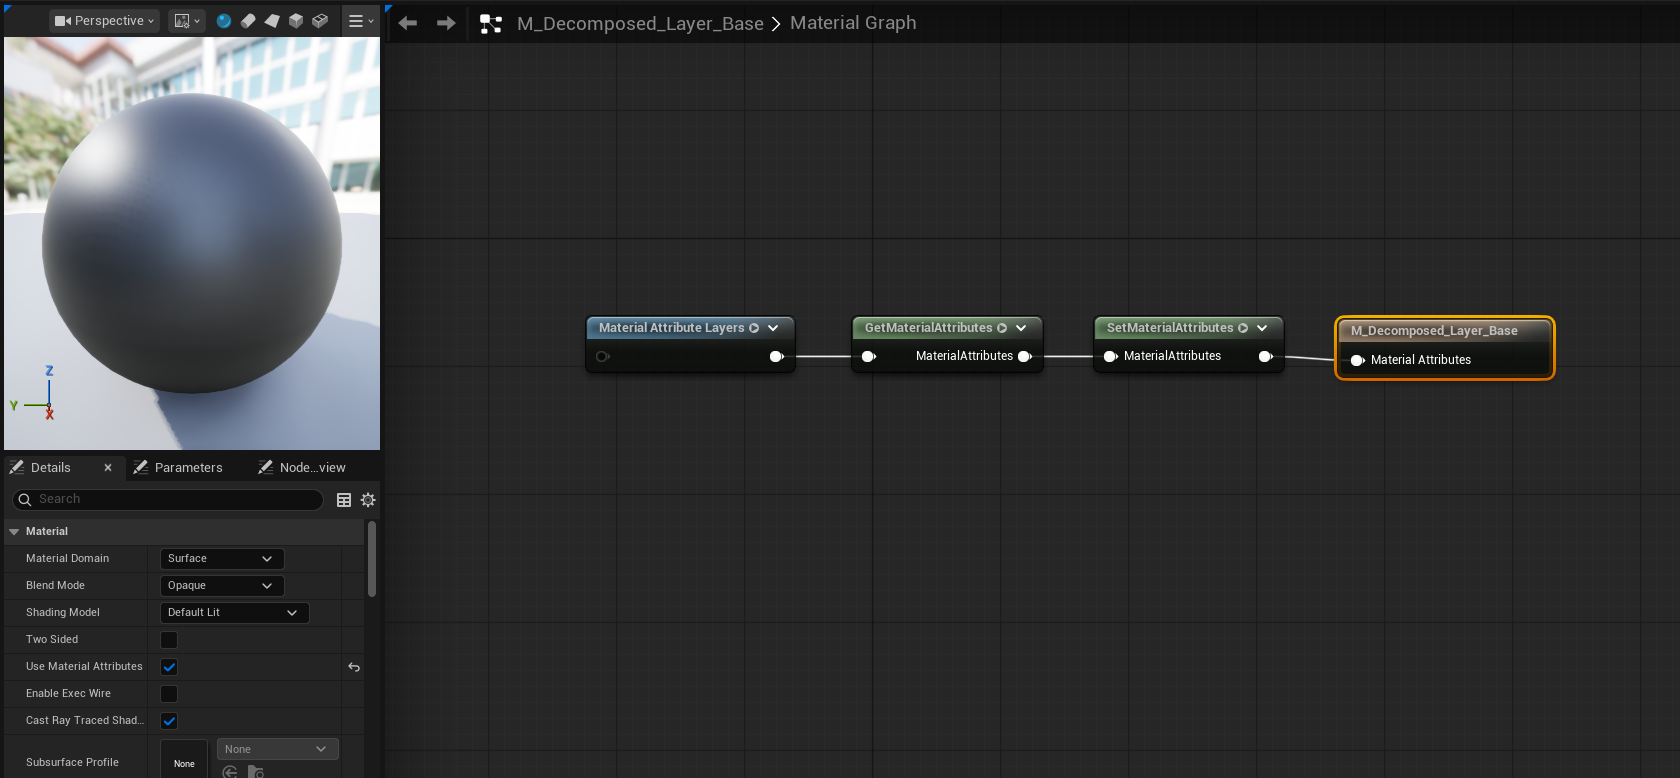
M_Decomposed_Layer_Base uses Material Attribute Layers as the root material.
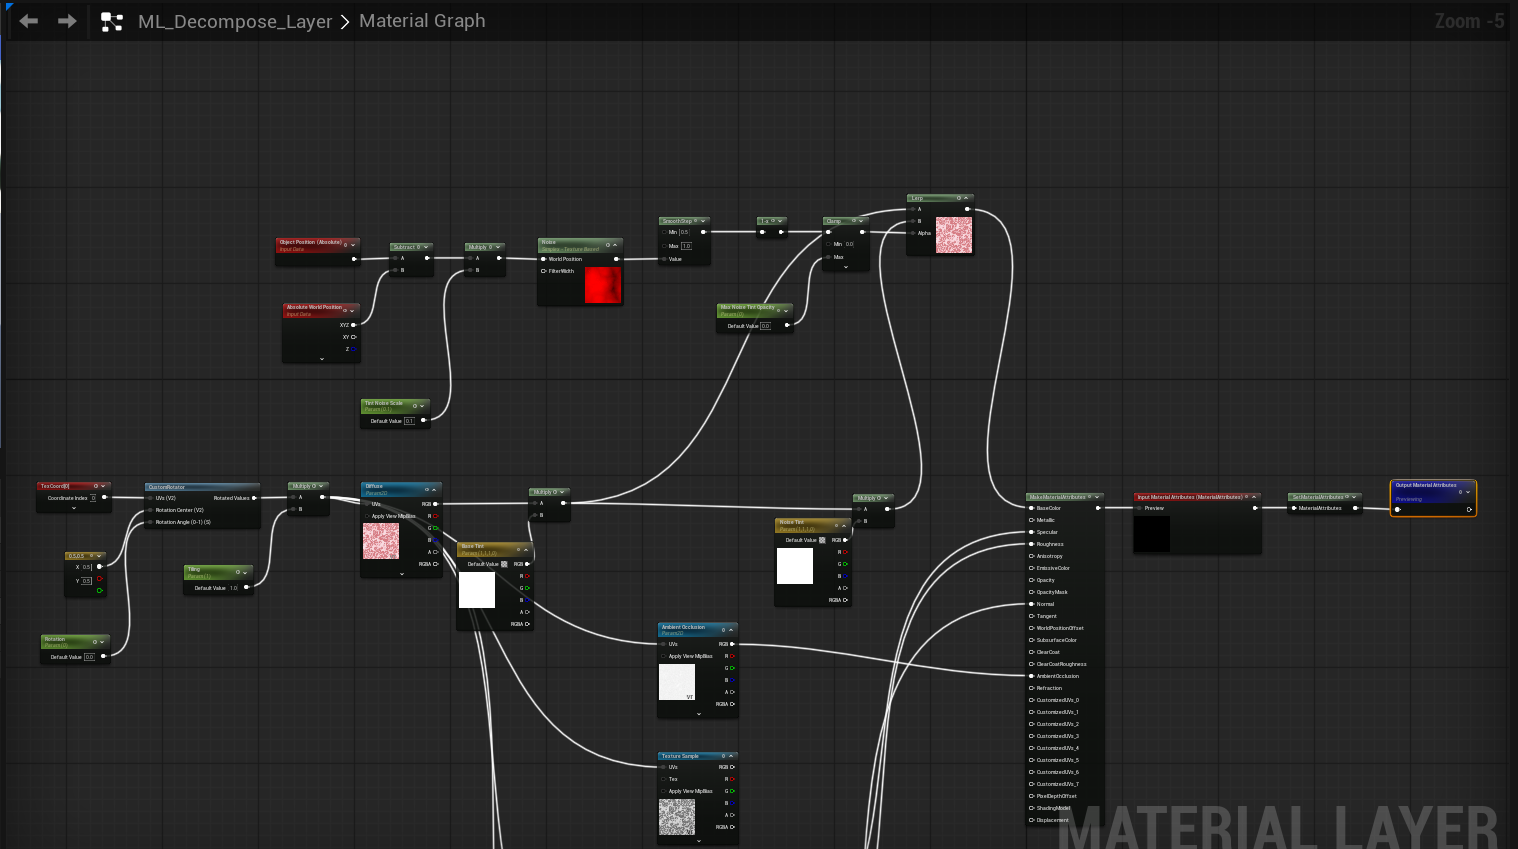
ML_Decompose_Layer: the decomposition layer handles texture sampling, tinting, noise breakup, and material attribute output.
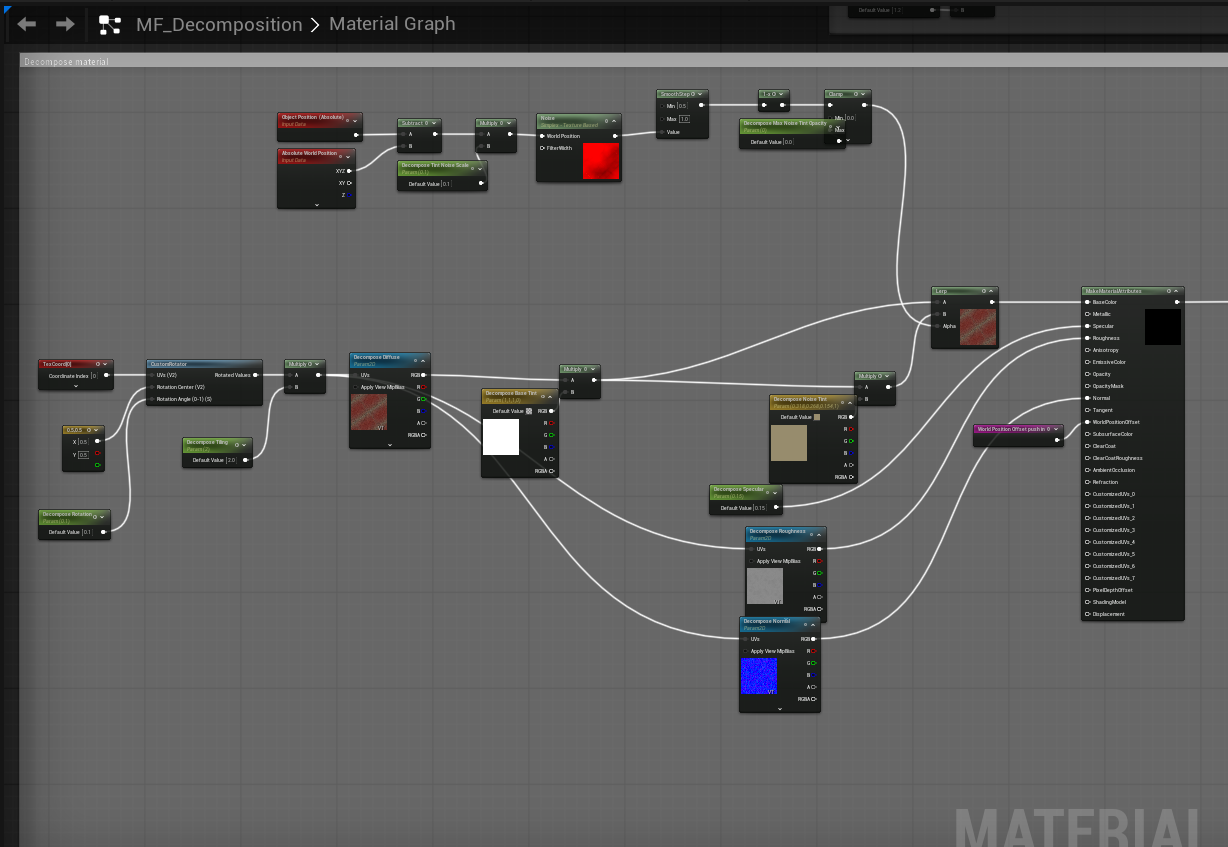
MF_Decomposition: the core function blends decomposition attributes using Decompose Amount and can push vertices/world position.

MLB_Decompose_Blend: top and bottom layers are blended using Decompose Value, with push-back driven by vertex normal/world offset.
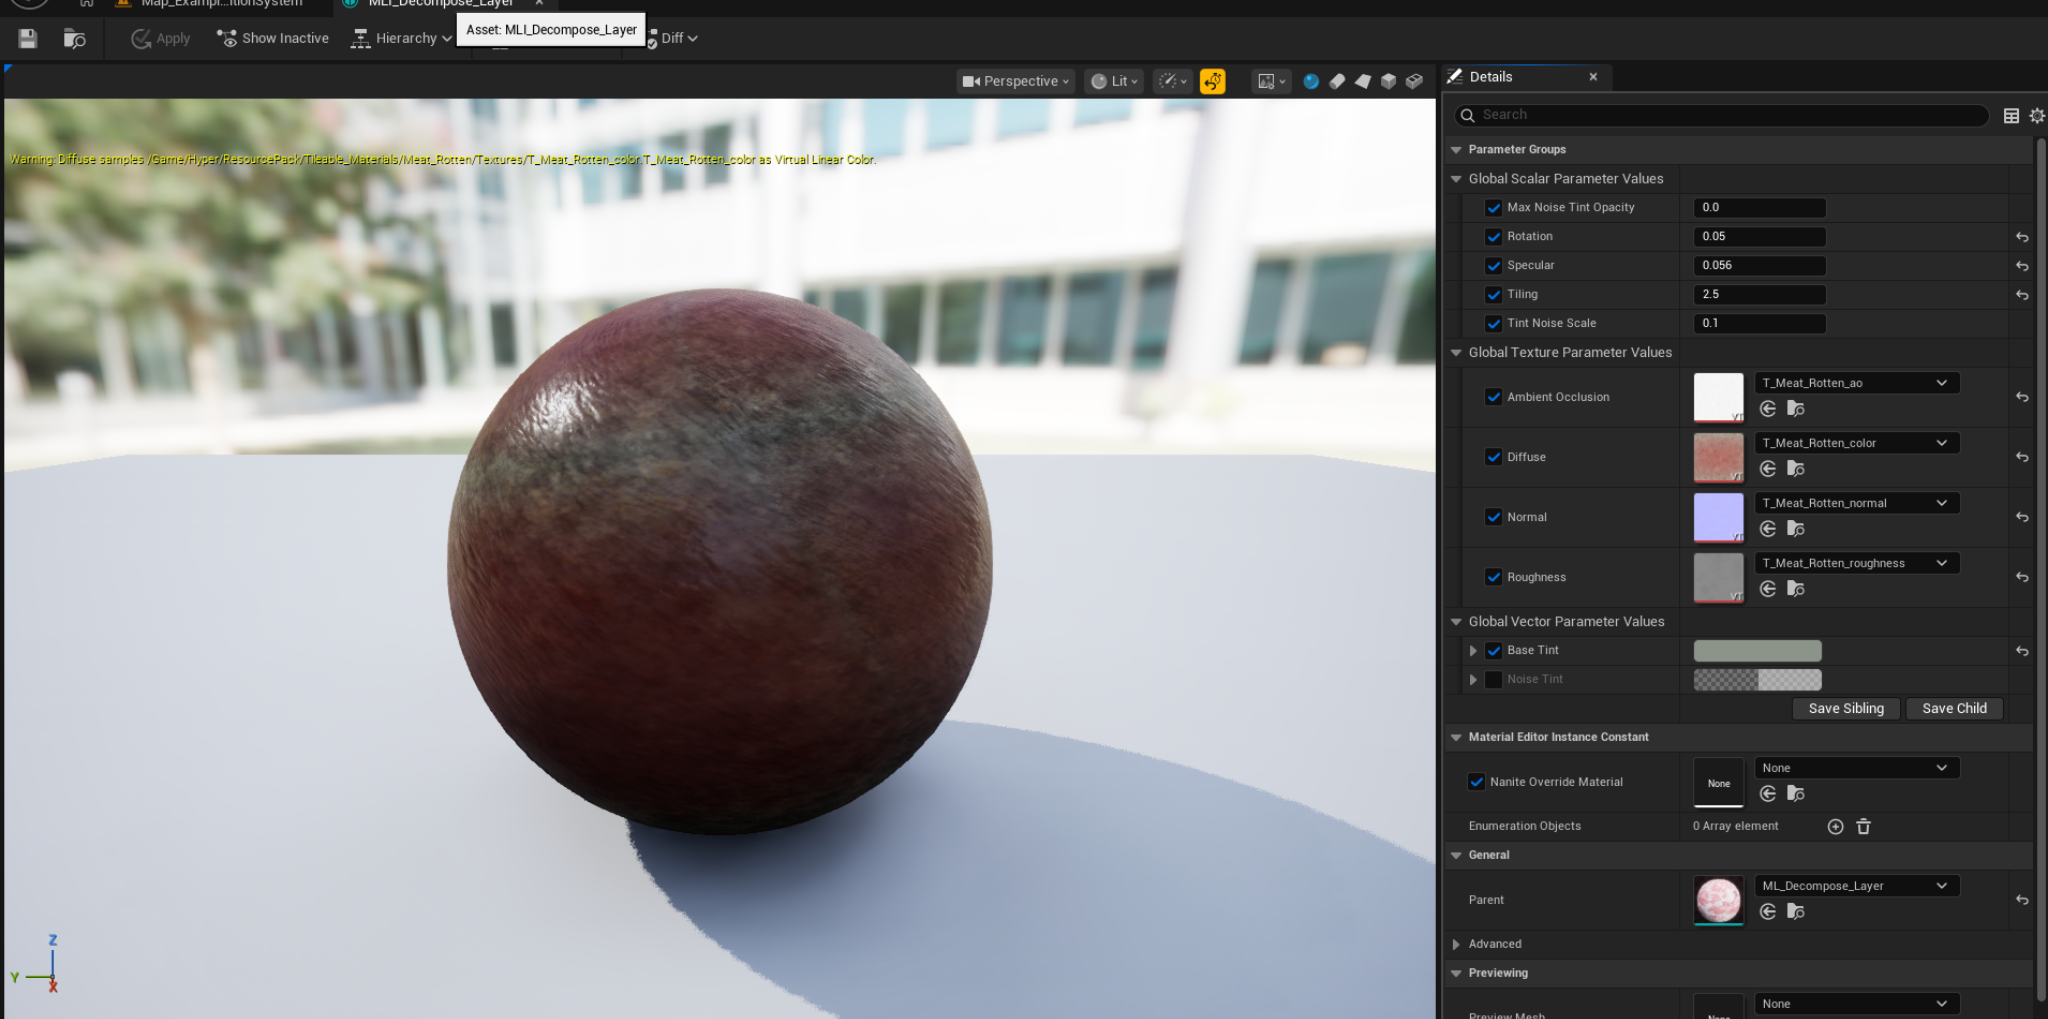
MLI_Decompose_Layer: artist-facing parameters include texture slots, base tint, noise tint, tiling, rotation, roughness, specular, and more.
Key exposed material controls
| Asset | Exposed controls visible in the screenshots | Why they matter |
|---|---|---|
| MLI_Decompose_Layer | Max Noise Tint Opacity, Rotation, Specular, Tiling, Tint Noise Scale, Ambient Occlusion, Diffuse, Normal, Roughness, Base Tint, Noise Tint | These are the main art-direction controls for the rotten look itself. |
| MLBI_Decompose_Blend_Inst | Blood Frequency, Blood Splat Scale, Push Back Scale | These shape the blend mask and how strongly the surface appears to sink or recede. |
| MF_Decomposition | Decompose Amount, has decompose switch path, mask/noise logic, world position offset | These connect gameplay progression to the actual visual change on the mesh. |
How to Start Decomposition
1) Start as soon as the actor exists
- Add the component to the actor.
- Populate Decay State Mapping with at least the opening state and its duration/decompose amount.
- Enable Start decomposing on beginplay.
- Make sure Initialize Materials can resolve a valid mesh and valid source materials.
- Press Play and confirm the runtime values begin updating in the demo or debug UI.
2) Start only when the actor dies
- Keep the component on the living actor or on the corpse actor that will persist after death.
- Enable Start Decomposing On Die.
- Make sure the actor exposes a valid Attribute Manager or a custom death event path that can call the component’s On Die_Event / manual initialize entry.
- Verify the corpse is not destroyed immediately after death.
- Test once with a long state duration so you can clearly confirm the start trigger worked before tightening timings.
3) Spawn an already-decayed corpse
- Call Manually Initialize Start Decomposing At Stage.
- Set the desired starting E_Decay_State first, such as Rotting or Skeleton.
- Let Start Decomposing run normally from that stage onward.
- Use this path for world dressing, crime scenes, ambient corpses, or map previews.
How to Change Decomposition Speed
The primary speed control shown in the screenshots is Decay State Duration inside F_Decay_State_Details. This is a float range, so each state can have both an average duration and some randomness.
- Open the component or preset that contains Decay State Mapping.
- Choose the state you want to tune, for example Bloat or Rotting.
- Reduce the Float Range values in Decay State Duration to make that state complete faster.
- Increase the Float Range values to make that state last longer.
- Test with a single actor and watch Current State Elapsed Time plus Current Decay State to verify the timing feels right.
| Practical tuning advice If the system feels like it changes too suddenly, do not only lengthen time. Also review the state’s Decompose Amount. A large jump can make a transition look abrupt even when the timer itself is long. |
How to Change Meshes, Materials, Fx, and Sound
Change which mesh is used
- If your actor uses a child skeletal mesh rather than the default one, enable Use child skeletal mesh.
- Verify Find Skeletal Mesh to Use returns the intended mesh component.
- If a later stage should become a different body mesh, configure the state’s Should Swap Mesh payload.
Spawn a static mesh at a later stage
- Open the desired state inside Decay State Mapping.
- Configure the Should Spawn Static Mesh payload.
- Use this for carcass props, final remains, or a handoff from an animated corpse to a lightweight static result.
Change stage FX
- Assign Niagara To Spawn in the state details for flies, gas, insects, or atmosphere.
- Assign Sound to Spawn if the state should trigger a loop or one-shot sound cue.
- Test both in gameplay because audio and FX often need different scale and timing than the mesh transition itself.
Change the decomposition material look
- Edit MLI_Decompose_Layer to retune the rot textures, tint, roughness, tiling, and noise behaviour.
- Edit MLBI_Decompose_Blend_Inst to adjust blood frequency, mask breakup, and Push Back Scale.
- If a state should force a material replacement, update the state’s Should Swap Material mapping so the correct material slot receives the new material instance.
- Re-test on both humanoid and animal meshes, because the same material settings can read differently on different UV layouts and proportions.
How to Add a New Decay State or Variant
There are two ways to expand behaviour: add a new variant using the existing enum states, or add a truly new state to the enum. The first option is safer; the second changes progression order and therefore needs more care.
Safer path: new variant using the same states
- Reuse Fresh Kill / Bloat / Rotting / Decomposing / Skeleton as the progression ladder.
- Author different Decay State Mapping payloads for a human, deer, infected creature, or special corpse type.
- Swap meshes, materials, Niagara, and sound differently per actor or per preset without changing code flow.
Advanced path: add a new enum state
- Add the new entry to E_Decay_State in the exact order you want progression to follow.
- Create a matching entry in Decay State Mapping.
- Author Decay State Duration, Decompose Amount, and any swap/spawn payloads for the new state.
- Test Advance Decay State carefully, because the supplied function visibly increments the enum and assumes the next entry is the next stage in the lifecycle.
- Update any UI, debug text, or designer notes that list the stage names.
| Recommendation For most production use, keep the enum stable and create creature-specific variants through mapping values and material instances. Only add new enum entries when the lifecycle itself genuinely needs a new progression step. |
Hooking Corpse Decomposition Into Other Systems
The screenshots already show one intended integration path: binding the component to an Attribute Manager so decomposition begins when the owner dies.
- Attribute / Health systems: bind the death event to On Die_Event or call the manual initialize event.
- AI / NPC systems: keep the corpse actor alive after death long enough for the feature to run, or spawn a corpse actor that inherits the correct mesh/material setup.
- Loot systems: delay destruction until looting is complete, then let decomposition continue or hand off to a later static-mesh stage.
- World dressing systems: use Manually Initialize Start Decomposing At Stage to place already-rotting ambient corpses.
- Performance management: use late-stage mesh swap or static mesh spawn to reduce runtime cost for corpses that no longer need the full living setup.
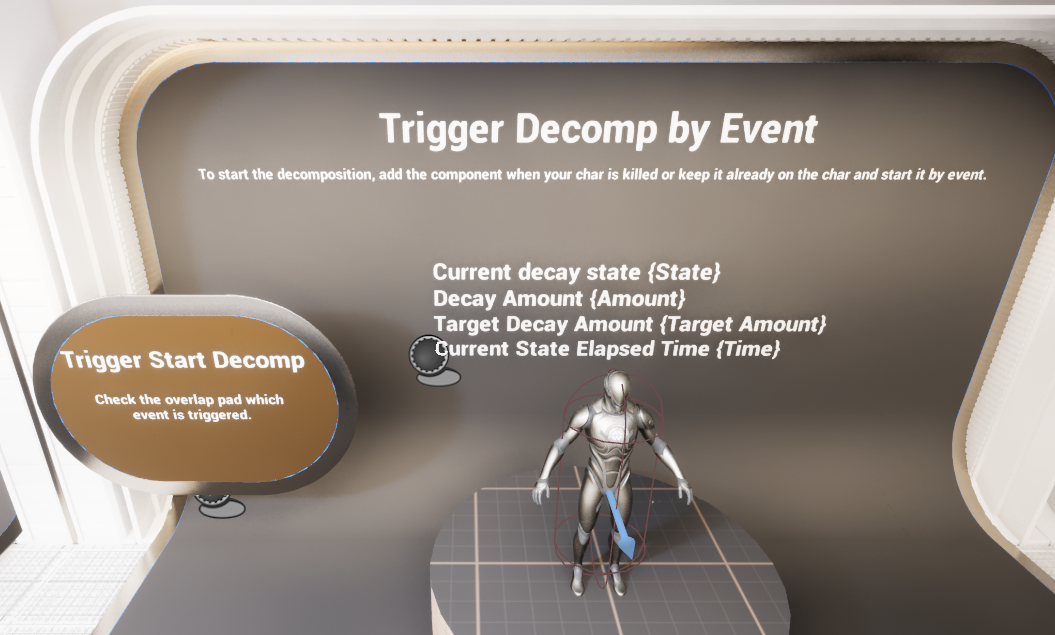
The demo explicitly shows that decomposition can be started by event rather than only by Begin Play preview.
Blend instance parameters are lightweight artist controls that can be tuned without changing gameplay Blueprint logic.
Example Flows
Preview deer in a test level
- Assign the decomposition component to the deer actor.
- Enable Start decomposing on beginplay.
- Author state mapping values for the deer materials and any late-stage mesh/static mesh handoff.
- Let the demo level expose live values so designers can tune timing and visuals quickly.
Humanoid starts rotting on death
- Keep the component on the humanoid character.
- Enable Start Decomposing On Die and bind the death event.
- On death, initialize materials if not already initialized, then start the current state.
- As the state completes, the system advances through the enum and can swap toward a skeleton mesh later.
Final stage handoff to remains
- Use a late stage such as Skeleton.
- Set a new skeletal mesh or spawn a static mesh depending on what is cheaper and looks better for your project.
- Optionally trigger Niagara or sound as the handoff happens.
- Leave the actor in its final low-cost representation for world persistence.
Summary
The Corpse Decomposition System shown in the supplied Hyper screenshots is a clean actor-owned Blueprint solution for staged corpse decay. Its core strengths are the Decay State Mapping authoring model, multiple start modes, reusable material-layer pipeline, and support for stage-based mesh/material/FX changes.
For technical users, the key integration work is attaching the component, resolving the correct mesh, providing the state mapping, and binding a death event if needed. For content users, the main tuning work happens in the state duration values, decompose amount targets, mesh/material swap payloads, and the decomposition material layer instances.
Taken together, this makes the feature suitable both as a gameplay system and as a presentation system: it can drive real corpse progression in a game, while also being easy to preview, debug, and retune inside a demo environment.