SKINNING SYSTEM
User Guide
A practical setup and customization guide for Hyper's component-based skinning workflow. This document focuses on how to place the system into a project, configure it correctly, and extend it without rewriting the core Blueprints.
Guide focus: This is intentionally written as a user guide rather than a low-level technical breakdown. The core execution path is explained where it helps with setup or troubleshooting, but the main goal is to help a buyer understand how to use, tune, and extend the system in a real project.
What the system gives you #
- A clear split between the actor that can be skinned and the actor that performs the skinning action.
- Data-driven loot setup through the skinnable actor's reward row handle.
- Support for multiple valid skinning tools through gameplay tags.
- Different knives or tools can change skinning speed and reward output through item attributes.
- Motion-warped positioning so the player stands in the correct place during the action.
- Optional animation, Niagara, sound, and decal feedback during the skinning loop.
- A temporary spawned knife actor for in-hand presentation during the action.
Introduction #
The Skinning System is built around two main components. AC_Skinnable lives on the world actor that should be skinnable, while AC_Skinning lives on the actor that is allowed to perform the skinning action, typically the player character. This split is one of the system's biggest strengths because it keeps target-side logic and player-side logic separate. As a result, the same player setup can be reused across many different skinnable targets, and each skinnable target can expose different requirements, rewards, timings, and interaction sockets without needing a custom implementation.
In the current implementation, the system is also item-driven. Skinning is not treated as a skill check in the demo setup. Instead, the quality of the result comes from the tool being used. A better knife can make the action faster and can improve the quantity of resources awarded. That gives designers a very easy progression path: basic knives can work, but advanced knives feel better and pay out more.
Motion Warping Setup Requirement #
This skinning system uses Unreal Engine’s Motion Warping system to align the player correctly with the skinnable target before the skinning animation begins. This is what allows the character to move into the correct position and face the correct direction automatically, rather than relying on the player to stand in the exact right place manually.
Before using this system in your own project, make sure the Motion Warping plugin is enabled in Unreal Engine.
How to enable Motion Warping #
- Open Edit > Plugins in Unreal Engine.
- Search for Motion Warping.
- Enable the plugin.
- Restart the editor if prompted.
Add a Motion Warping Component to the player #
The actor performing the skinning action must also contain a Motion Warping Component. In the provided setup, this should be added to the player character or whichever actor owns the AC_Skinning component.
To do this:
- Open your player character Blueprint.
- Click Add Component.
- Search for Motion Warping.
- Add the component to the character.
- Compile and save the Blueprint.
Why this is required #
During skinning, AC_Skinnable calculates a target location and target rotation based on the configured skin socket and skinning distance. AC_Skinning then sends that data into the Motion Warping component so the player can be warped into the correct position for the animation.
If the plugin is not enabled, or if the player character does not have a Motion Warping component, the skinning system will not be able to apply its alignment target correctly. This can result in the player failing to align with the corpse, incorrect animation positioning, or the action not behaving as intended.
Important note #
If you are creating your own custom player character instead of using the demo setup, always confirm that:
- the character has a Motion Warping Component
- the skinning montages are authored to support motion warping
- the AC_Skinning component is placed on the same actor that owns the Motion Warping component
Core assets and responsibilities #
AC_Skinnable #
AC_Skinnable should be placed on the actor you want the player to harvest. Its job is to answer a simple question: can this target be skinned right now? To do that, it checks the current state of the target, validates that the interacting player has a valid item, calculates where the player should stand, packages the skinning details, and then hands the action over to the skinning component on the player.
- Stores the target's required item tags, reward row, duration, interaction distance, and target socket.
- Checks that the interacting player is close enough.
- Checks that the target is dead before allowing skinning in the current implementation.
- Checks that the target has not already been skinned.
- Finds a socket-driven target point so the player aligns to the body correctly instead of just using the actor origin.
AC_Skinning #
AC_Skinning should be placed on the actor that will perform the action. Its job is to execute the skinning once the target has already approved it. It chooses the best valid knife from the player's inventory, initializes the skinning state, sets the motion warp target, plays the start and loop montages, spawns the temporary knife actor, applies FX during the loop, allocates rewards, and then cleans up when the action finishes.
- Chooses the best available tool by comparing the relevant skinning attribute on valid items.
- Applies item quality to timing and reward output.
- Spawns and destroys the temporary knife actor used for the animation presentation.
- Can drive Niagara, sound, and blood decal feedback from montage notifies.
- Uses a replicated flow for the actual action events, which makes the implementation network-aware rather than purely local.
Adding skinning to a player or character #
The player side of the system is simple to place but important to configure correctly. AC_Skinning is the component that actually carries out the action, so this should be added to the character that performs the skinning. If your project supports multiple controllable characters, each relevant character should have its own skinning component rather than trying to centralize the action somewhere else.
Minimum character-side setup #
- Add AC_Skinning to the character Blueprint.
- Assign the Skinning Start Montage, Skinning Loop Montage, and Skinning End Montage.
- Set the Skinning Multiplier Tag used to read the correct item attribute from inventory items.
- If you want feedback during the action, set Loop Montage Notify Name, Bone To Play Niagara From, Niagara To Play On Notify, Sound To Play On Notify, and Decal To Spawn On Notify.
- Make sure the character has the systems the component expects to talk to, especially inventory, equipment, character mesh access, movement control, and motion warping.
Why the player component matters: All of the actual feel of the action lives here. If a buyer wants the action to feel heavy, quick, clean, brutal, minimal, or more cinematic, most of that tuning happens in the player-side component through montage choice, notify placement, FX configuration, and the item attribute that scales the final result.
Configuring a skinnable actor #
This is the section most buyers will use first. To make an actor skinnable, add AC_Skinnable to the target actor and fill in the exposed settings. The example setup provided shows the intended workflow clearly: the component sits on the target actor, and the designer edits a small set of values in the Details panel rather than writing one-off Blueprint logic for each creature.
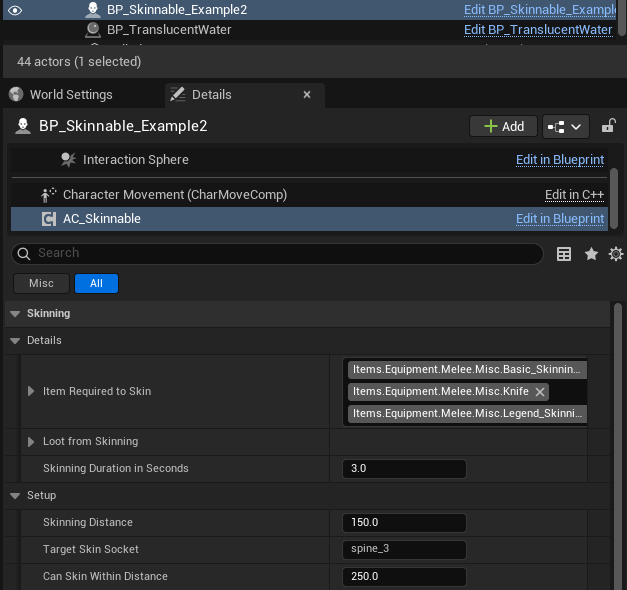
Example skinnable actor configuration in the Details panel.
Main target settings #
The most important fields on AC_Skinnable are the fields under the Skinning category. These control who can skin the actor, what they get from it, how long the action takes, and where the character should stand.
Item Required to Skin #
This is the first field to think about because it controls tool validity. The example setup shows multiple valid gameplay tags, which means the target can accept more than one kind of knife or skinning item. That is the preferred approach in most projects. Instead of hard-locking a creature to a single item definition, you allow a category of valid tools and then let the best matching item determine how efficient the action is.
Loot from Skinning #
This field points to the reward definition that should be used when the target is successfully skinned. The component packages this row handle into the skinning details struct and passes it to the player-side execution flow. On completion, AC_Skinning uses that row handle when it asks the item allocator system for the loot that should be awarded.
Skinning Duration in Seconds #
This is the base time for the action before the active tool modifies it. A low value makes skinning feel quick and game-like. A higher value makes the process feel more deliberate and more physical. Because the tool attribute can scale this value, you can think of it as the baseline difficulty or baseline harvesting time for this target.
Skinning Distance #
This controls how far out from the target socket the player should be positioned. The skinnable component calculates a point between the player and the socket direction, then projects the usable standing position outward by this distance. If the player stands too close, animations may clip. If the value is too far away, the player may look disconnected from the body. This is one of the best values to tune per creature.
Target Skin Socket #
This is the socket name used to anchor the action. Using a socket is much better than aligning to the actor origin, especially for ragdolls, unusual body shapes, or creatures whose root transform is not a good place to harvest from. In the provided example, the socket is spine_3, which is a sensible mid-body point for a large creature.
Can Skin Within Distance #
This value is part of the validation check that determines whether the player is close enough to begin. It is different from Skinning Distance, which defines where the player should stand during the action. A common mistake is to treat both values as the same thing. In practice, one is a permission check and one is an animation placement value.
Current implementation behaviour: The Can Skin function checks four major conditions before the action is allowed: the player has a valid required item, the target's current health is less than or equal to zero, the player is within the allowed range, and the target has not already been skinned.
F_Skinning_Details and what it carries #
The skinnable actor does not directly play the action. Instead, it prepares a compact bundle of information and hands that to the player-side component. That bundle is F_Skinning_Details, and it is the bridge between target setup and player execution.
From the screenshots provided, the struct contains a target skinning location, a target skinning rotation, a skinning reward row handle, a skinning duration value, and a required item tag. This is a very good size for the struct because it keeps the action self-contained. Once the player component receives it, the rest of the action can be executed without repeatedly querying the target for more information.
- Target Skinning Location: where the player should stand.
- Target Skinning Rotation: where the player should face.
- Skinning Reward: the loot row handle used when rewards are allocated.
- Skinning Duration: the base action time before item modifiers are applied.
- Required Item Tag: the tag category the system uses when searching for a valid and preferably optimal tool.
What happens in game #
For a user guide, you do not need every node in the execution chain memorized, but understanding the overall behaviour helps when configuring the system or diagnosing why something is not working.
- The player interacts with a valid skinnable actor.
- AC_Skinnable checks whether the action should be allowed.
- If valid, AC_Skinnable calculates the target standing position and facing rotation from the configured socket and distance.
- A skinning details struct is built and sent to AC_Skinning on the player.
- AC_Skinning finds the best valid tool in the player's inventory by looking for the matching tag and comparing the configured skinning attribute.
- The player is motion warped into place, movement is restricted for the duration of the action, and the temporary knife actor is spawned into the hand socket.
- The start and loop montages play, loop notifies can trigger FX, and a timer runs using the duration modified by the selected tool.
- When the action finishes, rewards are allocated into the player's inventory and the temporary knife actor is destroyed.
That is the behaviour that matters most to a buyer: skinning is target-configured, tool-sensitive, animation-supported, and reward-driven.
Knives, tool quality, and choosing the best item #
One of the best parts of this system is that it does not just ask whether the player has any valid knife. It searches the player's inventory for matching items and then chooses the best one by reading a skinning attribute value from the item. That means you can support multiple knives that all work, while still rewarding the player for carrying a better tool.
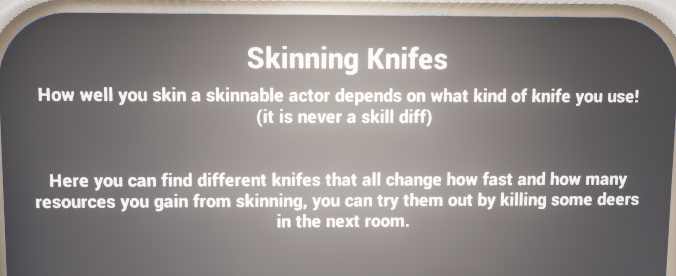
The demo setup communicates the intended design clearly: better knives change efficiency rather than requiring a separate skill check.
How the best knife is chosen #
The Get Best Skinning Weapon function loops through inventory items, checks whether each item has the required tag from the current skinning details, and then compares the item's skinning attribute value against the current best item. If there is no current best item yet, the first valid item becomes the best item. If there is already a best item, the function keeps whichever one has the higher attribute value.
This is a clean design because it does not force the player to manually equip the perfect knife before every action. If the inventory contains a better valid tool, the system can use it automatically.
How the skinning attribute is read #
The Get Skinning Attribute From Item function asks the item for the attribute matching the Skinning Multiplier Tag. If that attribute exists, its generic value is returned. If it does not exist, the system falls back to a default value of 1.0. That fallback matters because it means ordinary tools still work even if they have not been given a custom multiplier yet.
Design implication: A value of 1.0 is effectively the neutral baseline. Values above 1.0 can be used to improve performance, while lower values can be used to create deliberately poor or improvised skinning tools.
Rewards and loot configuration #
The reward side is driven from the skinnable target rather than from the knife. That is the correct way around. The creature decides what it can give, and the tool decides how efficiently that reward is harvested.
When skinning finishes, the player-side component takes the reward row handle from the current skinning details and asks the item allocation system for a generated loot list. It then loops through the resulting items and applies the current tool's skinning attribute to the quantity before adding the final values to the inventory.
- Target decides reward source through the Loot from Skinning row.
- Allocator/generator decides what items are produced from that row.
- Selected tool modifies the resulting quantity through its skinning attribute.
What this means for balancing #
If you want two creatures to feel different, change the reward row and duration on the skinnable target. If you want two knives to feel different, change the item attribute value read through the skinning multiplier tag. Keeping those responsibilities separate makes balancing much easier later.
Animations, motion warping, and feedback #
A skinning action lives or dies by presentation. The current implementation gives you several useful layers of feedback without forcing them all to be used.
Motion warping #
Set Motion Warping Target reads the target location and rotation from the skinning details and pushes those values into the character's motion warping component under the warp target name used by the montage. This is what lets the player snap cleanly into the correct pose relative to the body rather than hoping the animation lines up from wherever the player happened to be standing.
If your montage supports motion warping correctly, this makes the interaction feel substantially more polished.
Montages #
The system exposes separate start, loop, and end montages. This makes the action easier to tune because you can change the anticipation, the repeated working motion, and the exit separately. For example, a short field-dressing action might use a very small start, a quick loop, and almost no end montage, while a heavier harvesting animation could exaggerate all three.
Loop notify driven FX #
During the loop montage, notifies can be used to trigger Niagara, sound, and decals. The exposed settings make this configurable without rewriting the component. The bone used for Niagara and sound placement is also configurable, which means you can play the feedback from the knife hand, the torso, or another relevant body point depending on the look you want.
Temporary knife actor #
The system also spawns a temporary skinning knife actor and attaches it to the weapon socket during the action. The example BP_Temp_Skinning_Actor determines what visual representation to use and can swap between static and skeletal mesh paths. This is useful because the action can show an appropriate knife even when the player's normal weapon flow is not what you want for harvesting.
How to add your own skinnable creature #
This is the most common buyer question, and the workflow is straightforward once the logic split is understood.
- Create or open the creature or corpse actor you want to make skinnable.
- Add AC_Skinnable to the actor.
- Choose a mesh socket that represents a good harvesting position. Mid-body sockets usually work best.
- Set Item Required to Skin to one or more gameplay tags that represent valid knives or harvesting tools.
- Set Loot from Skinning to the reward row you want this creature to produce.
- Set Skinning Duration in Seconds to the base time you want for this creature.
- Tune Skinning Distance until the player stands in a believable place without clipping.
- Tune Can Skin Within Distance so the player can begin the action without needing to stand in an unnaturally perfect spot.
- Test the action with both basic and advanced knives so you can see whether the target feels correctly balanced.
Most of the time, that is all you need. The component already handles validation, socket-based placement, and communication with the player-side execution component.
How to allow several knife types #
The example setup already points in this direction. Instead of requiring one exact item, populate Item Required to Skin with the tags for every tool category you want to allow. Then make sure each valid item carries the appropriate item attribute that the player-side component reads through the Skinning Multiplier Tag.
This gives you a very flexible content pipeline. A crude knife, hunting knife, ceremonial blade, advanced survival knife, or specialized skinning tool can all work against the same creature if they share the correct category tags, while still feeling different because of their attribute values.
How to make one knife better than another #
Edit the item's attribute that matches the Skinning Multiplier Tag. Because the component falls back to 1.0 when the attribute is absent, you can treat 1.0 as your basic standard knife and push special tools upward from there.
- Use values around the baseline for ordinary knives.
- Use higher values for premium or specialist tools.
- Avoid making the multiplier so high that the action becomes visually absurd unless that is part of the design.
Remember that the current implementation applies the same general multiplier concept when calculating action timing and reward quantity, so very high values will affect feel and economy together.
How to change where the player stands during skinning #
There are two levers to use here: the target socket and the skinning distance.
- If the player is aligned to the wrong part of the body, change Target Skin Socket.
- If the player is aligned to the correct part of the body but stands too close or too far away, change Skinning Distance.
- If the player cannot start the action when standing in a place that should feel valid, increase Can Skin Within Distance.
These three values are often enough to solve almost every positioning issue without touching the core Blueprint.
How to change what the player receives #
Do not edit the player-side component for this. Instead, change the reward row assigned to Loot from Skinning on the target. That is where the target's harvestable output should be defined.
This keeps your project scalable. Multiple creatures can share a reward row when that makes sense, and rare or unique creatures can have their own dedicated rows.
How to make a creature slower or faster to harvest #
Start by changing Skinning Duration in Seconds on the skinnable target. That controls the base experience for that creature. If the action is still not where you want it, then look at the attribute values on the valid knives because those are layered on top of the base time.
A useful rule of thumb is to tune the creature first and the knives second. That way the creature defines the job, and the knife defines how good the player is at that job.
How to add or change FX #
Use the AC_Skinning settings rather than editing the core action sequence. Assign the loop montage notify name, then configure the Niagara system, sound, decal material, source bone, and random decal offset values as needed.
If you want a clean presentation, you can leave some or all of these empty and just use the montage. If you want a more visceral presentation, notifies give you a controlled place to add repeated feedback during the working loop.
How to make a target reusable #
By default, the current implementation marks the target as skinned and uses that state to prevent a second harvest. That is the correct default for carcasses and similar one-time harvestables.
If your game needs reusable or resettable targets, you will need to add your own reset logic. That usually means clearing IsSkinned and restoring any interaction availability you want after your own respawn or reset condition is met. This is not shown in the provided implementation, so it should be treated as a project-specific extension rather than a built-in feature.
Troubleshooting and common issues #
The player cannot start skinning #
- Check that the target is actually dead according to the value AC_Skinnable reads.
- Check that the player is within Can Skin Within Distance.
- Check that the target has not already been marked as skinned.
- Check that the player's inventory contains an item whose tags match one of the required tags.
The player stands in the wrong place #
- Verify that Target Skin Socket exists on the mesh you are using.
- Adjust Skinning Distance rather than moving the whole actor if the body part is correct but the spacing is wrong.
- Confirm that the montage's motion warp target name matches the one used by the component setup.
Rewards feel wrong #
- Check the reward row assigned to Loot from Skinning.
- Check the selected knife's skinning attribute value.
- Remember that a missing attribute falls back to 1.0, so some tools may look identical if you have not differentiated them yet.
FX do not appear #
- Check that the loop notify name in the montage matches the one expected by the component.
- Check that Niagara, sound, or decal assets are assigned.
- Check that the configured source bone exists on the character mesh.
The knife visual is wrong #
Look at BP_Temp_Skinning_Actor and the item data it reads. The temporary actor chooses which mesh setup to use based on the item information available at begin play. If the wrong visual appears, the problem is usually in the item representation rather than in AC_Skinning itself.
Practical design advice for buyers #
The easiest way to get value from this system is not to overcomplicate the first pass. Start with one working creature, two knife tiers, one clear reward row, and a clean animation set. Once that loop feels good, expand the content library. The system is built to support content growth without needing new Blueprints for every variation.
- Use tags to define categories of valid tools rather than exact single-item restrictions where possible.
- Let the target define what it gives and let the knife define how well the player harvests it.
- Tune socket and distance values per creature rather than trying to force one global placement that fits everything.
- Treat montage and notify setup as part of the content pipeline, not just a polish pass. It changes how premium the system feels.
Summary #
The Skinning System is a strong modular harvesting workflow built around a very sensible separation of responsibilities. AC_Skinnable decides whether the target can be harvested and provides the data needed to do so. AC_Skinning executes the action, selects the best valid tool, aligns the player through motion warping, handles presentation, and allocates the final rewards.
From a buyer's point of view, the most important advantage is that most customization happens through exposed settings, item attributes, reward rows, sockets, and montages rather than through rewriting the core logic. That makes the system easy to fit into different projects, whether the goal is simple survival harvesting, higher-end hunting gameplay, or a more stylized looting flow.
In short: configure the target, configure the player, define your knives, define your rewards, and then tune the values until the action feels right.