Inventory System
Updated May 25, 2026
The Inventory System manages item data, containers, inventory actions, UI updates, nested storage, world pickups, decay, save/load behavior, and common extension workflows.
For shared setup guidance, see the Migration Guide and Integration Guide. Use the System Atlas to look up functions, variables, events, components, and ownership references. Use this page for inventory-specific behavior and implementation notes.
Related setup: Set Up Inventory for the Player, Change Inventory Type on Interact Locations, Customize Your Datatables, Make your own Equipment.
Related Videos
Version note: Some videos may have been recorded before V4. The same principles still apply, but asset names, component names, and folder locations may differ. Use this written documentation and the current V4 names as the source of truth.
System walkthrough: Hyper Inventory System: Walkthrough. PlayRelated tutorial: Add Jigsaw or List-Based Inventories to your Unreal Project. PlayRelated principle: Data Structures – Enumerations and Data Tables. Play
Learning note: basics course videos are not specific to this system. Use them to understand the underlying Unreal Engine or Blueprint principle, then follow the current documentation for project-specific names and setup.
Core Principles of the Inventory System
System Architecture Overview
The inventory system is built around two core building blocks that work together to create a flexible and powerful inventory management solution:
- AC_Inventory – The main inventory component that acts as the central manager for all containers.
- BP_Inventory_Container – An actor representing a single inventory grid or storage space.
Each character, chest, or any actor that needs inventory functionality has its own AC_Inventory component. This component manages all inventory containers belonging to that actor, handles initialization, saving and loading, and provides global utility functions that operate across all containers.
The system is modular and supports multiple inventory types including standard grid-based inventory, jigsaw-style inventory with variable item sizes, and list-based inventory views. Other systems such as crafting, vendors, loot chests, equipment, and hotbar functionality are built on top of this core inventory framework and are explained in their respective documentation files.
Key Technical Concepts
This system uses several Unreal Engine features that you should be familiar with:
The inventory system uses Gameplay Tags extensively for item categorization and filtering. For example, items can be tagged as Items.Equipment.Weapon.Rifle or Items.Consumable.Food, and containers can use the Allowed Items setting to restrict which tagged items they accept. Gameplay Tags provide a hierarchical, designer-friendly way to categorize content without hardcoding enums.
The system uses Blueprint Interfaces to allow different actors to respond to inventory actions. For example, items can implement an interface to define their “use” behavior. Interfaces allow polymorphic behavior – different items can respond to the same “Use Item” call in different ways (consume food, equip weapon, etc.).
Abstract Classes and Inheritance
Some components like AC_Respawn_Actor_Abstract are marked as abstract, meaning they provide a base interface and functionality but aren’t meant to be used directly. Child classes like AC_Respawn_Actor_Base inherit from the abstract parent and implement the actual functionality. This creates a clear hierarchy where common functionality is defined once in the parent and specialized behavior is added in children. See the Respawn Actor Manager documentation for examples of this pattern.
All item definitions are stored in DT_Items, a Data Table where each row represents an item with all its properties (name, icon, weight, value, etc.). Data Tables allow designers to modify item properties without touching code or blueprints.
Interaction with Items
Before diving into the inventory mechanics, it’s important to understand how players interact with items in the world. The system includes an Interact_Basic component that uses a line trace to check for blocking objects in the ‘interaction’ channel. The sphere radius collision box handles detection, so you don’t have to trace directly to the mesh. This is particularly useful for smaller meshes that might otherwise be difficult to target precisely.
UI Management
The system uses a UI manager component to handle the opening and closing of inventory panels. By default, the inventory can be accessed by pressing the ‘I’ key or ‘Tab’ key.
Container System Introduction
This section introduces the container system and its main components. The container system is the foundation of the inventory architecture, consisting of the AC_Inventory component that manages containers, and BP_Inventory_Container actors that represent individual inventory grids.
AC_Inventory Component
The AC_Inventory component is the central inventory manager that owns and manages all containers on a character or storage actor. This section introduces the component’s role and responsibilities in the system.
Component Placement
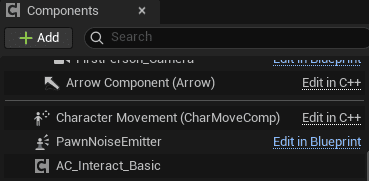
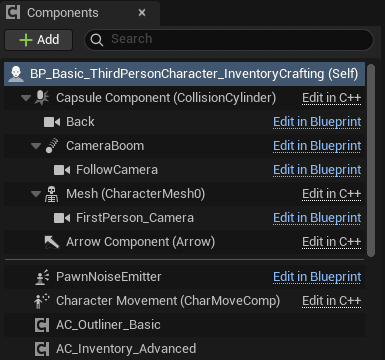
The AC_Inventory component should always be the topmost component on your character or any actor that uses it. This is critical because it must initialize before any other component that references inventory containers. This ensures the default containers are correctly created and registered before equipment managers, crafting systems, or other dependent components attempt to access them.
Responsibilities
The inventory component handles several critical functions:
- Initializes and spawns all containers defined in the Inventories To Create array
- Manages the Inventory Containers Array, which holds references to all active containers
- Provides global utility functions that can operate on one or multiple containers
- Routes events and updates from all containers to higher-level systems like UI or gameplay logic
- Handles saving and loading of containers, items, and nested relationships
- Maintains references to containers used for standard inventory operations
Usage Patterns
For simple setups with a single inventory grid (like a basic player inventory):
- You only need to spawn one container in the Inventories To Create array
- All inventory functions (like “Add Item to Any Container”) will only operate on that single container
- The main inventory panel name will come from the Inventory Component, not the container
For complex setups with multiple containers (such as inventory, equipment, and backpacks):
- All containers are automatically managed and accessible through the Inventory Containers Array
- Each container can have different rules, sizes, and behaviors
- Containers can be dynamically created at runtime (for example, when opening a backpack)
BP_Inventory_Container
A container represents a single inventory grid and exists as an actor in the world. Every container holds items, manages grid behavior, and contains its own logic for adding and removing items. This section introduces the container actor and its role in the system.
Items can only exist inside a container. The only exceptions are:
- World pickups (which are actors, not container-bound)
- Hotbar slots, which are directly linked to containers but not physical container grids themselves
Container as Actors
Each BP_Inventory_Container can be extended with child blueprints if you need specialized behavior. Containers exist as actors in Unreal Engine for several reasons:
- Actors support replication natively, making multiplayer synchronization straightforward
- Event dispatchers and Blueprint events work seamlessly with actors
- Actors can be spawned, destroyed, and managed dynamically during gameplay
- Actors can have parent-child relationships in the world, which is used for nested containers
Technical Note: While using Unreal’s Object class would be more memory-efficient, Objects do not support replication in Blueprints. Since this system is designed to work entirely in Blueprints, actors provide the necessary replication and event functionality. For C++ implementations, you may want to consider using replicated objects instead.

Container Architecture
Containers have a hierarchical structure that enables powerful nested inventory functionality.
Each container:
- Exists as an actor with its own event dispatchers and utility functions
- Holds an array of items (represented as structs)
- Can have a parent-child relationship with other containers (for nested inventories)
- Has a unique ID that is generated during the save process for linking containers
Containers know which container they belong to because child container actors are attached to their parent container actors in the world. This parent-child attachment enables nested inventories such as:
Backpack → Inside another backpack → Both move and save/load together
When a container is nested inside another:
- The child container actor is attached to the parent container actor in the world
- When the parent is moved, dropped, or saved, all attached child containers follow
- This relationship is preserved during save and load operations
Event Dispatchers
Containers use event dispatchers to communicate changes to the UI and other systems.
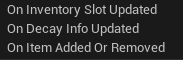
In BP_Inventory_Container:
- OnInventorySlotUpdated – Called whenever a slot’s content changes
- OnItemAdded / OnItemRemoved – Called when items are added or removed from this container
- OnDecayInfoUpdated – Called when an item’s decay or durability changes
In AC_Inventory:
- OnInventorySlotUpdated – Called globally whenever any container managed by this component updates a slot
This allows UI or gameplay logic to respond without knowing which container triggered the change. The global event in the inventory component is particularly useful for systems that need to track any inventory changes regardless of which specific container was modified.
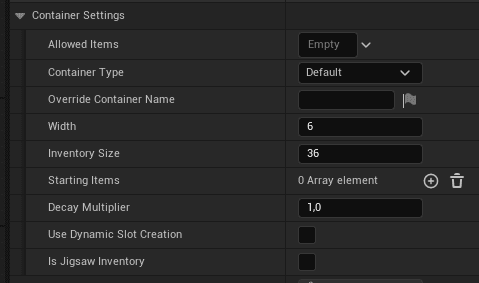
Container Settings
Each container has several configurable settings that determine how it behaves. These settings are defined when spawning a container and can be customized per container instance.
Setting Descriptions
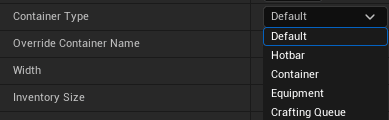
Container Type
Defines the type and purpose of the container. This determines how the container is used and displayed in the UI. See section 2.2.5 for detailed information on container types.
Allowed Items
Defines which categories of items can be stored using Gameplay Tags. For example, you can restrict a container to only accept items tagged with Items.Equipment.Weapon or Items.Consumable. Leave empty to allow all items.
This is useful for:
- Equipment slots that only accept specific armor types
- Quivers that only accept arrows
- Crafting stations that only accept resources
- Magazine pouches that only accept ammunition
The system uses Gameplay Tag matching with parent tag support – if you specify Items.Equipment, it will accept any item with that tag or any child tags like Items.Equipment.Weapon.Rifle.
Override Container Name
Overrides the default name display. If left empty, the container will use the container type name or the name of the item it’s linked to (in the case of backpacks or other item-based containers).
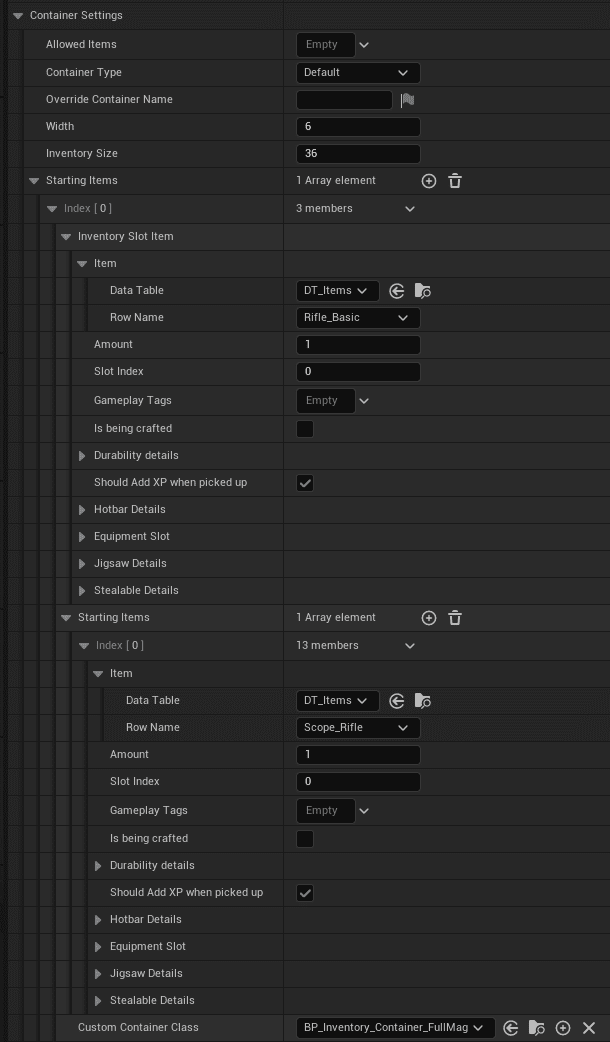
Starting Items
Defines which items are automatically spawned when the container is created. This is useful for giving players starting equipment or for loot chests that should always contain certain items. See section 2.3.3 for detailed information on the Starting Items system.
Width
Defines how wide the container should display itself in the UI. This setting controls the visual layout of the container grid.
Number of Slots
Defines how many slots the container has. For grid-based inventories, this represents the total number of grid spaces.
Custom Container Class
Allows you to specify a child class of BP_Inventory_Container to use instead of the default. This is used when you need special logic for a container, such as the Full Mag container or Jigsaw container.
Container Types
Container Types define how a container is used within the system and how it appears in the UI. The type determines whether the container is visible in the main inventory panel, has special behavior, or requires specific logic.
Default
Used for main inventory containers that appear in the primary inventory UI. When you have multiple containers with the Default type, the UI will automatically create a grid for each one. Each grid will display underneath the previous one with its own custom name.
Container
Dynamically created at runtime when opening an item like a backpack. These containers are not shown in the main inventory panel but instead open in separate windows that can be dragged around. Players can have multiple of these windows open simultaneously.
Equipment
Used by the equipment manager component to store equipped items. These containers have special logic for equipping and unequipping items and are not directly accessible through the standard inventory panel. See the Equipment Manager documentation for more details.
Crafting
Used by the crafting system to store the crafting queue. Items in this container represent queued crafting operations. See the Crafting documentation for more details.
Hotbar
This container type exists in the system but is not used by the default hotbar implementation. It is only a placeholder if you choose to implement a Minecraft-style hotbar where the hotbar is its own container. See the Hotbar documentation for information on the reference-based hotbar system that is actually used.
Creating UI for Different Container Types
If you want to create your own container type with custom UI display:
- Add the type to your container settings
- Create your own UI implementation for displaying that grid
- The crafting and equipment systems provide good examples of custom container UI implementations
The system automatically handles Default containers by creating grids in the main inventory panel. For other types, you need to implement the display logic yourself or the container will not be visible in the standard inventory UI.
Container Relationships and Nesting
Containers can be nested within one another, creating powerful inventory organization possibilities.
Parent-Child Relationships
When a container is placed inside another container (for example, a backpack inside another backpack):
- The child container actor is attached to the parent container actor in the world
- When the parent container is moved, all child containers move with it
- When the parent container is dropped or transferred, all child containers follow
- The entire hierarchy is preserved during save and load operations
Saving and Loading Nested Containers
Each container is saved individually with a unique ID. When containers are nested:
- Each container saves its own contents and links to its parent container via ID
- On load, all containers are respawned and re-linked based on their saved IDs
- This ensures full restoration of nested structures (a backpack inside a backpack will be restored exactly as it was)
You don’t need to manually handle saving or re-linking – this is all handled automatically by the system.
Items and Data Structure
Item Data Table
All items that can be held in the inventory are listed in the DT_Items data table. In this data table there are numerous options to customize each item. We have provided a list of predefined items that you can use as a reference when creating a new item.
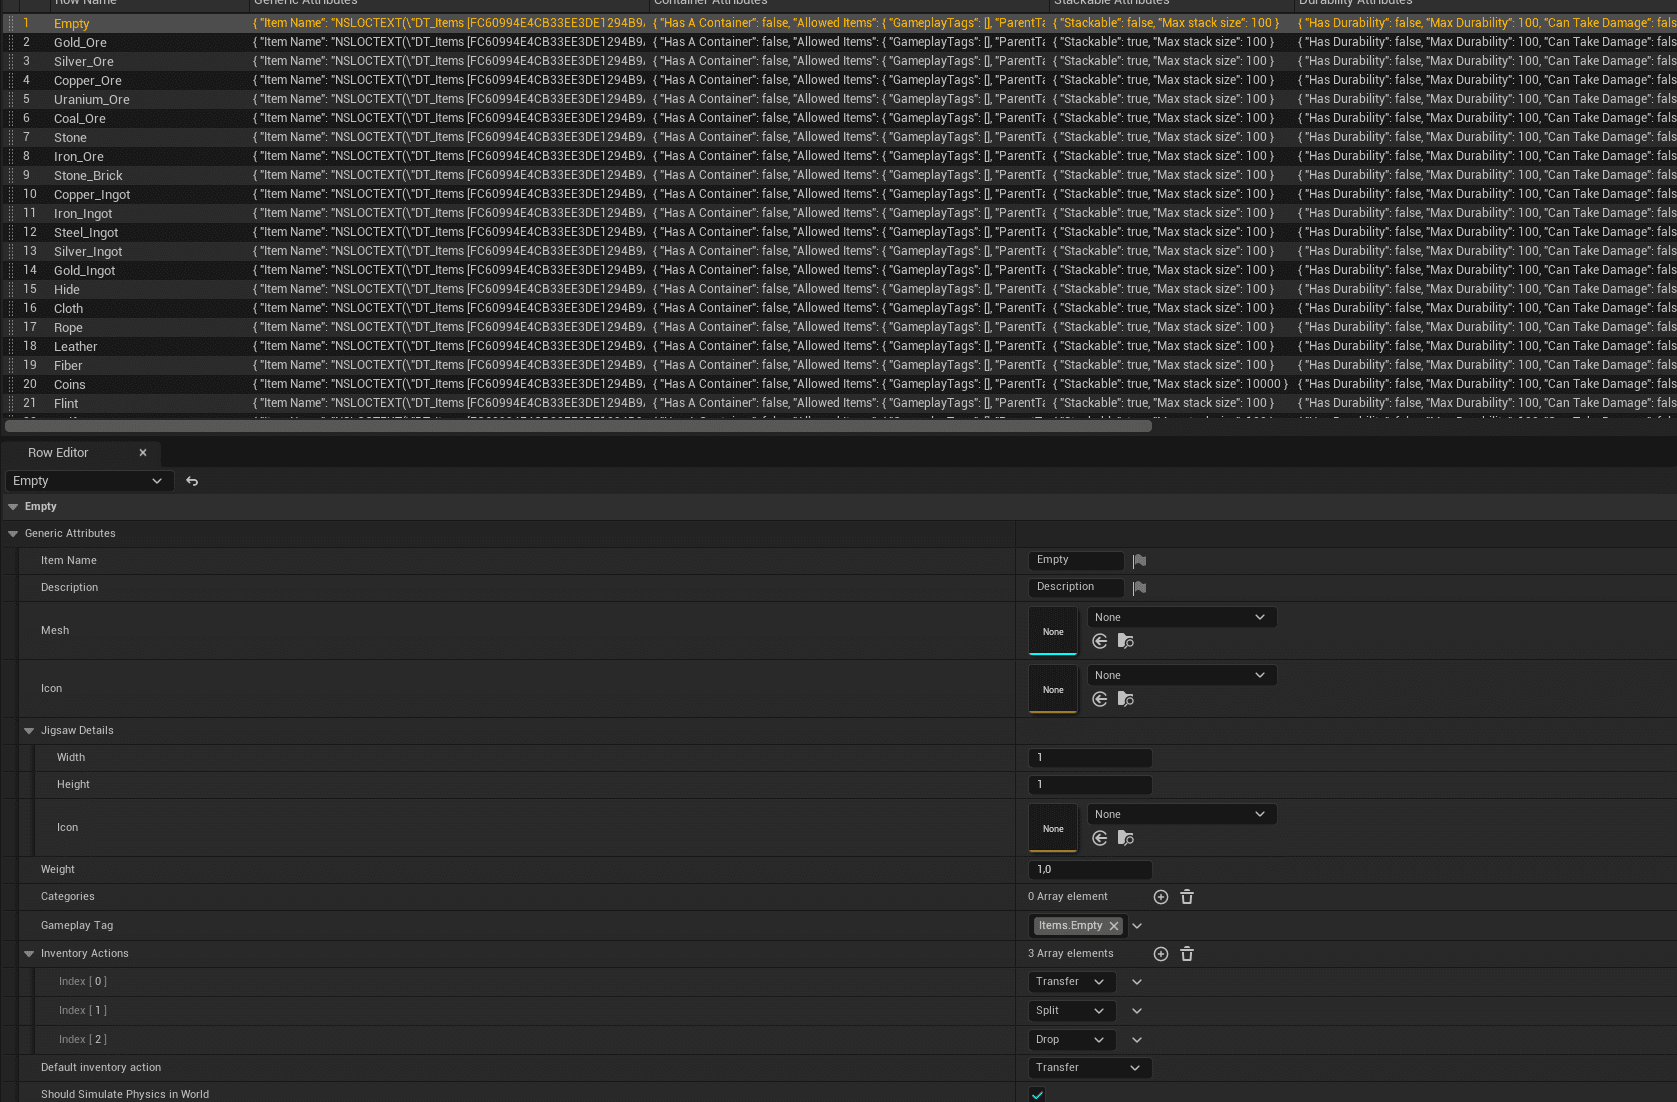
The data table includes settings for:
- Item name and description
- Icon and mesh
- Item category (using gameplay tags)
- Stack size
- Weight
- Durability and decay settings
- Available inventory actions
- Default action
- Container settings (if the item can contain other items)
- Equipment slots
- Crafting requirements
- Vendor pricing
- And much more
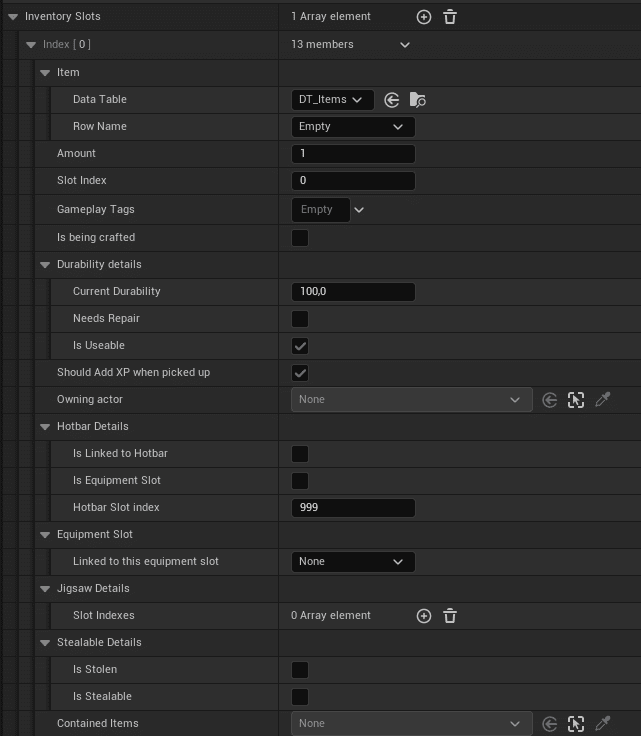
Items as Structs
Items in this system are represented by structs, not actors. Each item struct contains:
- A row name reference to the item in DT_Items data table (used to get the actual item data)
- Runtime data such as current durability, amount, and decay state
- A reference to nested containers (if the item contains other items)
- Hotbar linking information
The item struct does not contain all the data from the data table directly. Instead, it holds a row name that allows you to retrieve the full item data from DT_Items when needed. This keeps the struct lightweight and ensures all items reference the same source data.
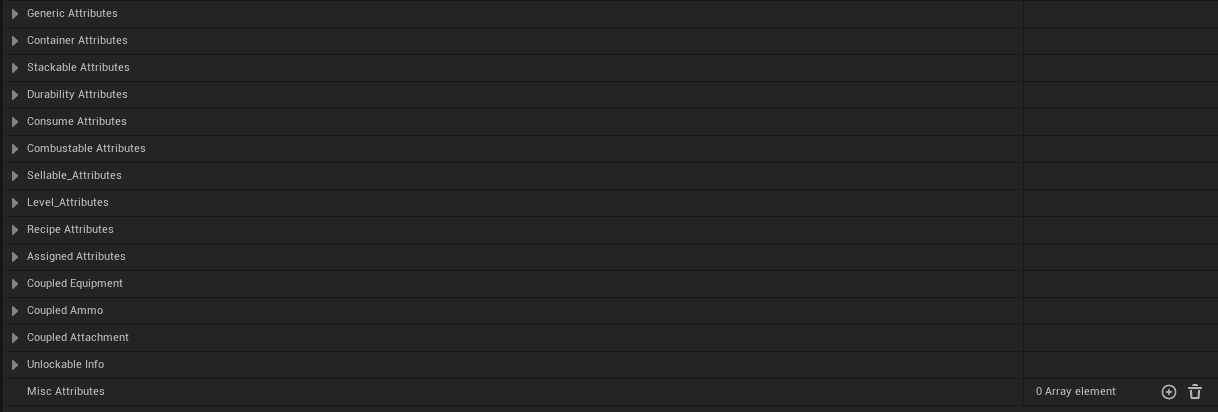
Misc Attributes Array
The item system includes a Misc Attributes array that allows you to define very specific variables for specialized use cases. This array lets you pass along custom data that doesn’t fit into the standard item properties.
Example Use Case – Skinning Knife
For a knife item where you want to define specific skinning skills or bonuses:
- Add entries to the Misc Attributes array
- Define key-value pairs like “SkinningBonus” = “25” or “CanSkinRareAnimals” = “true”
- Your gameplay code can query these attributes when needed
- Each item can have completely unique misc attributes relevant to its specific function
This system provides flexibility for game-specific mechanics without modifying the core item structure.
Starting Items System
The Starting Items system allows items to contain other items, creating dynamic and complex initial inventory setups. This is particularly powerful for setting up items like weapons with pre-loaded ammo or containers with pre-filled contents.
How Starting Items Work
Each item in DT_Items can have its own Starting Items array. This creates a hierarchy where items can contain other items. For example:
- A rifle item can have ammo items in its starting items
- A backpack item can have tools and supplies in its starting items
- A first aid kit item can have bandages and medicine in its starting items
Nested Starting Items
The system supports multiple levels of nesting. An item’s starting items can themselves have starting items, allowing for complex setups:
Rifle (item on the ground)
├─ Starting Items:
├─ 30 Bullets (in weapon's ammo container)
└─ Red Dot Sight (in weapon's attachments container)
Use Case: Weapon with Ammo
When you want a rifle on the ground to spawn with ammo already loaded:
- Create the rifle item in DT_Items
- In the rifle’s Starting Items array, add ammo items
- When the rifle is spawned or added to inventory, it automatically creates its weapon container and populates it with the starting ammo
Use Case: Pre-filled Backpack
When you want a backpack to contain items when picked up:
- Create the backpack item in DT_Items
- In the backpack’s Starting Items array, add the items it should contain
- When the backpack is opened, its container is populated with those items
This system allows for dynamic starting items that are defined in the data table rather than requiring separate Blueprint setup for each item configuration.
Inventory Actions
Context-Sensitive Interactions
The interaction system is context-sensitive, meaning the available actions change based on where and what you’re interacting with.
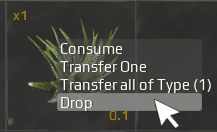
Which interactions are available is determined via the data table. Here you can define all possible interactions for each item, and when relevant, what the default action should be. For instance, double-clicking on meat will consume it.
Context Menu Creation
The context is determined by the type of slot you’re interacting with. For instance, in the inventory slot widget’s OnMouseButtonDown event:
- First check if the slot is empty
- If not empty and the right mouse button was pressed, create a context menu (the right-click menu)
- Based on whether the inventory component is a vendor or not, choose which menu to display
The context menu is constructed based on inventory actions defined in the data table. For each available action, a new context menu button (WBP_Button_Rectangle_DropDown) is created. The button is given parameters that are exposed on spawn, so when the button spawns it knows what action to take when clicked.
Dropdown Menu Button Logic
The dropdown menu button has two main graphs
On Construct
Sets the visuals and settings based on the variables that were set when it was constructed. This includes the button text and icon.
On Clicked
Determines which action to execute when the button is clicked. For example, when the action is Consume and you click the button, it processes the Consume function in the inventory component.
The following sections explain each available action in detail.
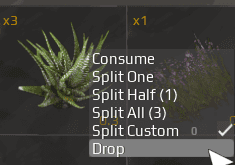
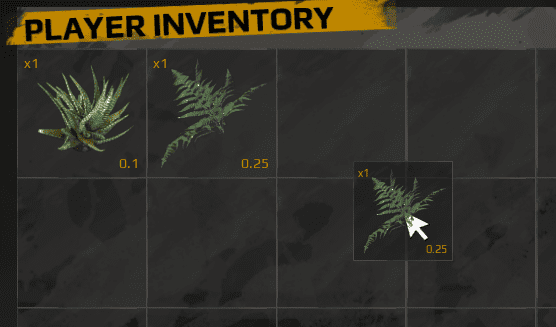
Split
Stackable items can be split in the inventory. This allows you to divide a stack of items into smaller portions.
Split Options:
- Split One: Takes one item from the stack
- Split Half: Divides the stack in half
- Split All: Moves the entire stack (with a max override of 100 items at once)
When splitting:
- The system checks if the item is stackable
- Calculates the amount to split based on the option chosen
- Creates a new stack in an empty slot or attempts to combine with an existing stack
- Updates both the source and destination slots
Transfer
If another inventory is open (such as a storage chest), you have the ability to transfer items between inventories.
Transfer Options are the same as split options:
- Transfer One: Moves one item from the stack
- Transfer Half: Moves half the stack
- Transfer All: Moves the entire stack
The Custom Amount feature (explained in the transfer options section) allows you to specify an exact number of items to transfer.
Swap Stacks
When dragging and dropping items between slots, if both slots contain items, the system swaps their positions.
Combine Stacks
If you drag a stackable item onto another stack of the same item, the system will combine them up to the maximum stack size.
Example:
- Slot A: 30 Wood
- Slot B: 50 Wood (max stack 99)
- Combine: Slot A becomes 0 (or empty), Slot B becomes 80
Each item can have a Default Action defined in the data table. This action triggers when you double-click an item.
Common default actions:
- Default action
- Consume: For food and potions
- Equip: For armor and weapons
- Use: For tools and utility items
- Open: For containers like backpacks

Drop
The Drop action removes an item from your inventory and spawns it in the world as a pickup.
Source and Destination Inventory Components
When performing actions between containers (transfer, drag and drop), the system uses:
- Source Inventory Component: The inventory component of the container the item is coming from
- Destination Inventory Component: The inventory component of the container the item is going to
This allows for transferring items between different actors (player to chest, player to player, etc.).
Inventory UI
This section covers all UI-related functionality for the inventory system.
UI Creation and Binding
The UI system binds directly to containers through event dispatchers. Each grid UI binds to its own container and listens to its event dispatchers for updates.
The UI does not know about other containers except through the main AC_Inventory component. When multiple containers are displayed in one panel, each will show its own title. If there’s only one container, it will display only the main inventory title from the Inventory Component.
Global Updates
All container updates are routed through the OnInventorySlotUpdated event dispatcher in the AC_Inventory component.
Important: Individual grids should only bind to their specific container’s update events for efficiency. The global OnInventorySlotUpdated event from the inventory component should only be used when you need to know that anything changed across all containers, such as:
- Updating total weight display
- Tracking overall inventory value
- Monitoring for specific item additions/removals across all containers
This prevents unnecessary UI updates when changes occur in unrelated containers.
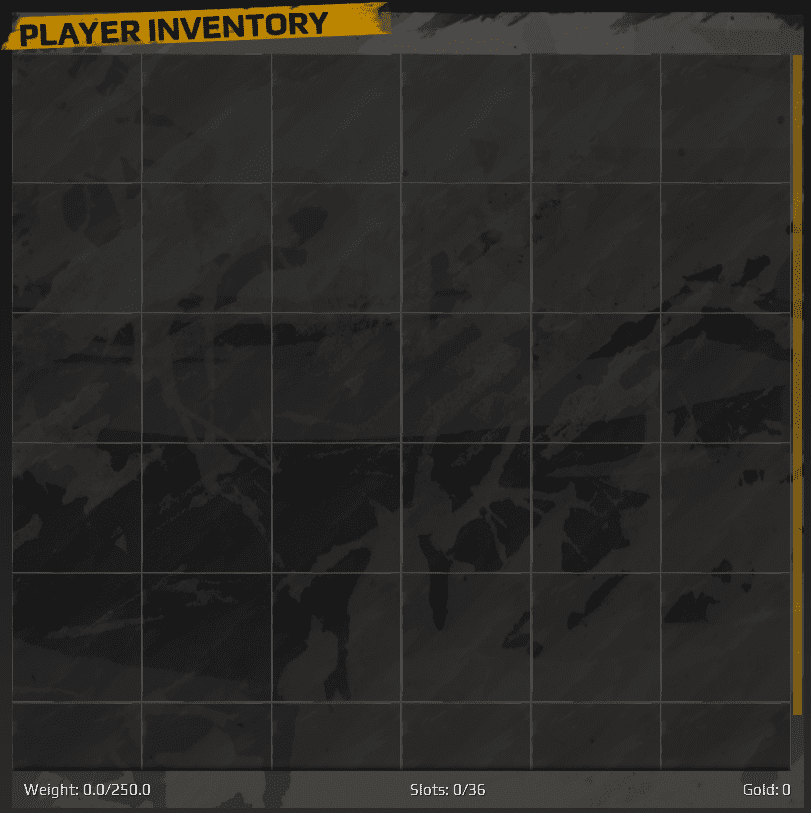
Inventory Grid Structure
The inventory UI consists of multiple layers stacked on top of each other. The structure is as follows:
Inventory Slot → Inventory Grid → Inventory Panel → Player Inventory (used for multiple panels)
Inventory Slot
The inventory slot holds a reference to the item it’s holding. This uses the same struct as the items in DT_Items. This way the UI can read values such as the amount of items, hotbar info, durability, etc. The inventory component itself is responsible for changing these values, not the UI. The UI simply displays the current state.
Inventory Grid
The inventory grid creates the slots required by the container. This is done on construct. The data from the container is placed inside each slot so the icon and other information display correctly.
Inventory Panel
The inventory panel can contain one or more grids. When you have multiple Default containers, the panel will create a grid for each one and stack them vertically.
Initialize Inventory
When BeginPlay is called on the AC_Inventory component, the system provides the data that the UI needs to create the slots.
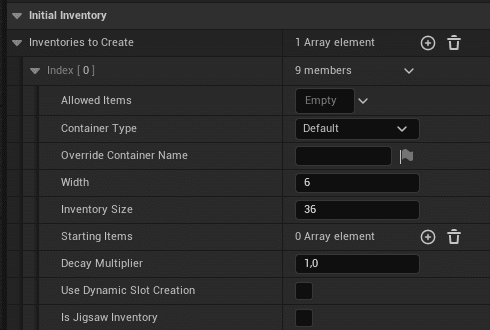
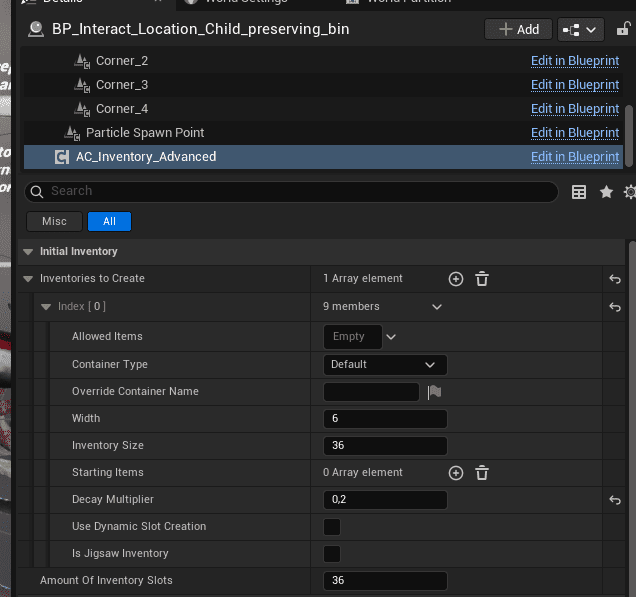
Inventories To Create
The component has an array called Inventories To Create where you define the container settings for each container that should be created on initialization. The initialization process:
- Creates containers based on the Inventories To Create array
- Each container is spawned with its configured settings (type, size, allowed items, etc.)
- Creates empty slots in each container
- Populates those slots with items from each container’s Starting Items array
- Triggers UI updates to display everything correctly
Container Initialization Order
Because other components (Equipment Manager, Crafting, etc.) may create their own containers during initialization, the AC_Inventory component must be at the top of the component list to ensure it initializes first.
Updating the Inventory
Each time a container’s item array changes, the system uses replication with RepNotify to synchronize the changes. When the inventory updates:
- The container checks which variables have changed
- If relevant data has been updated (hotbar info, durability data, new items, etc.), the container triggers its OnInventorySlotUpdated event dispatcher
- This event is also forwarded to the Inventory Component’s global OnInventorySlotUpdated dispatcher
- The UI, hotbar, and other systems listening to these events update accordingly
This ensures that all systems stay synchronized without needing to manually refresh everything. Only the specific slots that changed will update their displays.
Tooltip
Tooltips display detailed information about an item when hovering over it in the inventory.
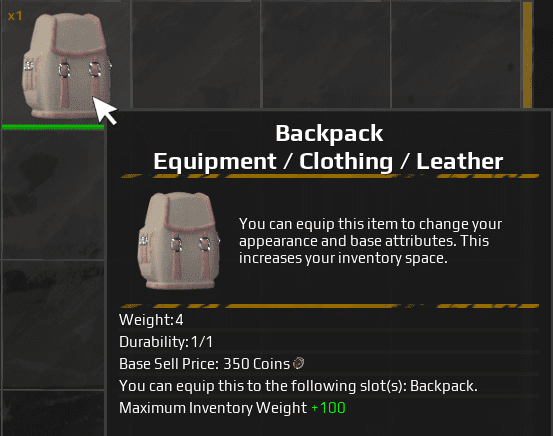
The tooltip system reads data from the item struct and formats it for display, showing:
- Item name and description
- Weight and value
- Durability state
- Special properties
- And more
Tooltips are implemented in the inventory slot widget and can be customized to show different information based on your game’s needs.
Drop and Transfer Resolution
- Check if there’s a valid drop target
- If dropping onto the same item type, try to stack them
- If stacking isn’t possible, leave the item in the source slot
- If the item is different or there’s no target, swap the items or drop to world
- Spawn a pickup actor in the world at the player’s location
Drag and Drop Detection
The drag and drop system also detects if you’re trying to drop an item onto the same item type and will attempt to stack them. If stacking isn’t possible, the item remains in the source slot to prevent accidental item loss.
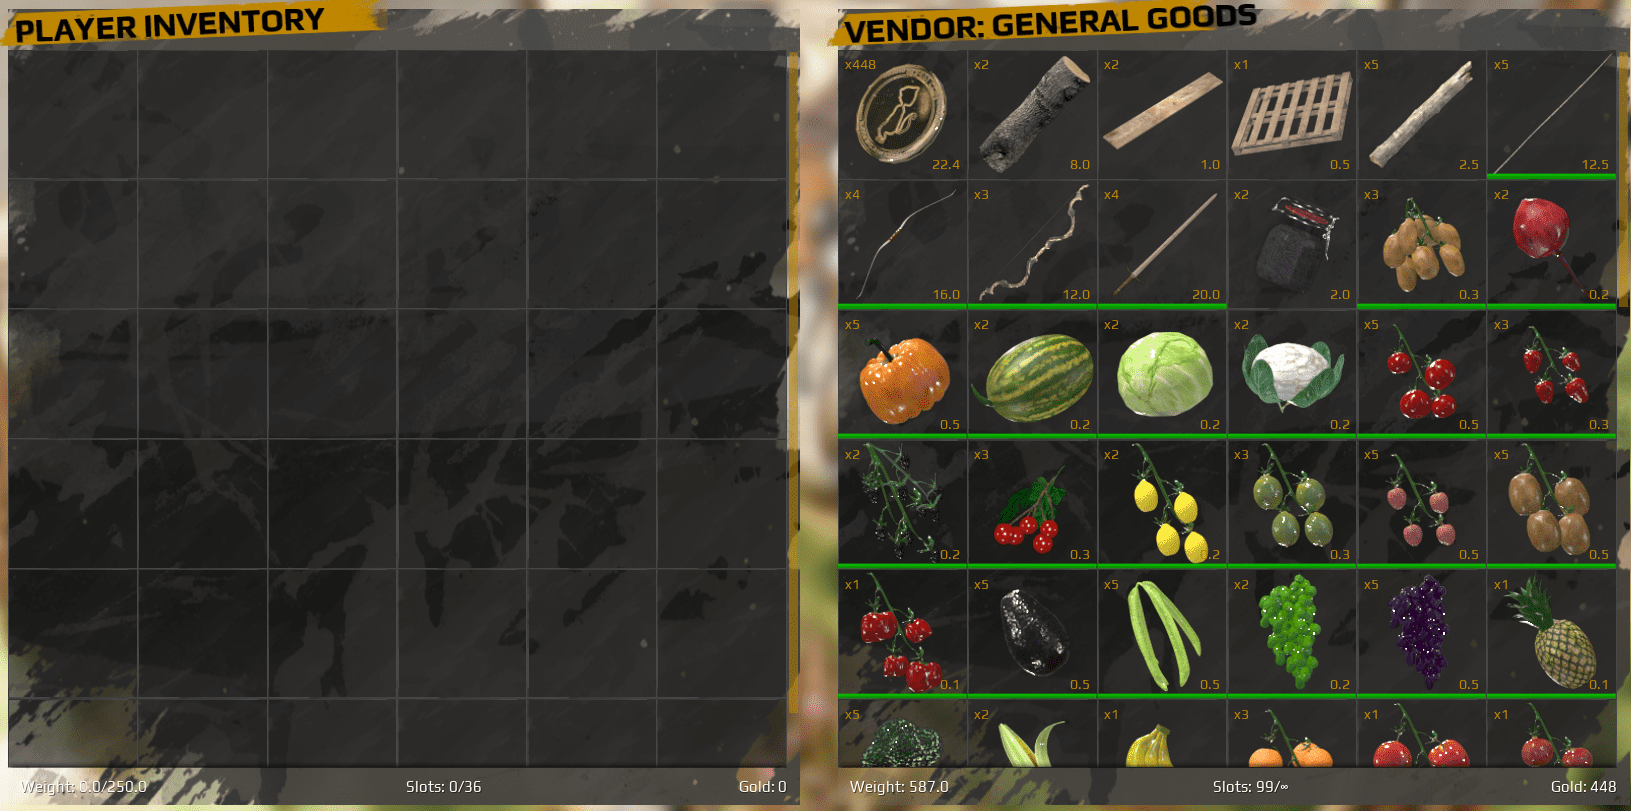
Source and Destination Inventory Components
Understanding the source and destination system is crucial for working with inventory transfers.
The source inventory component is always where the action started. For example, if you move an apple out of a chest, the chest is the source and the player inventory is the destination. By using this method, the system always knows where to transfer items.
Reference Passing
These references are passed down through all layers in the UI and are used when processing functions. This ensures that every action knows exactly which inventories are involved.
Getting Inventory Component References
When creating the inventory UI, the inventory component references are passed through:
- For the left panel: The chest’s inventory component is the source, the player’s is the destination
- For the right panel: The player’s inventory component is the destination, the chest’s is the source
- These references are maintained consistently across all UI elements
This system allows the UI to correctly handle transfers, drag and drop, and all other operations without confusion about which inventory is which.
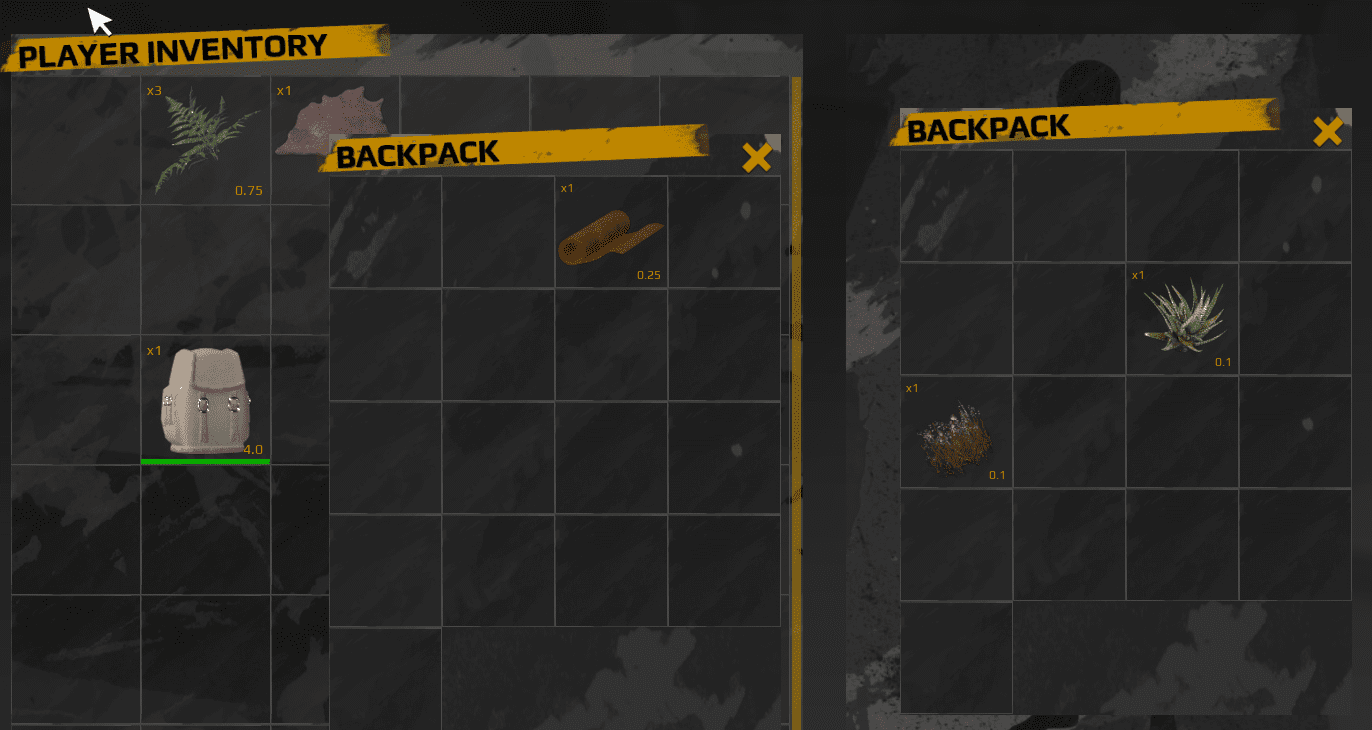
Nested Containers and Backpacks
The container system supports nested inventories, allowing items like backpacks to contain their own inventory grids.
Opening Containers
Items can have containers associated with them. When an item has the “Open” action enabled, double-clicking or selecting “Open” from the context menu will create a separate window showing that item’s container.
Container Settings for Items
In the DT_Items data table, you can configure Container Settings for any item. This includes:
- Whether the item has a container
- The size of the container
- The custom container class to use (if any)
- Starting Items for the container
- Allowed item types

Opening Behavior
When you open an item that has a container:
- The system checks if the container has already been created
- If not, it spawns a new container and attaches it to the item
- A draggable window is created showing the container’s grid
- You can open multiple container windows simultaneously
- Each window can be dragged around independently
Items That Should Not Be Opened
Some items have containers but should not be opened through the UI. For example:
- Rifles with ammo containers: You don’t want to manually open the rifle, you just want to reload it
- Equipment with attachment slots: These use special equipment UI instead of generic container windows
For these items, disable the “Open” action in the data table. They will still have containers that can be accessed programmatically, but players won’t see an “Open” option.
Drag and Drop Between Containers
You can drag items between different container windows. The system automatically handles the transfer between containers.
Dropping Items Onto Container Items
A special feature allows you to drop items directly onto a backpack or other container item in your inventory. When you do this:
- The system detects that the target item has a container
- It attempts to place the dropped item inside that container
- If successful, the item is added to the backpack without needing to open it first
- If the container is full or can’t accept the item, the drop fails and the item stays in the source slot
This provides a quick way to organize items without opening multiple windows.
Getting Inventory Component References
When working with containers, you often need to find the main inventory component that owns the container hierarchy. This is needed for operations like adding items, checking for available space, or triggering global inventory events.
The system includes a utility function that retrieves the inventory component from any container. This function works by:
- Checking the container’s parent actor
- If the parent is also a container, continue checking up the hierarchy
- Keep following the parent chain until finding an actor that isn’t a container
- Return the inventory component from that actor
This ensures you always get the correct inventory component, even when dealing with deeply nested containers (backpack inside a backpack inside a backpack).
Use Cases
This function is useful when:
- Adding loot to a player who might have nested backpacks
- Saving container hierarchies
- Performing inventory-wide searches
- Triggering UI updates from nested containers
Decay System
Decay in Inventory
Each item has the option to decay while in an inventory. Decay represents the gradual deterioration of items over time, such as food spoiling or materials degrading.
Decay Settings
In the data table, each item can configure:
- Whether it decays
- Decay rate (how fast it decays)
- What happens when fully decayed (destroy, become unusable, require repair, or transform into another item)
Decay Behavior
When an item is fully decayed, you can choose different outcomes:
- Destroyed: The item is removed from the inventory
- Not Usable: The item remains but cannot be used until repaired
- Requires Repair: The item must be repaired to be functional again
- Spawn New Item: The item transforms into something else (for example, fresh meat becomes spoiled meat)
Decay Multipliers
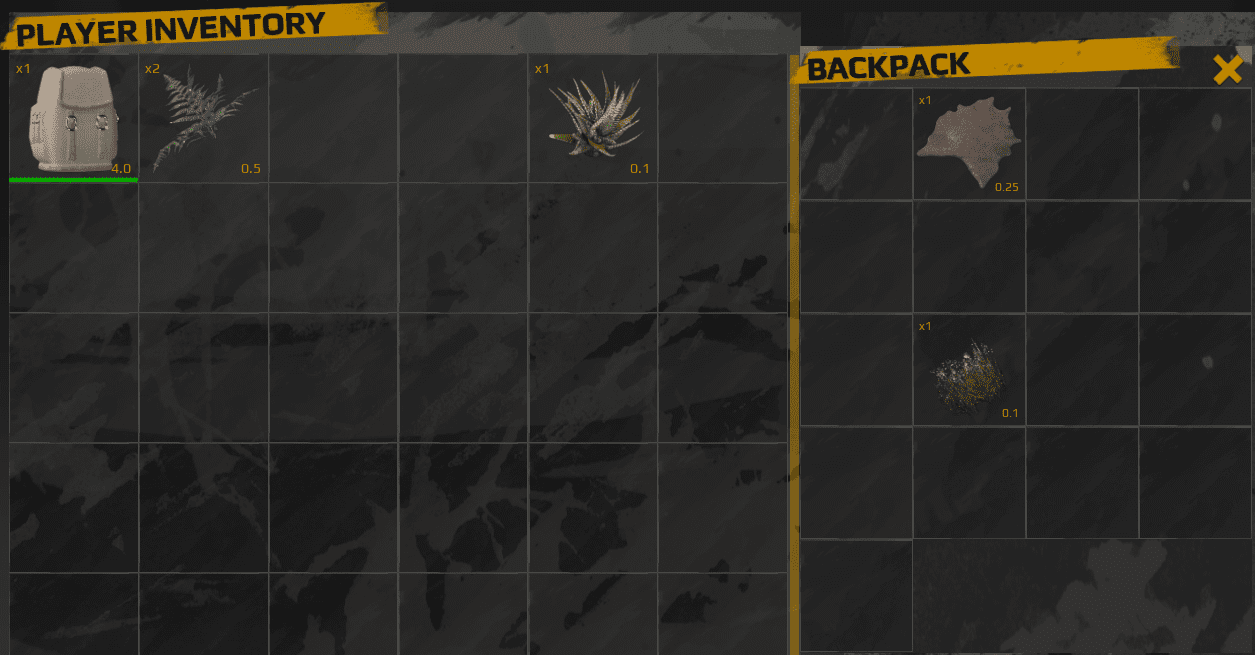
Decay multipliers can be applied at the container level to simulate different storage conditions. This allows you to create refrigerators, freezers, or hot environments that affect decay rates.
Container Decay Multiplier
Each container can have a decay multiplier setting:
- 1.0: Normal decay rate
- 0.25: 75% slower decay (refrigerator)
- 0.0: No decay (freezer)
- 2.0: Twice as fast decay (hot environment)
For example, a preserving bin might have a decay multiplier of 0.25, making items decay at only 25% of the normal rate, effectively preserving them 4 times longer.
This system allows you to create realistic storage solutions where players are incentivized to build refrigerators and freezers to preserve their food and perishable items.
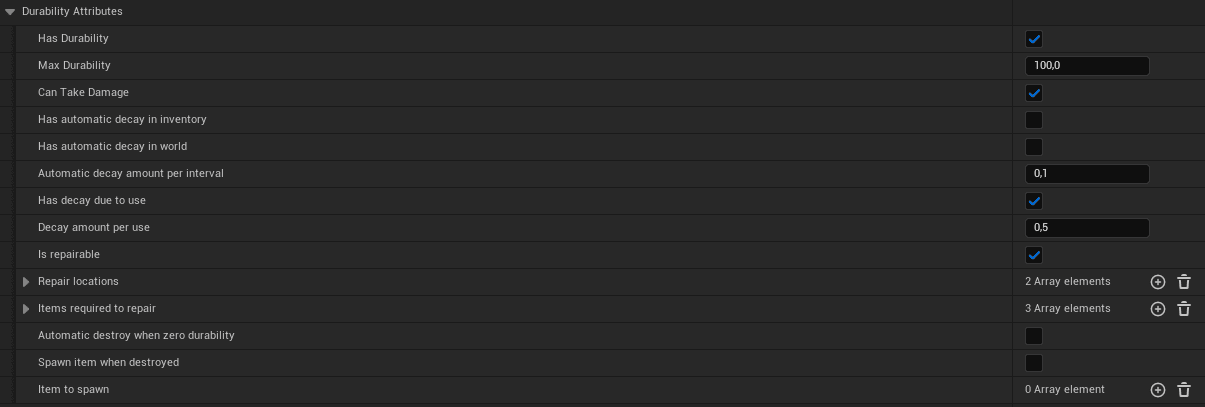
Durability and Repair
The durability system works alongside decay to track item condition.
Durability Mechanics
There are two main ways durability decreases
Due to Use
Used for equipment and tools. When you perform an action (hitting something with a pickaxe, firing a weapon), the system removes a random value between the configured range from the durability.
Due to Decay
Works on a timer. The system uses a random value between the configured range and removes durability based on that. This can be toggled off per item.
Repair System
Items that are set to be repairable in the data table can be repaired using specific requirements.
Repair Settings:
- Whether the item can be repaired
- What resources are required to repair
- How much durability is restored per repair
- Whether repair is only possible at specific locations (such as a workbench)
When repairing:
- Check if the player has the required resources
- Verify the item can be repaired at the current location
- Remove the resources from inventory
- Restore the item’s durability
- Update the UI to reflect the repaired state
Save and Load System
The inventory system includes comprehensive support for saving and loading all container states, including nested containers and item data.
AC_Inventory_SaveManager Component
The save and load functionality is handled through a component placed on the Game Mode called AC_Inventory_SaveManager. This component exists in a central location because multiple different actors need to save and load inventory data.
Why a separate component?
The save manager is separate from the inventory component for several reasons:
- Pickup items in the world (like dropped backpacks) need to save their containers
- The inventory component exists on multiple actors (players, chests, vendors)
- Spawning actors during load requires game mode access
- Centralizing the save logic prevents code duplication

Note: This component is only needed if you’re using a save system. If you’re not implementing save/load functionality, you don’t need this component.
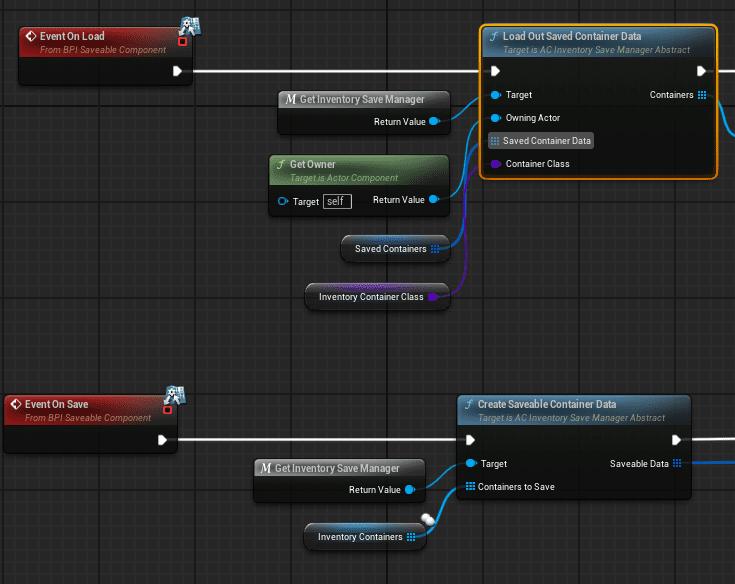
Saving Container Data
To save inventory containers, you call the save function on the AC_Inventory_SaveManager and pass the containers you want to save.
Save Process:
- The save manager iterates through all provided containers
- For each container, it saves:
- Container settings and type
- All items in the container
- Links to parent/child containers (via unique IDs)
- Item durability, decay, and other runtime data
- Returns a data structure that can be serialized to your save file
Nested Container Saving
When saving containers:
- Each container is saved individually with its unique ID
- Parent-child relationships are preserved through ID references
- The entire hierarchy is reconstructed on load
You don’t need to manually iterate through nested containers. Pass the top-level containers to the save manager, and it will automatically handle all nested containers.
Loading Container Data
When loading, you provide the saved data structure to the AC_Inventory_SaveManager, which reconstructs all containers and their contents.
Load Process:
- The save manager reads the container data structure
- Spawns each container actor
- Restores all items to their correct slots
- Re-establishes parent-child relationships between containers
- Updates all item states (durability, decay, etc.)
- Returns references to the loaded containers
The inventory component can then take these loaded containers and register them in its Inventory Containers Array.
Nested Container Loading
The save manager automatically handles nested containers:
- Child containers are spawned and attached to their parent containers
- All relationships are restored based on saved IDs
- Items that contain other containers are properly linked
This ensures that a backpack inside a backpack will be restored exactly as it was saved, with all items in the correct locations.
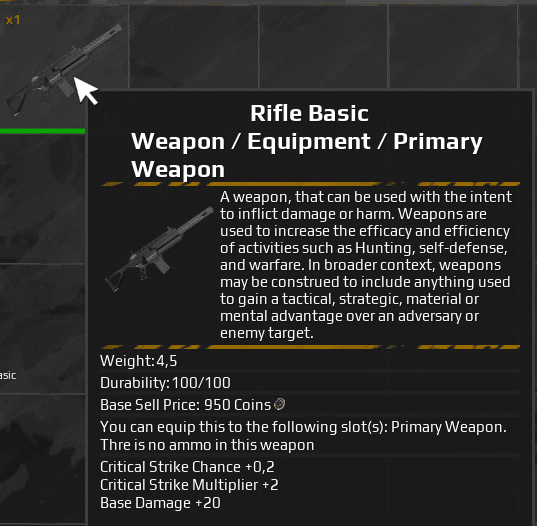
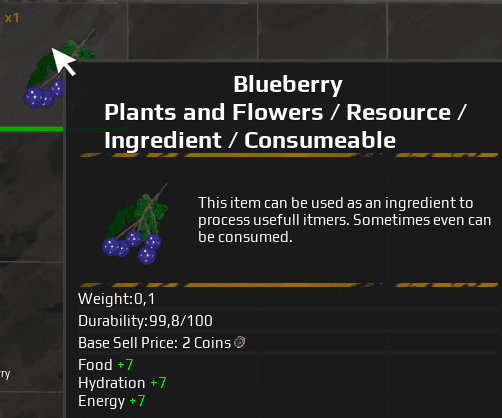
Tooltip
When hovering over a non-empty item in the inventory, a tooltip appears. This is a UI widget that shows information relevant for that item and inventory context.
The tooltip information differs based on item type. A weapon tooltip shows different data than a consumable tooltip.
Tooltip Structure
The tooltip consists of two parts
Top Section
Contains the item name and description. These are pulled directly from the item’s data table entry.
Bottom Section
Dynamically created inside a vertical box. For each type of tooltip content (weight, durability, value, etc.), a function generates the appropriate widget and inserts it into the vertical box.
Dynamic Content Creation
The tooltip system uses functions for each data type:
- Add Weight Info: Shows item weight and contribution to encumbrance
- Add Durability Info: Shows current durability and max durability
- Add Value Info: Shows buy/sell price
- Add Decay Info: Shows decay state
- Add Effect Info: Shows buffs/debuffs from consuming
This modular approach makes it easy to add new tooltip information types or customize existing ones.
Dynamic Slot Creation
The system includes an option for dynamic slot creation. This means that when your inventory is full and you try to add more items, new slots can be automatically created.
How It Works:
- Attempt to add an item to a container
- If all slots are full and dynamic slot creation is enabled
- Add a new index to the container’s item array
- Place the new item in that slot
- Update the UI to show the new slot
Use Cases
Dynamic slot creation is useful for:
- Player inventories that should never reject items
- Loot systems where you want to guarantee items are added
- Temporary storage where size restrictions don’t make sense
Considerations
Be aware that unlimited dynamic slot creation can lead to:
- Performance issues with very large inventories
- UI layout problems if too many slots are created
- Balance issues where inventory management becomes trivial
You may want to set a maximum slot limit even when using dynamic slot creation.
Limiting the Inventory
You can limit the inventory based on weight or number of slots.
Weight Limit
When using a weight limit:
- Each item contributes its weight multiplied by its stack size
- The total weight is compared against the maximum weight
- If the weight exceeds the maximum, the player becomes encumbered
Encumbrance Effect
When encumbered, the player is slowed down. You can configure:
- The movement speed penalty
- Whether encumbered players can sprint
- Visual effects to indicate encumbrance
- Whether you can still pick up items when encumbered
Slot Limit
When using a slot limit:
- The container has a fixed number of slots
- Items cannot be added if all slots are full (unless dynamic slot creation is enabled)
- This is the traditional inventory limitation system
You can use both systems together (weight limit and slot limit) for more complex inventory management, or choose just one based on your game design.
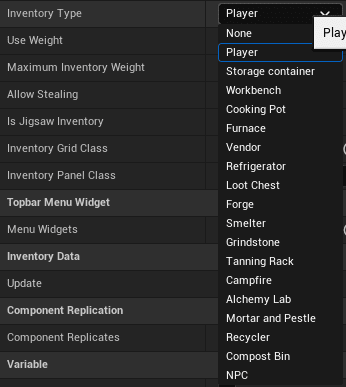
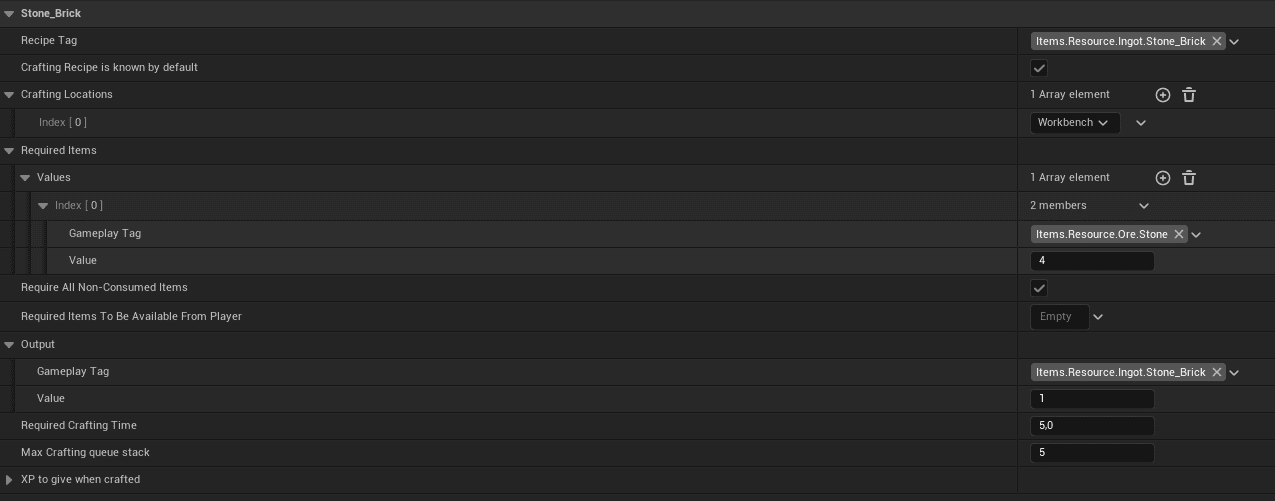
Inventory Type
Containers can have different inventory types that determine special behavior and available interactions. The inventory type affects things like crafting locations, repair restrictions, and decay rates.
Predefined Types:
- Player Inventory: Standard player inventory
- Storage Inventory: Basic storage container
- Workbench: Crafting station for tools and equipment
- Cooking Pot: Cooking recipes
- Furnace: Smelting and high-temperature crafting
- Vendor: Buying and selling items
- Refrigerator: Reduced decay rate for preservation
- Loot Chest: Random loot generation
- Forge: Metalworking recipes
- Smelter: Ore processing
- Grindstone: Repair and sharpening
- Tanning Rack: Leather processing
- Campfire: Basic cooking
- Alchemy Lab: Potion crafting
- Mortar and Pestle: Grinding ingredients
- Recycler: Breaking down items
- Compost Bin: Organic decomposition
Usage in Crafting
Inventory types are used for recipe-based crafting. For example:
- Fish can only be cooked at a Campfire or Cooking Pot
- Metal can only be smelted at a Furnace or Smelter
- Advanced tools can only be crafted at a Workbench
The crafting system checks the inventory type before allowing a recipe to be crafted. See the Crafting documentation for more details.
Usage in Repairs
Some items can only be repaired at specific locations:
- Weapons might require a Workbench
- Armor might require a Forge
- Tools might require a Grindstone
You can create your own inventory types and assign them to containers as needed for your game’s systems.
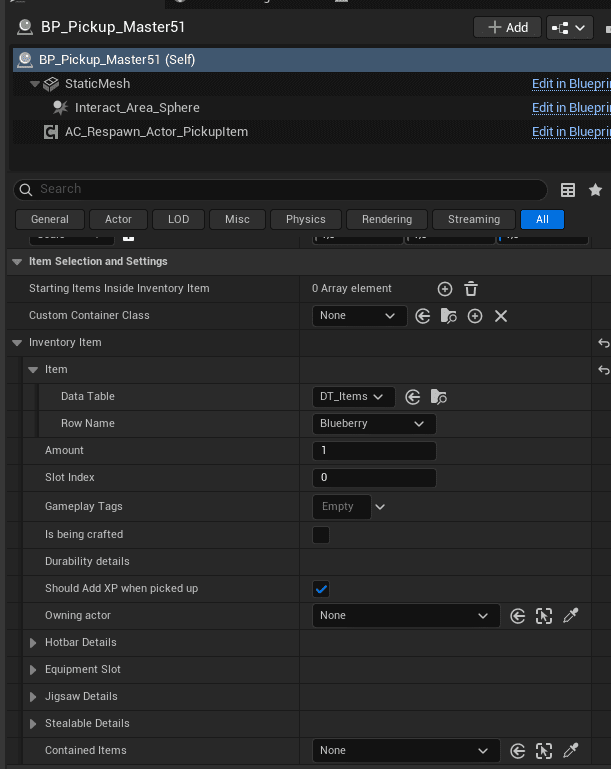
Pickup Items
All pickups derive from the Pickup Master Blueprint. This provides a consistent foundation for all items that can be picked up in the world.
Pickup Master Settings
You can configure numerous variables in the Pickup Master:
- Item text display and height above the item
- Mesh to spawn
- Pickup radius
- Respawn settings (see Respawn Actor Manager documentation)
- Simulate physics on drop
For the respawn radius to work correctly, you need to have a navigation mesh set up in your level. This is because the respawn system uses the navmesh to find valid spawn locations within the radius. For more information on the respawn system, see the Respawn Actor Manager documentation.
Spawning an Item in the World
There are two main ways to create pickups in your world
Designer Placement
You can drag and drop the Pickup Master blueprint into your level and select the item from the data table list. You can also change and override spawn settings like the mesh, respawn settings, and physics simulation.
Predefined Pickups
For items you use frequently, you can create a child blueprint of the Pickup Master. In the child blueprint, set the default item and any other settings you want. This creates a reusable pickup that always spawns the same item with the same configuration.
Runtime Spawning
You can also spawn pickups programmatically during gameplay:
- When players drop items from inventory
- As loot from defeated enemies
- As rewards for completing objectives
- From respawning resource nodes
The system handles converting inventory items to world pickups automatically when items are dropped.
Decay in World
Pickup items in the world also have decay functionality. When an item is spawned as a pickup, it uses the durability and decay values it had when spawned and continues to decay at normal decay speed.
This means:
- Dropped food will continue to spoil
- Abandoned equipment will continue to degrade
- Items don’t “pause” their decay when in the world
If an item fully decays while in the world:
- It can be destroyed (removed from the world)
- It can transform into another item (fresh meat becomes spoiled meat)
- The behavior is determined by the item’s decay settings
This creates realistic item persistence where players can’t exploit the system by dropping perishable items to pause their decay.
Data Table and Import Logic
Nearly everything in the system is driven from data tables (inventory, crafting, vendors, loot, etc.). The data table approach makes it easy to manage large numbers of items and allows for bulk editing.
Working with Large Item Lists
If you have many items, using Excel or another spreadsheet program is recommended.
Import Process:
- Create your item data in Excel (XLSX format)
- Export the XLSX to CSV format
- Convert the CSV to JSON using an online CSV to JSON converter
- Optionally clean up the JSON (remove empty objects)
- Import the JSON into the data table in Unreal Engine
When importing, you may receive a message about multiple attributes not being assigned. This is normal and not a problem – it just means some optional fields were left empty.
Benefits of This Workflow
Using Excel and data table imports allows you to:
- Manage thousands of items efficiently
- Bulk edit multiple items at once
- Use Excel formulas to generate values (like scaling damage/cost by level)
- Easily share item data with designers who aren’t familiar with Unreal
- Version control item data separately from Blueprint assets
All this data is automatically linked to the inventory system. You don’t need to write any code to make new items work – just add them to the data table and they’re immediately usable.
Advanced Use Cases
Creating Custom Container Classes
You can create custom container classes by making child blueprints of BP_Inventory_Container. This allows you to override logic and implement special behavior for specific container types.
When to Create Custom Containers
Custom containers are useful when you need:
- Special logic for adding or removing items
- Custom initialization behavior
- Unique item filtering or organization
- Special UI handling
- Container-specific calculations
How to Create a Custom Container
- Create a child blueprint of BP_Inventory_Container
- Override the functions you need to customize
- Implement your custom logic in BeginPlay or other events
- Assign the custom container class in your container settings
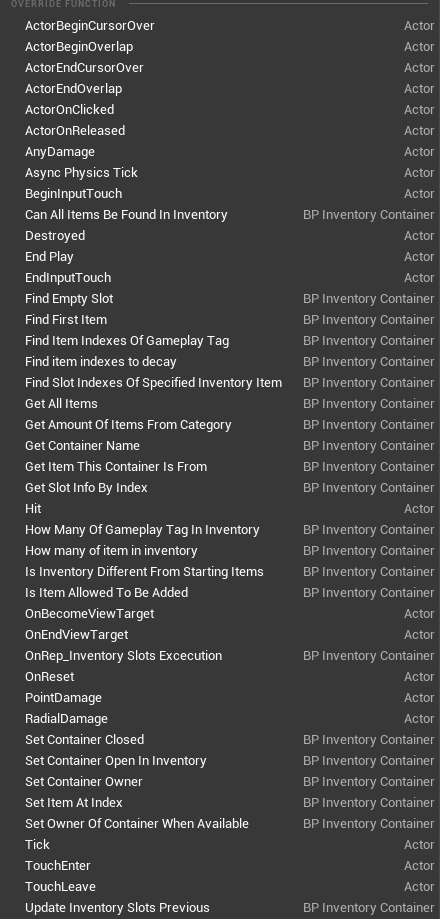
Overridable Functions
Common functions to override:
- AddItem: Custom logic for adding items
- RemoveItem: Custom logic for removing items
- GetAllItems: Return items in a specific way (see Jigsaw example)
- CanItemBeAdded: Custom validation for item acceptance
- Initialize: Custom setup when the container is created
Example: Full Mag Container
The Full Mag container is a custom container class that demonstrates how to implement specialized initialization logic.
Purpose
This container is used for weapons that need ammunition. When the weapon is created, the Full Mag container automatically:
- Determines what weapon owns this container
- Retrieves the weapon’s data to find the appropriate ammo type
- Calculates how much a full magazine should contain
- Adds the correct ammo to the weapon’s container
- Adds spare magazines to the container if configured
Implementation
The Full Mag container overrides the BeginPlay event:
- Get a reference to the item that owns this container (the weapon)
- Look up the weapon’s data in the item data table
- Read the magazine capacity and ammo type
- Add that ammo to the container
- If spare magazines are configured, add those as well
Using the Full Mag Container
To use this container for a weapon:
- In the item data table, find your weapon
- In Container Settings, set Custom Container Class to BP_Container_FullMag
- When the weapon is created, it will automatically initialize with ammunition
This pattern can be used for any item that needs intelligent initialization based on its data table settings.
Containers to Use for Any Actions
The inventory component has a setting called Containers to Use for Any Actions. This determines which containers are included in global inventory operations.
What Are “Any Actions”?
Functions like:
- Add Item to Any Container
- Check if Player Has Item
- Get All Items in Inventory
- Remove Item from Any Container
These functions don’t target a specific container – they work across multiple containers.
Default Configuration
By default, the system only uses:
- Default type containers
- Container Type containers (backpacks, etc.)
The system does NOT include:
- Equipment containers
- Crafting containers
- Other specialized containers
Why This Matters
This prevents issues like:
- Crafting checking if you have items in your equipment slots
- “Transfer All” moving equipped items
- Item searches finding items you can’t actually access
Customizing the List
If you want to change which containers are included:
- Use the GetAllInventoryContainersOfType function
- Specify the container types you want to include
- Pass that list to your custom function
For example, if you want a search that includes equipment:
- Get containers of type Default, Container, and Equipment
- Perform your search on that combined list
- Process the results
Note: If you change which containers are used for any actions, you may need to implement special logic for equipment and other systems to prevent unexpected behavior.
How-to Guides
How to Add a New Inventory Action
This guide explains how to create a new inventory action that appears in the context menu.
Step 1: Add to Enum
Start by adding the action to the enum_inventory_actions.
- Open the enum in the content browser
- Add a new entry with your action name
- Save the enum
Step 2: Add to Item Data Table
Add the action to the items that should have this action available.
- Open DT_Items
- For each item that should have the action, add it to the Inventory Actions array
- Optionally set it as the Default Action
If you need to add the action to many items, use the Excel import method to bulk edit.
Step 3: Add to Context Menu
Make sure the action is included in your context menu UI element.
- Open the inventory slot or relevant UI widget
- Find the context menu creation logic
- Ensure the context menu iterates through all available actions
- The system should automatically create buttons for all actions in the enum
Step 4: Add Button Text
The dropdown menu button needs to know what text to display for your action.
- Open UI_Button_Rectangle_Drop_Down
- Find the text selection logic (usually a Select or Switch node)
- Add your action to the list with appropriate button text
Step 5: Implement Action Logic
Add the actual functionality when the button is clicked.
- In UI_Button_Rectangle_Drop_Down, go to the On Clicked Logic
- Add your action to the Switch or Select node
- Create a custom event for your action functionality
- Implement the logic you want to execute
Example Implementation
For an “Examine” action that displays detailed item information:
- Create a custom event “Execute Examine Action”
- Get the item data from the button’s references
- Open an examination UI widget
- Populate it with detailed item information
- Display the widget
Step 6: Test
Test your new action:
- Add an item to your inventory that has the action
- Right-click the item
- Verify the action appears in the context menu
- Click the action and verify it executes correctly
That’s it! Your new inventory action is now fully functional.
How to Add a New Item
Adding items to the inventory system is straightforward thanks to the data table approach.
Step 1: Open Data Table
Open the DT_Items data table from the content browser.
Step 2: Add New Row
Click the “Add” button to create a new row in the data table.
Give the row a unique name (this is the item’s ID).
Step 3: Configure Basic Properties
Fill in the essential item properties:
- Item Name: Display name for the item
- Description: Text shown in tooltips
- Icon: Texture to display in inventory slots
- Mesh: Static mesh for world pickups
- Category: Gameplay tag for item classification
- Gameplay tag
Step 4: Configure Gameplay Properties
Set up the item’s gameplay characteristics:
- Stack Size: Maximum items per stack (1 for non-stackable)
- Weight: Item weight for encumbrance calculations
- Can Be Dropped: Whether players can drop this item
- Can Be Sold: Whether vendors will buy this item
- Value: Base price for trading
Step 5: Configure Actions
Set up which actions are available for this item:
- Inventory Actions: Add all actions that should appear in the context menu
- Default Action: Set the action that executes on double-click
Step 6: Configure Advanced Settings (Optional)
Depending on your item type, configure:
- Durability settings (for equipment)
- Decay settings (for perishables)
- Container settings (for backpacks and items that hold other items)
- Equipment slots (for equippable items)
- Crafting recipe (if the item can be crafted)
- Consumable effects (for food, potions, etc.)
Step 7: Save and Test
Save the data table and test your item:
- Add a Pickup Master to your level
- Select your new item from the item dropdown
- Play the game and pick up the item
- Verify it appears correctly in inventory
- Test that all actions work as expected
That’s all! Your item is now fully integrated into the inventory system.
For Bulk Adding Items
If you need to add many items:
- Use Excel to create a spreadsheet with all item data
- Export to CSV
- Convert to JSON
- Import into the data table
(See section 4 for detailed instructions)
How to Set Up Nested Containers
Nested containers allow items like backpacks to contain other items, creating hierarchical inventory organization.
Step 1: Configure Item Container Settings
Open DT_Items and find the item you want to make a container (e.g., a backpack).
In the Container Settings:
- Set Has Container: True
- Set Number of Slots: How many slots the container has
- Set Container Type: Usually “Container” for dynamically opened containers
- Optionally set Override Container Name
- Optionally add Starting Items
Step 2: Enable the Open Action
In the item’s Inventory Actions array:
- Add “Open” to the list of actions
- Optionally set “Open” as the Default Action
This allows players to open the container by double-clicking or right-clicking and selecting Open.
Step 3: Test Basic Container
Test that the container works:
- Add the item to your inventory
- Double-click or right-click and select Open
- Verify a container window appears
- Try adding items to the container
Step 4: Configure Advanced Settings (Optional)
You can configure additional settings
Allowed Items
Restrict what can be stored in the container using gameplay tags:
- Only weapons
- Only consumables
- Only resources
Custom Container Class
Use a custom container blueprint for special behavior:
- Organize items automatically
- Apply special rules
- Provide unique functionality
Starting Items
Pre-populate the container with specific items when created.
Step 5: Test Nested Containers
Test putting containers inside containers:
- Create two backpack items
- Put one backpack inside the other
- Open the outer backpack
- Open the inner backpack
- Add items to both backpacks
- Verify everything works correctly
Step 6: Test Save/Load (If Using Save System)
If your game has save/load:
- Create nested containers with items
- Save the game
- Load the game
- Verify all containers and items are restored correctly
The system automatically handles saving and loading nested container hierarchies.
Tips for Nested Containers:
- Don’t allow too many nesting levels (can cause performance issues and confuse players)
- Consider limiting what items can have containers (don’t let everything be a container)
- Use visual indicators to show which items contain other items
- Consider adding a weight reduction benefit for using backpacks to encourage organization
Nested containers are a powerful feature that allows for deep inventory organization and player expression in how they manage their items.