Emote system #
Contents
Introduction #
The Emote System is a lightweight, data-driven communication layer built on Gameplay Tags, a shared DataTable, and a generic radial menu. Rather than hardcoding each emote into Blueprint logic, the system reads emote definitions from data, converts them into radial menu segments at runtime, and executes the selected emote by tag.
In the supplied example, each emote is represented by a Gameplay Tag such as Emote.Wave or Emote.Point, paired with an animation montage, a radial menu icon, display text, and an optional world icon. The component stays intentionally small: UI selection produces a tag, the emote component resolves that tag into data, validates execution, and then plays the montage through the project’s replication-aware montage path.
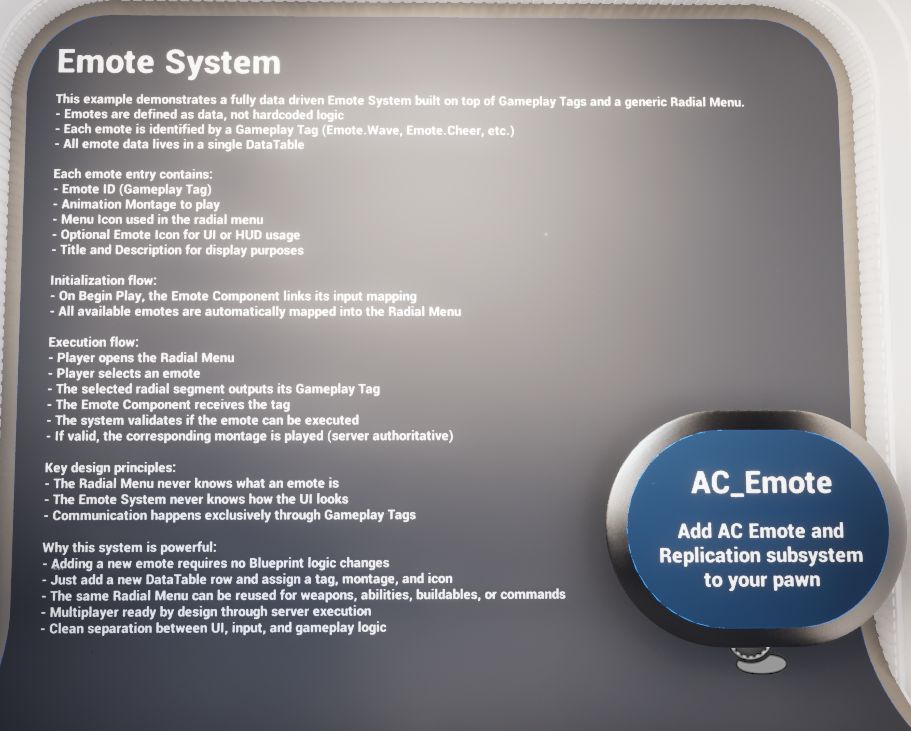
Demo overview billboard used in the example map.
Core Assets #
|
Asset |
Type |
Purpose |
|
AC_Emote |
Actor Component / system component |
Core emote logic. Links input, builds radial menu entries from the data table, receives the selected tag, validates execution, and plays the final montage. |
|
F_Emote |
Structure |
Defines the data for one emote entry. |
|
DT_Emotes |
Data Table |
Holds all available emotes in one place. New rows create new radial entries without changing Blueprint logic. |
|
BP_Emote_Billboard |
Blueprint actor |
Optional example actor spawned above the character’s head to display the emote icon in world space. |
Details Panel / Important Variables #
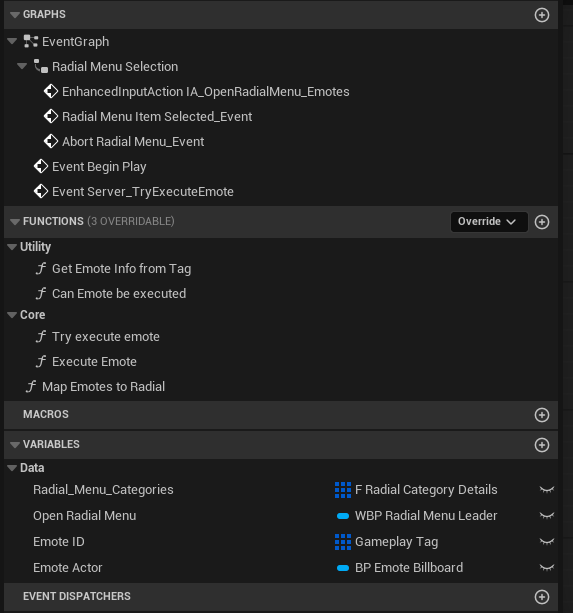
AC_Emote graph and variable overview.
|
Variable |
Type |
Role in the system |
|
Radial_Menu_Categories |
F Radial Category Details |
Container populated by Map Emotes To Radial. This is what the radial widget reads when the menu is created. |
|
Open Radial Menu |
WBP Radial Menu Leader |
Widget reference used when the player opens the emote radial menu. |
|
Emote ID |
Gameplay Tag |
Tag identifier representing the currently requested emote. The same tag is used to look up data in DT_Emotes and to identify radial segments. |
|
Emote Actor |
BP_Emote_Billboard |
Optional actor class used to spawn a world icon above the character when an emote is executed. |
Structure Explained #
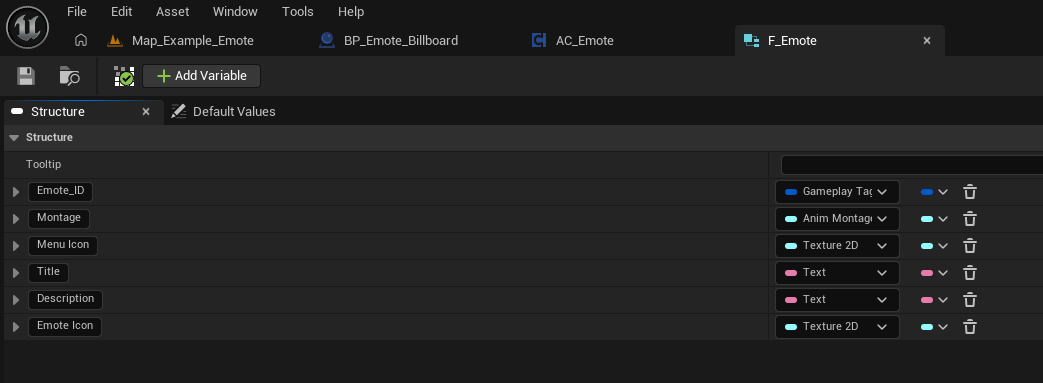
F_Emote structure.
F_Emote is the single payload structure used by the system. It defines everything the emote component needs in order to build UI and execute the result.
|
Field |
Type |
Purpose |
|
Emote_ID |
Gameplay Tag |
Unique identifier for the emote. This links the data row to the radial segment and later back into execution. |
|
Montage |
Anim Montage |
Animation montage played when the emote is successfully executed. |
|
Menu Icon |
Texture 2D |
Icon used inside the radial menu. |
|
Title |
Text |
Display name shown to the player in the menu. |
|
Description |
Text |
Optional explanatory text shown in the radial menu. |
|
Emote Icon |
Texture 2D |
Optional world-space icon used by the demo billboard actor above the character’s head. |
Data Table Explained #
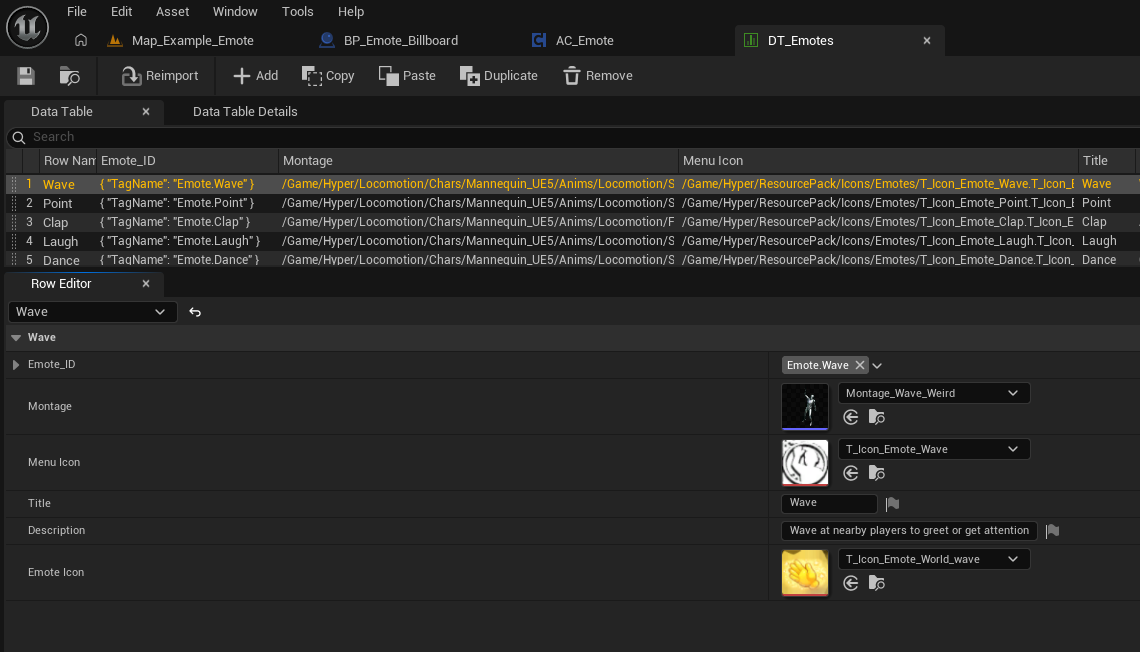
DT_Emotes example rows.
DT_Emotes is the source of truth for the system. Each row represents one emote and stores the tag, montage, menu icon, title, description, and optional world icon. In the supplied example, rows such as Wave, Point, Clap, Laugh, and Dance are all built the same way.
Because the component reads the table at runtime, adding a new emote is a content task rather than a Blueprint task. As long as a row is valid and contains a unique Gameplay Tag, the emote can be turned into a radial menu segment automatically.
Event Flow #
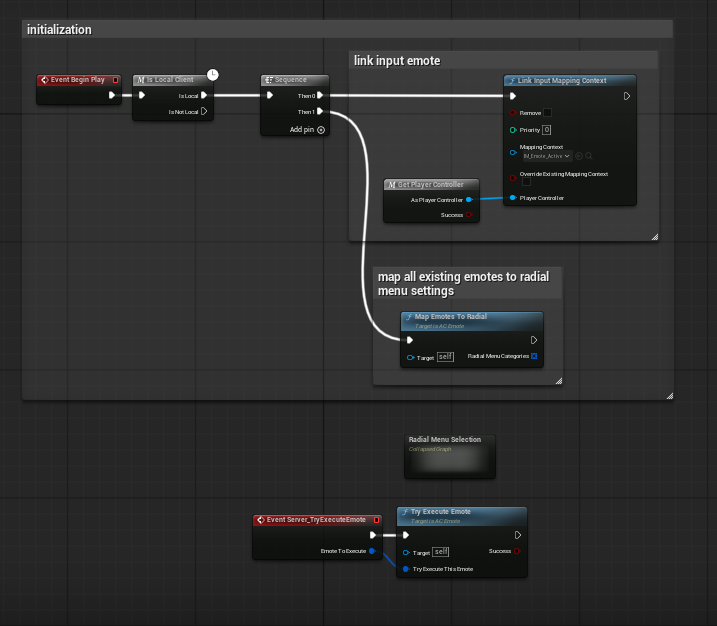
Initialization flow in AC_Emote.
Initialization is intentionally small. On Begin Play, the component checks for the local client path, links the emote input mapping context, and immediately calls Map Emotes To Radial so the radial menu categories are ready before the player opens the menu.
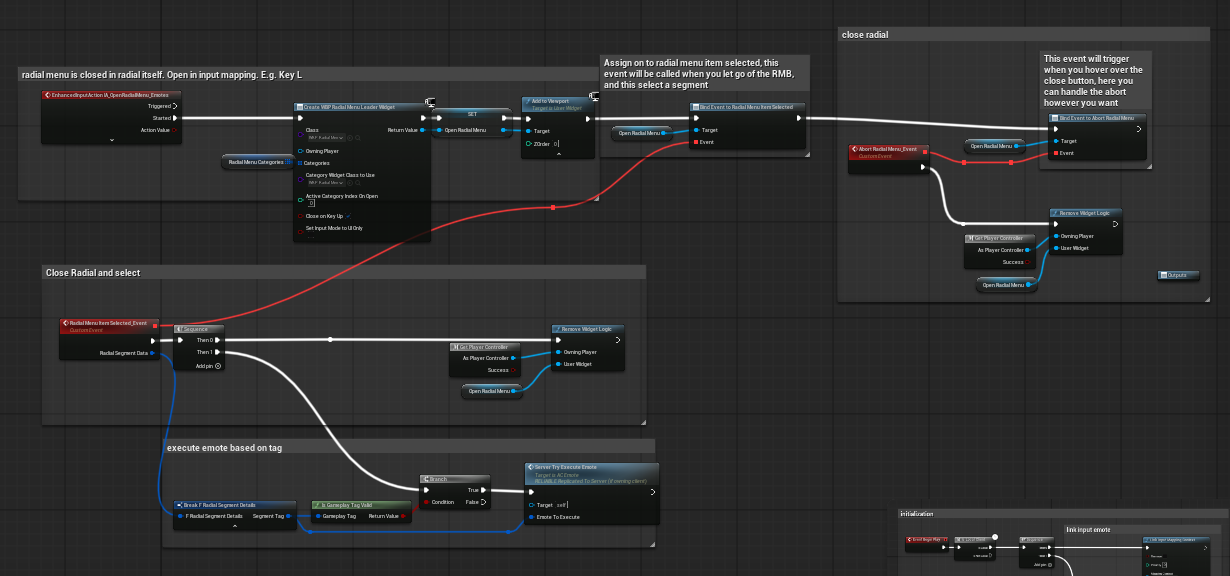
Opening the radial, binding selection, and passing the chosen tag to the server wrapper.
When the input action fires, the component creates the radial widget, supplies the prepared categories, adds the widget to the viewport, and binds two callback events: one for item selection and one for abort or close. When a segment is selected, the widget is removed, the segment tag is broken out of the radial segment struct, validated, and forwarded to the server-facing execute event.
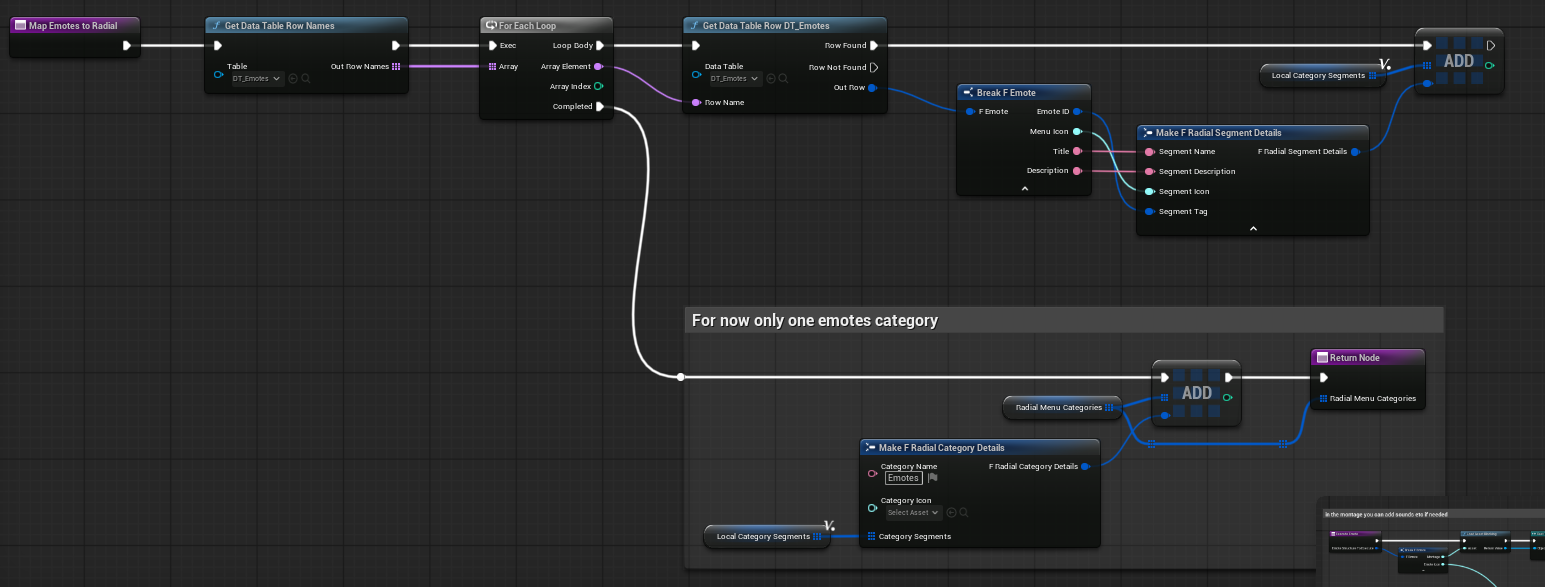
Mapping DT_Emotes rows into radial menu category data.
Map Emotes To Radial pulls every row name from DT_Emotes, reads each row, breaks F_Emote, then converts the title, description, menu icon, and Gameplay Tag into F Radial Segment Details. Those segments are gathered into a single category called Emotes. The current implementation notes that only one emote category is used for now.
Functions to Use #
|
Function |
Purpose |
Notes |
|
Get Emote Info from Tag |
Looks up the matching F_Emote from the emote tag. |
Returns success/fail and the emote struct. This is the bridge from Gameplay Tag back into emote data. |
|
Can Emote be executed |
Validation hook before playing the montage. |
Currently returns true. Intended extension point for conditions such as movement, combat state, stun, or already playing another emote. |
|
Try execute emote |
Main validation and dispatch function. |
Checks that the tag exists, stores the local emote struct, raises a script error when the tag is missing, then calls the final execute function if validation passes. |
|
Execute Emote |
Plays the montage and optionally spawns the emote icon actor. |
Loads the montage, routes playback through the replication-aware montage path, and optionally spawns/attaches a BP_Emote_Billboard above the head socket when an Emote Icon is valid. |
|
Map Emotes To Radial |
Builds radial menu categories from the data table. |
No per-emote Blueprint work is needed once the row exists in DT_Emotes. |
|
Server_TryExecuteEmote |
Server-facing wrapper event. |
Used after radial selection so the chosen tag is processed through the authoritative execution path. |
Demo Billboard Actor #

Example billboard icon in gameplay.
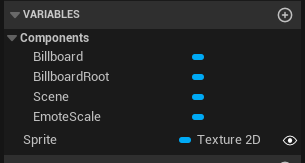
BP_Emote_Billboard components.
BP_Emote_Billboard is example presentation content rather than core emote execution logic. On Begin Play it sets the supplied sprite, plays a short EmoteScale timeline to animate the icon, updates the billboard root scale, and refreshes the sprite so the scale change is reflected correctly.
In Execute Emote, the component can destroy any previous billboard actor, spawn a fresh billboard if the Emote Icon is valid, and attach it to the character’s head socket. This creates the floating icon effect shown in the demo map.
How to Add Your Own Emote #
- Create a new Gameplay Tag for the emote, following the existing naming pattern such as Emote.Wave or Emote.Point.
- Open DT_Emotes and add a new row.
- Assign the new tag to Emote_ID.
- Set the Montage that should play when the emote is selected.
- Assign a Menu Icon for the radial menu.
- Fill in the Title and Description text that should appear in the menu.
- Optionally assign an Emote Icon if you want the world-space billboard to appear above the character.
- Because AC_Emote rebuilds radial data from DT_Emotes, no new Blueprint branch is required for a basic emote.
This is the main strength of the system: content creators can extend the emote list by authoring data rather than editing logic.
How to Change Menu Text / Icons #
- Edit the relevant row in DT_Emotes.
- Change Title and Description to update the radial menu text.
- Change Menu Icon to update the icon shown in the radial segment.
- Leave the Gameplay Tag unchanged if you only want to reskin an existing emote without changing how gameplay refers to it.
How to Change the Played Animation #
- Open the relevant row in DT_Emotes.
- Replace the Montage reference with a different Anim Montage.
- The execution graph resolves the montage from the emote struct at runtime, so the updated montage is used automatically.
- If you need sounds, notifies, or extra timing, add them inside the montage itself or extend the Execute Emote function.
How to Trigger an Emote by Tag #
- Use the emote’s Gameplay Tag as the input key for the system.
- For authority-safe execution, route the tag through the same server-facing wrapper used by the radial menu selection event.
- Internally, the tag is resolved through Get Emote Info from Tag, validated, and then executed through the same montage path as a player-selected emote.
This makes the component suitable not only for UI-driven emotes, but also for scripted interactions, AI commands, dialogue moments, or contextual prompts that simply pass in a known emote tag.
How to Add Execution Rules #
- Extend Can Emote be executed with your own gameplay checks.
- Typical checks would include movement state, weapon state, aiming, being stunned, being dead, being in dialogue, or already playing another montage.
- Return false when the emote should be blocked.
- Because validation is isolated in one function, you can add rules without rewriting lookup, UI, or execution.
How to Expand to Multiple Categories #
- The current graph creates a single category called Emotes.
- To support multiple categories, split rows into different local segment arrays based on a rule you choose, such as social, taunt, celebration, or command.
- Build one F Radial Category Details entry per group, then add each group to Radial_Menu_Categories before returning the array.
- This lets the same data-driven approach scale without changing the basic tag-based execution model.
In other words, the current implementation is already structured in a way that can grow; the only part that is currently hardcoded is the single category assembly step.
Summary #
The Emote System is a clean example of a small but well-decoupled data-driven feature. DT_Emotes defines the available content, F_Emote packages the data, AC_Emote converts that data into radial menu entries and executes the selected result by tag, and BP_Emote_Billboard provides optional world feedback.
For a buyer, the biggest benefit is that adding or changing emotes usually means editing data rather than editing Blueprint graphs. The current implementation is intentionally straightforward, but it already includes clear extension points for validation rules, alternative presentation, and future category expansion.
In practical terms, this makes the system easy to understand, easy to customize, and easy to integrate into a wider gameplay framework without tightly coupling UI, input, and animation logic.