Skip to content
Games by Hyper
Sign Up / Login
Games by Hyper

Generic

  • QuickStart
  • Support
  • Purchase Options
  • Roadmap
  • FAQ
  • Learning
  • For Professional Studios

Templates

  • Template Logic and flexibility

Shared Infrastructure

  • Gameplay Tags
  • Datamanagement
  • Folder Structure

Item Management

  • Inventory
  • Jigsaw Inventory
  • List Inventory
  • Respawn Actor Manager
  • Hotbar
  • Crafting
  • Item Allocator
  • Vendor
  • Icon Creator
  • Interactive Foliage
  • Inspection System

Interaction and Feedback

  • Interaction System
  • Outliner System

UI

  • Main Menu
  • HUD
  • Information Prompt

Locomotion

  • Animation Framework
  • Extended Movement Component
  • Leader Posing
  • Custom-Skeletal-Meshes

Combat

  • Attribute Manager
  • Team Affiliation
  • Equipment Manager
  • Ragdoll System
  • Ability System
  • Target Locking
  • Weapon Attachment System
  • Limb System
  • Combat-framework

Construction and Survival Mechanics

  • Building System
  • Mineable Rocks
  • Tree Cutting
  • Farming System
  • Fishing System
  • Swimming System

Game Management

  • Global Save System
  • Respawn System
  • Session Manager
  • Game Mode System
  • Spectate System
  • Player Manager
  • Team Manager
  • Score Manager
  • Guild Manager
  • Party Manager

Multiplayer

  • Online Multiplayer Framework
  • Replication Subsystem
  • Chat System
  • Console Command Manager

AI

  • Basic AI
  • NPC Behavior System
  • Perception System
  • Companion System

Exploration and Narrative

  • Dialogue System
  • Memory System
  • Quest Manager
  • Map System
  • Teleport System
  • Guide System
  • Event Manager
  • Visual Novel System
  • Dungeon Adventure Kit
  • Region Manager

Progression and Leveling

  • Level Manager
  • Unlock System
  • Reputation System

Security and Control Systems

  • Drone System
  • Lock System
  • Security System
  • Defense System
  • Defense System – Modern
  • Defense System – Primitive

Character and Player Systems

  • Character Creator
  • Class System
  • Mount System
  • First Person

Environmental Control and Immersion

  • Time and Day Night Cycle management
  • Weather System
  • Background Music System
  • Footstep System

Environment Building

  • Mesh to Actor Swap System
  • Auto Landscape
  • Cave
  • Deform
  • Ditch
  • Exclusion
  • Forest
  • Forest-Basic
  • Lake
  • Level Instances
  • Mesh
  • Path
  • Props
  • Spline
  • Village
View Categories
  • Home
  • Docs
  • Custom-Skeletal-Meshes

Custom-Skeletal-Meshes

2 min read

Custom-Skeletal-Meshes #

Custom Skeletal Meshes #

Every project has it's own characters, so there are several ways to incorporate your own skeletal meshes (SKM) into Hyper's systems.

Hyper frameworks use UE5's “Leader Pose” features that enable live animation retargeting.


Changing Your Skeletal Mesh #

If you are using any of the three MST projects (Starter, Plus, or Pro), using your own SKM is simple.

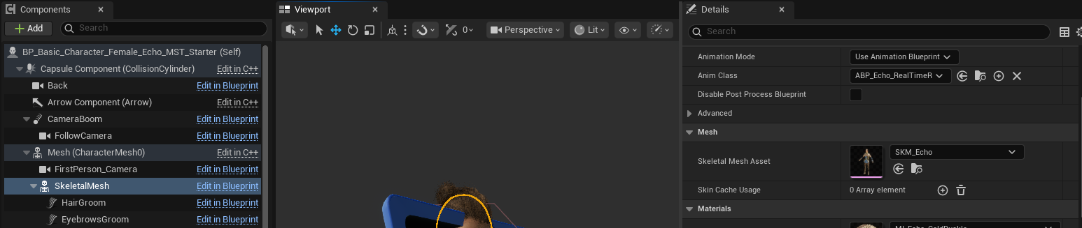
  • Select the child SkeletalMesh from your Character Blueprint Components (left).
  • Choose a new “Skeletal Mesh Asset” in the details panel (right).

Note that the free Echo character is used as the child mesh by default, and Echo includes custom grooms for eyebrows and hair. Depending on your own SKM needs, you may want to remove or replace those grooms.

How It Works #

This method is implemented by using a custom Animation Blueprint (e.g. ABP_Echo_RealTimeRetarget) that is attached to the child SKM in the Character Blueprint. This Animation Blueprint is very light-weight, making use of the "Copy Pose From Mesh" node to allow the child to copy animations directly from it's parent in the Character Blueprint.

Multi-Mesh Characters #

If you have modular or multi-mesh characters, simply make sure that every child SKM is assigned the same ABP and they should work seamlessly together.


Alternate Leader Pose Technique #

If you are working from scratch, you can quickly add Leader Posing via your Character Blueprint's construction script without needing a separate ABP. This is a matter of preference, and you should decide which approach to use based on your own workflows.

To start, simply add a child SkeletalMesh component below the default character mesh, then select it's custom “Skeletal Mesh Asset” in details.

To enable leader posing for child meshes…

  • Ensure that your child SkeletalMesh(es) do NOT have an animation blueprint assigned.
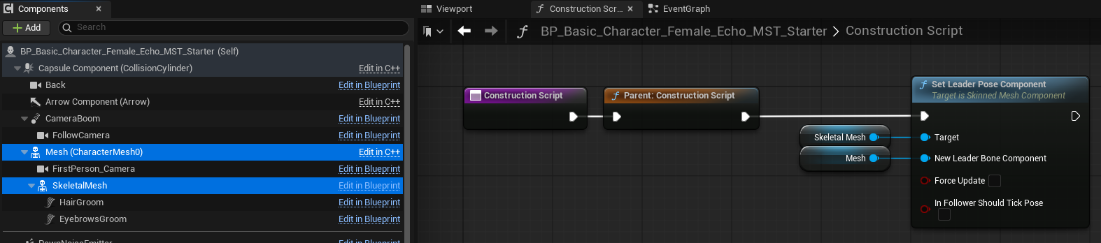
  • Open the Construction Script for your Character Blueprint.
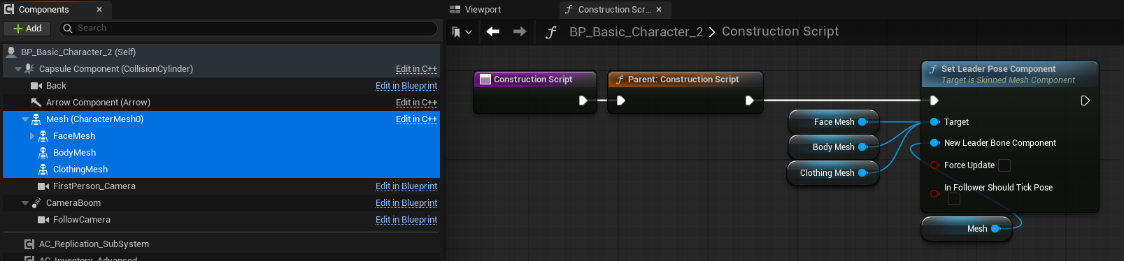
  • Add a “Set Leader Pose Component” node
  • Connect your child skeletal mesh to the “Target” input
  • Connect your parent skeletal mesh to the “New Leader Bone Component” input
  • Recompile, and you should see your new mesh running the parents animations.

You can also use this technique for multi-mesh characters, as shown below.

What are your Feelings
Still stuck? How can we help?

How can we help?

Table of Contents
  • Custom-Skeletal-Meshes
    • Custom Skeletal Meshes
    • Changing Your Skeletal Mesh
      • How It Works
      • Multi-Mesh Characters
    • Alternate Leader Pose Technique

© 2026 Games by Hyper

X Reddit Patreon Discord Linkedin YouTube

Review Cart

No products in the cart.

We noticed you're visiting from Austria. We've updated our prices to Euro for your shopping convenience. Use United States (US) dollar instead. Dismiss

  • Hyper Bundle Configurator
  • Shop
    • Game Templates
    • Courses
    • Loyalty Store
    • Survival Modules
    • RPG Modules
    • Environment Building
    • Browse All
  • My account
  • Become a Member
  • Cart
  • Get Help
    • FAQ
    • Upgrade your Game Template
    • Documentation
  • About Hyper
  • News & Updates