
Hotbar
Updated May 25, 2026
Important: Read the Inventory documentation first so the container system, item data, and slot update flow are clear before working with the hotbar.
Overview
The hotbar provides quick access to inventory items through keyboard shortcuts. In the current implementation, the hotbar does not store items directly. It stores references to items that still live inside allowed inventory containers.
For shared setup guidance, see the Migration Guide and Integration Guide. Use the System Atlas to look up functions, variables, events, components, and ownership references. Use this page for Hotbar-specific setup, runtime behavior, extension points, and integration notes.
Related setup: Set Up Inventory for the Player, Customize the UI.
This reference-based design keeps item state in one place. When the player uses an item from the hotbar, the system uses the referenced item from its container, updates the actual container slot, and refreshes the hotbar display from that source.
Related Videos
Version note: Some videos may have been recorded before V4. The concepts still apply, but asset names, component names, and folder locations may differ. Treat the written V4 documentation as the source of truth.
UE – Ultimate Inventory System – Dynamic linked Hotbar PlayHyper Inventory System walkthrough Play
Reference-Based Hotbar
The hotbar is an array of quick-access slots. Each slot points to an item in an allowed container instead of copying or moving the item into the hotbar.
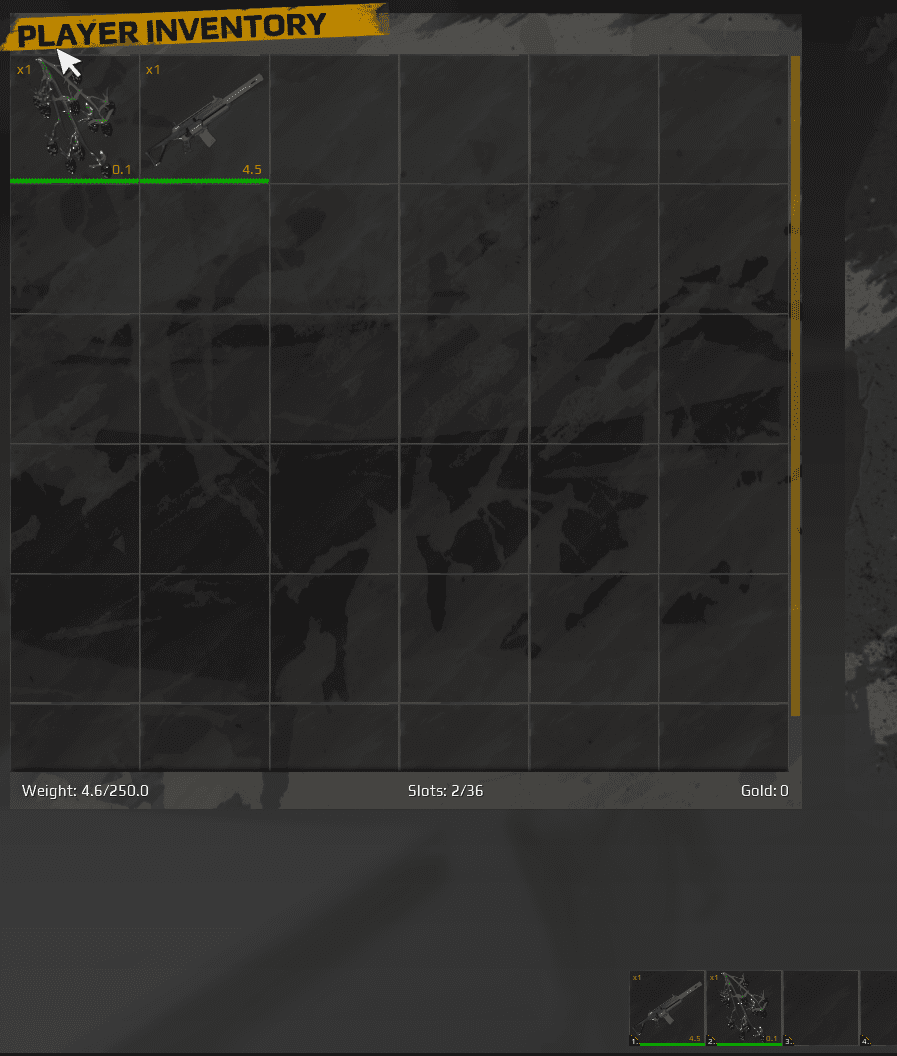
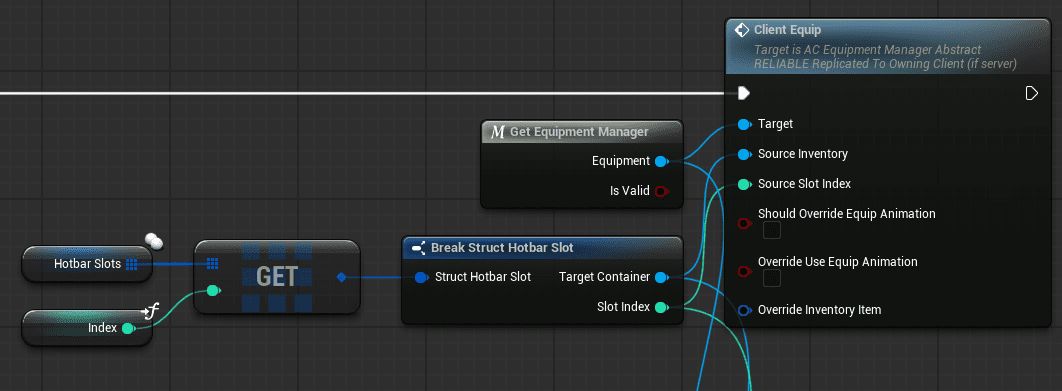
Each hotbar slot stores:
- Container Reference: The container that owns the item.
- Slot Index: The slot inside that container.
The hotbar uses those two values to retrieve item data such as icon, name, quantity, durability, and available actions.
The difference is important:
| Container | Hotbar |
|---|---|
| Stores actual item data. | Stores references to items in containers. |
| Owns quantity, durability, and item state. | Displays and triggers actions for the referenced item. |
| Changes when items are moved, consumed, or removed. | Refreshes when linked container slots update. |
Using references prevents item duplication, keeps inventory and hotbar state synchronized, and avoids maintaining separate copies of the same item data.
Container Reference Flow
When the player presses a hotbar key, the hotbar resolves the reference and uses the item from its source container.
- Read the hotbar slot for the pressed key.
- Get the linked container reference.
- Get the linked slot index.
- Query the item from the container, such as with GetItemAtSlot or equivalent logic.
- Retrieve the item data needed for display or action execution.
- Execute the item’s default action.
- Update the container and hotbar UI.
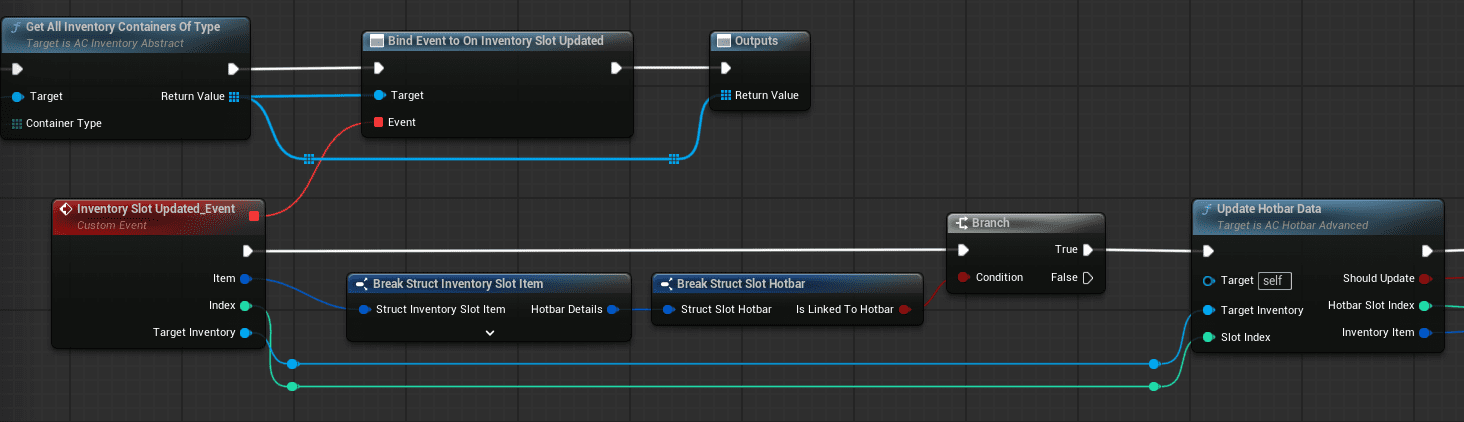
The hotbar binds to container update events so it can stay current when items are used, moved, removed, or changed. When a linked container triggers an update, the hotbar checks whether the changed slot affects any hotbar reference, then refreshes the affected display.
This keeps the hotbar accurate for quantity changes, durability changes, empty slots, and items that move between allowed containers.
Allowed Containers
The hotbar only binds to containers that are allowed for quick access. This prevents players from using items that are inside nested, unavailable, or specialized containers.
By default, the hotbar binds to:
- Default type containers, such as the main inventory.
- Equipment type containers, such as equipped item slots.
The hotbar does not bind to:
- Container type containers, such as backpacks inside the inventory.
- Crafting containers.
- Other specialized containers that should not be accessible from quick-use input.
For example, a potion inside a backpack cannot be linked to the hotbar. If the player moves that potion into the main inventory, it becomes eligible for hotbar linking.
Auto-Unlinking
If a linked item moves from an allowed container into a restricted container, the system automatically removes the hotbar link.
- The item is linked to a hotbar slot.
- The player moves it from the main inventory into a backpack or another restricted container.
- The system detects that the new container type is not allowed for hotbar access.
- The hotbar reference is cleared.
- The hotbar slot becomes empty.
- The item remains in the restricted container.
This avoids using items from closed or nested containers and keeps player expectations clear: only directly accessible items can be triggered from the hotbar.
When a linked item moves within allowed containers, the hotbar reference updates to the new container and slot. When the item is removed, consumed, dropped, sold, or destroyed, the hotbar slot clears.
Hotbar Actions
Link Item
Linking creates a quick-access reference from a hotbar slot to an item in an allowed container.
- Drag an item from the inventory.
- Drop it onto a hotbar slot.
- Validate that the item is in an allowed container and has an executable hotbar action.
- Store the container reference and slot index in the hotbar slot.
- Store the hotbar reference on the item data if the implementation tracks it there.
- Update the UI.
If validation fails, the link is not created and the player should receive feedback.
Delink Item
Delinking removes the hotbar reference without removing the item from the inventory.
- Right-click hotbar slot: Select the remove action, clear the link, and leave the item in its container.
- Drag away: Drag the hotbar slot outside the hotbar area and release to clear the link.
- Replace with another item: Drop a different item onto the occupied slot. The old link clears and the new link is created.
- Automatic delink: Clear the link when the item moves to a restricted container, leaves the inventory, or belongs to a container that is destroyed or unloaded.
Swap Item
Swapping changes the order of hotbar references without moving the actual items in their containers.
- Swap two occupied slots: Drag one hotbar slot onto another. The two references exchange hotbar positions.
- Move to an empty slot: Drag an occupied hotbar slot onto an empty slot. The reference moves and the original slot clears.
Implementation usually stores both references temporarily, updates each item or slot reference to its new hotbar index, and refreshes the UI.
Some implementations also support shortcut-driven swapping, such as modifier keys, drag previews, valid-drop highlights, animations, or sound feedback.
Alternative: Container-Based Hotbar
A container-based hotbar treats the hotbar as a real inventory container. Items are moved into hotbar slots instead of being referenced from another container.
In this model:
- The hotbar is created as a container with its own slots.
- Items move into the hotbar container.
- Hotbar keys use items directly from that container.
- The hotbar container can also appear in the main inventory UI.
| Reference-based hotbar | Container-based hotbar |
|---|---|
| Items stay in their original containers. | Items physically move into hotbar slots. |
| Requires reference tracking and auto-unlink logic. | Uses the normal container system. |
| Does not consume additional inventory space. | Hotbar slots are actual item storage. |
| More flexible quick access. | Often easier for players to understand visually. |
Use the container-based approach when the hotbar should behave like a limited quick-access inventory, especially for Minecraft-style survival inventory layouts. Use the current reference-based approach when quick access should not move items out of their original containers.
Configure Hotbar Slots
- Choose the number of hotbar slots. Five slots works for a small focused set; nine or ten slots is common for survival and RPG layouts; larger bars fit MMO-style setups.
- Set the hotbar slot array size in the character blueprint or hotbar component.
- Create input actions for each slot, such as Hotbar1, Hotbar2, and so on.
- Bind those actions to keyboard keys.
- For each input action, execute the default action from the linked item and safely ignore empty slots.
- Create the hotbar widget with one slot widget per hotbar index.
- Display the item icon, quantity, and keybind number for each linked slot.
- Bind to inventory slot update events and refresh affected hotbar slots when linked items change.
- Configure which container types are allowed for hotbar links.
- Test linking, using, moving, auto-unlinking, swapping, and delinking.
Custom Hotbar Actions
Custom actions are useful when a hotbar input should do more than execute the item’s default action.
Possible input patterns include:
- Hold to charge or aim.
- Double-tap for a special action.
- Modifier keys, such as Shift + hotbar key, for alternate behavior.
- Long press versus short press.
- Short input combos.
Typical implementation flow:
- Detect the input pattern, such as normal press, hold, modifier, or double-tap.
- Resolve the item referenced by the hotbar slot.
- Select the matching action from the item data.
- Execute that action.
- Provide visual feedback, such as tooltip text, modifier-state icons, progress bars for holds, or combo timing feedback.
- Test all input combinations for conflicts.
Example logic for a hotbar key:
- Get the item from slot 1.
- If Shift is held, execute the secondary action.
- Otherwise, if the hold timer is greater than one second, execute the charge action.
- Otherwise, execute the primary action.
Implement a Container-Based Hotbar
Use this path if the project should replace reference-based linking with a hotbar that behaves like a normal inventory container.
- Add a new container entry to the inventory component’s containers-to-spawn list.
- Set the container type to Hotbar, or create that type if needed.
- Set the number of slots, usually nine or ten.
- Bind the hotbar UI directly to the hotbar container’s slots.
- Allow items to move between inventory containers and the hotbar container using the normal transfer functions.
- On hotbar key press, get the item from the hotbar container at the pressed slot index and execute its default action.
- Show the hotbar container in the inventory panel if players should manage it there.
- Remove or disable reference-specific logic, including link functions, reference tracking, auto-unlinking, and hotbar container-type restrictions.
- Test item movement, item use, persistence, save/load, and moving items back to the main inventory.
The trade-off is straightforward: the code becomes simpler and item location is clearer, but players must manually organize the hotbar and items physically occupy hotbar slots.