Set Up Your Map to Play In
Updated May 25, 2026
Use this page to set up the GameMode, gameplay framework classes, required components, and world actors for your own playable map. The setup path depends on which Hyper systems your project uses, so follow the branch that matches your project instead of copying every option blindly.
Related setup: Use the Automatic Integration Tool, Migrate and Integrate Hyper, Set Up Your Own Character, Set Up Your Main Menu and Game Map, Set Up Your Game Environment.
Setup your gamemode, all classes and assign components
Pre-integrated files
- If you have many Hyper systems, use the pre-integrated files.
- If you used the Use the Automatic Integration Tool, it may already have generated much of this combined setup for you. Use this page to verify the generated GM_Hyper, components, world actors, and project-specific changes.
- The most important systems for this path are Save System, Respawn, and Main Menu.
- This is the setup used by most Hyper foundations, such as MST Pro.
- For most users, this is the fastest route. It takes only a few seconds and automatically adds the correct components.
- After using the pre-integrated files, continue with Component checks.
- If you do not use that combined setup, continue with Setup custom gamemode.
- The setup package is available here for verified users. After adding it, you may see several warnings. Compile the Blueprints and the warnings should clear.
Setup custom gamemode
If you do not use the pre-integrated GameMode, for example because you do not have respawn, saving, and main menu together, build your own GameMode from the systems you own.
1. Collect the required GameMode components
Start with the GameMode. Some Hyper systems override a GameMode function, so the correct setup depends on which systems are present in your project.
- Add all components that exist in your separate GameModes, such as Respawn Handler and Save Manager.
- Check the other GameModes you own to see which components are required.
- Be aware that some components are added dynamically, so compare against the relevant source GameModes before assuming a component is missing.
2. Choose the correct GameMode base
If you have MST Pro
Duplicate the MST Pro GameMode and use it as your base.
- If you also have GM_PlayerConnection, inherit your GameMode from GM_PlayerConnection.
If you do not have MST Pro
Your setup depends on the components and systems you have.
- If you have GM_PlayerConnection, inherit your GameMode from it.
- If you do not have GM_PlayerConnection, inherit from GameModeBase.
- If you only have Respawn, copy the code from GM_Respawn into your GameMode.
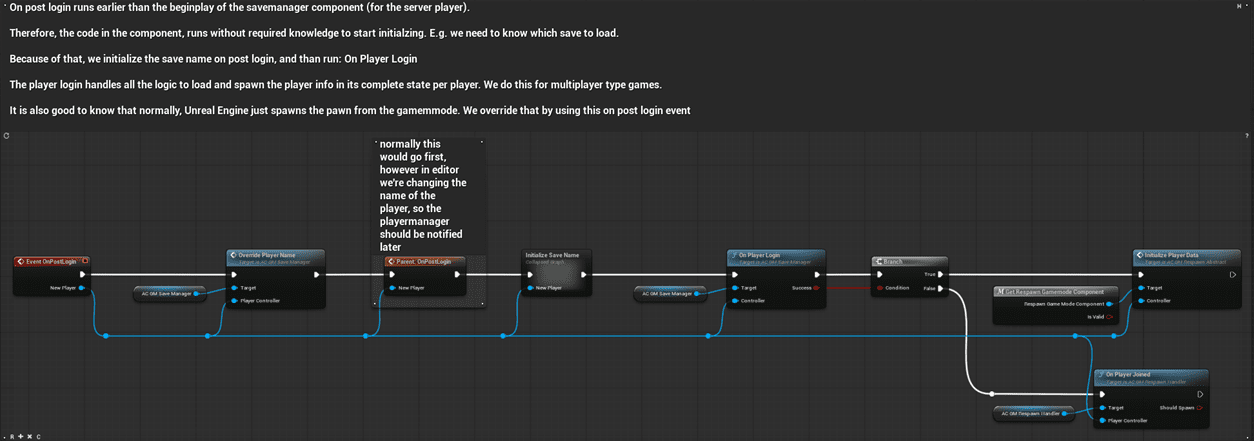
3. Add Save System or Respawn logic
If you only have Save System
- If you do not have GM_PlayerConnection, duplicate GM_Save_Game and use that as your base.
- If you have GM_PlayerConnection, recreate the code shown below.
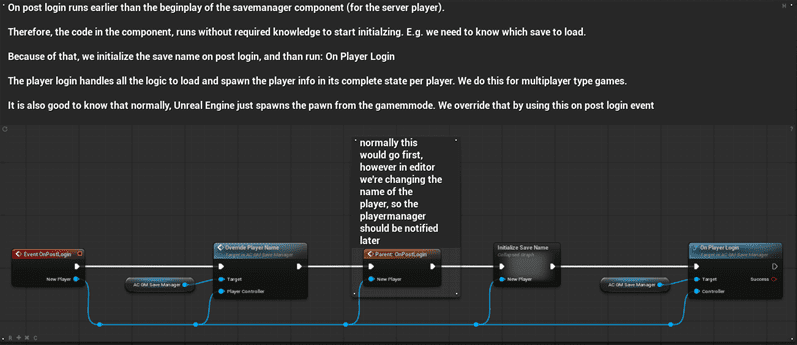
If you have Respawn and Save System
Copy the code shown below into your GameMode.
4. Add the other gameplay framework classes
Once you have created your GameMode, use the + icons on the right to add the other gameplay framework classes:
- Game State
- Player Controller
- Player State
- Default Pawn
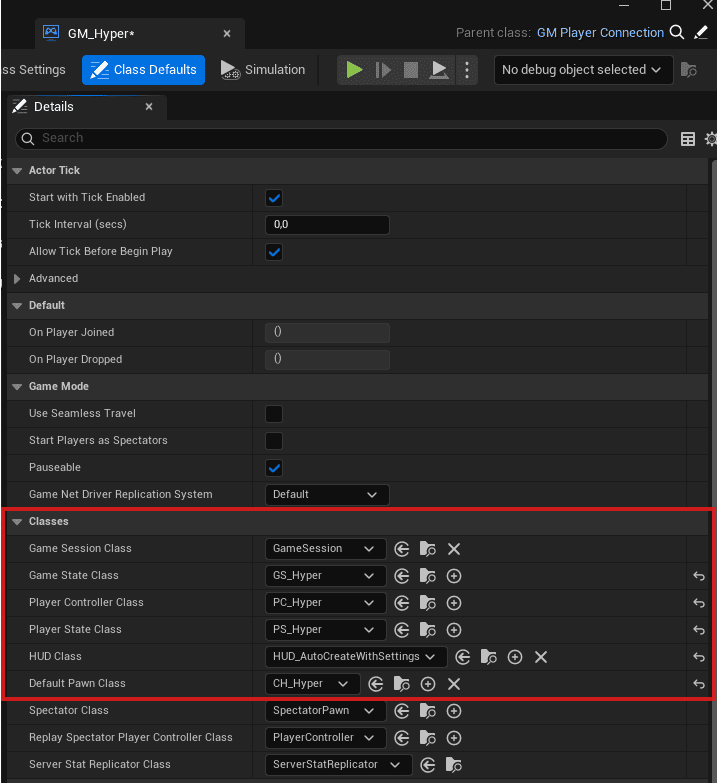
5. Select the HUD class
If you have a HUD class from Hyper, select it here.
- HUD_AutoCreateWithSettings is the most advanced option because it includes a settings menu.
- You have this class if you use a foundation with a main menu, such as MST Pro, or the main menu system.

Component checks
Once you have added all components, check the setup below before testing the map.
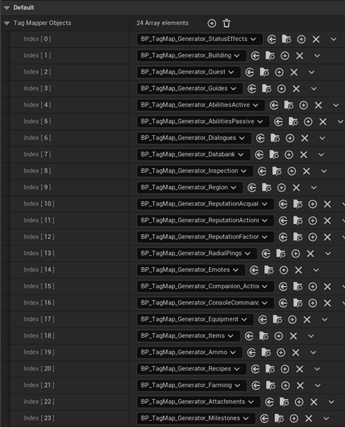
- AC_GS_TagMapper: this component has an array of tag mapper objects.
- Add every tag mapper object you have in your project to this list.
- If you downloaded the pre-integrated files, there may be a few invalid entries. Delete those invalid entries, otherwise you will get Message Log errors on BeginPlay.

- Character: select your inventory component and set the inventory type to InventoryTypes.Player.
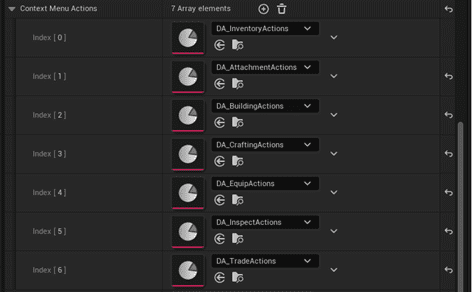
- AC_Inventory: open the Context Menu Actions array and add all options you have in your project.
- This enables or disables context menu options.
- For example, if you have the inspection system, its context menu can be added here.


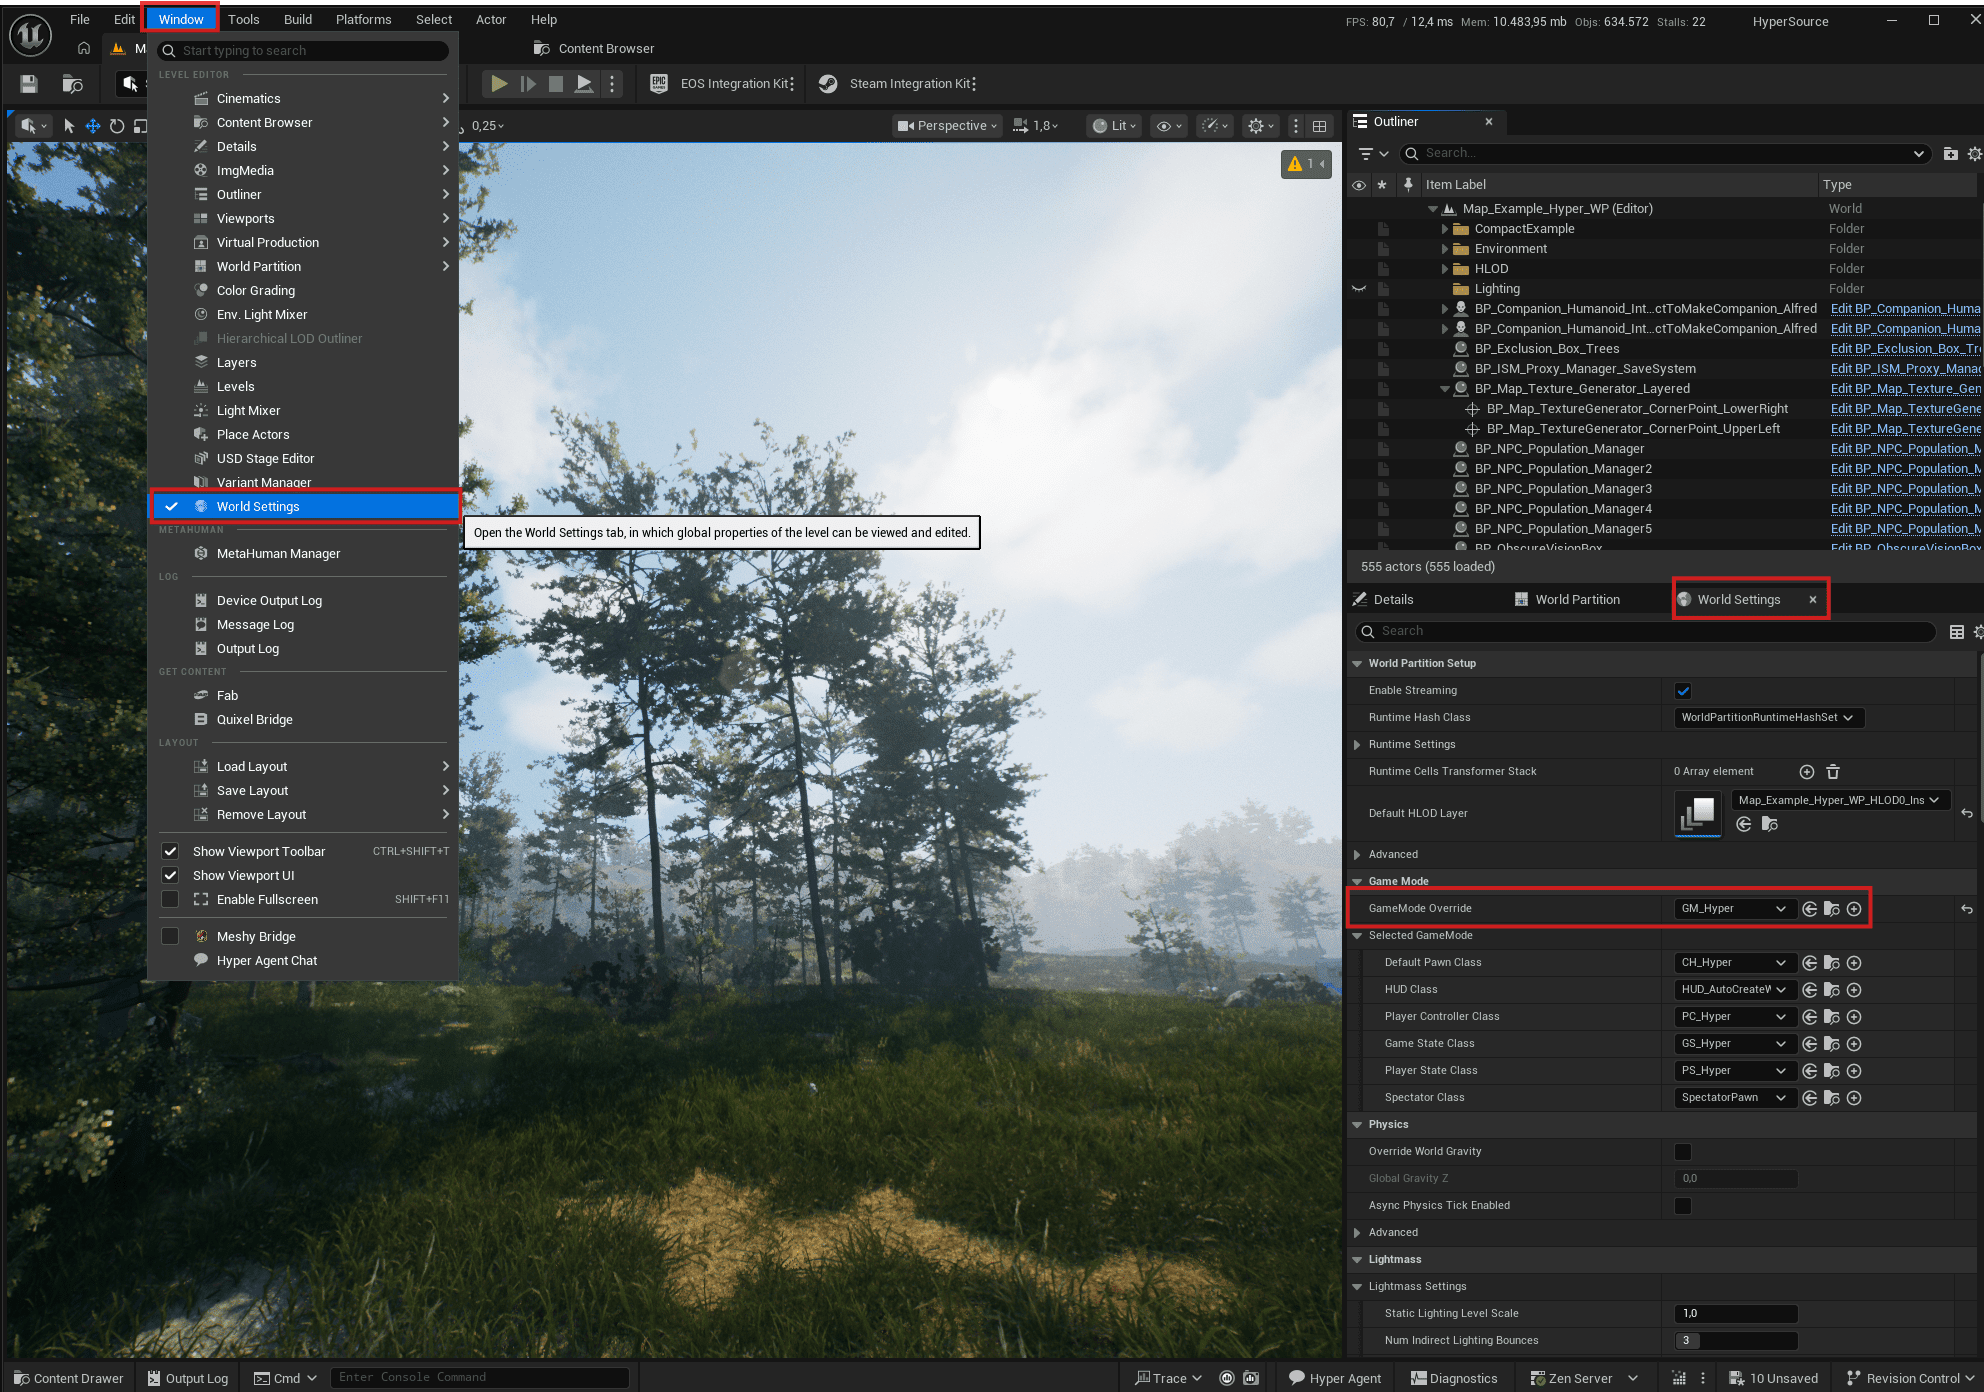
Assign the created gamemode
Assign the created GameMode in the World Settings.
Classes to place in world
- Some Hyper modules use actor classes that must be placed directly in the level or world.
- If your map uses the Mesh to Actor Swap system with ISM instances, also place the required proxy manager. See Place the ISM Proxy Manager.
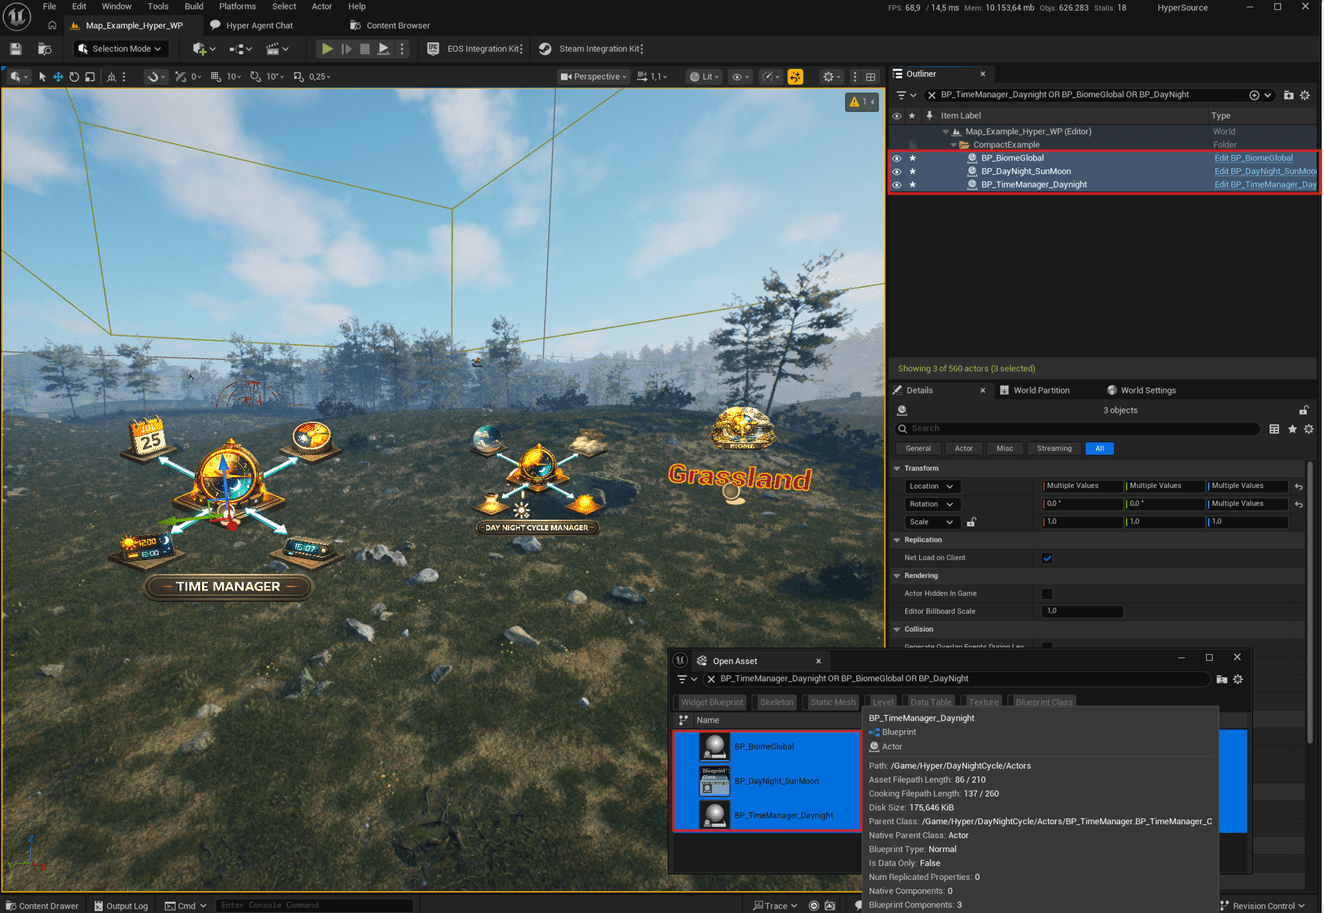
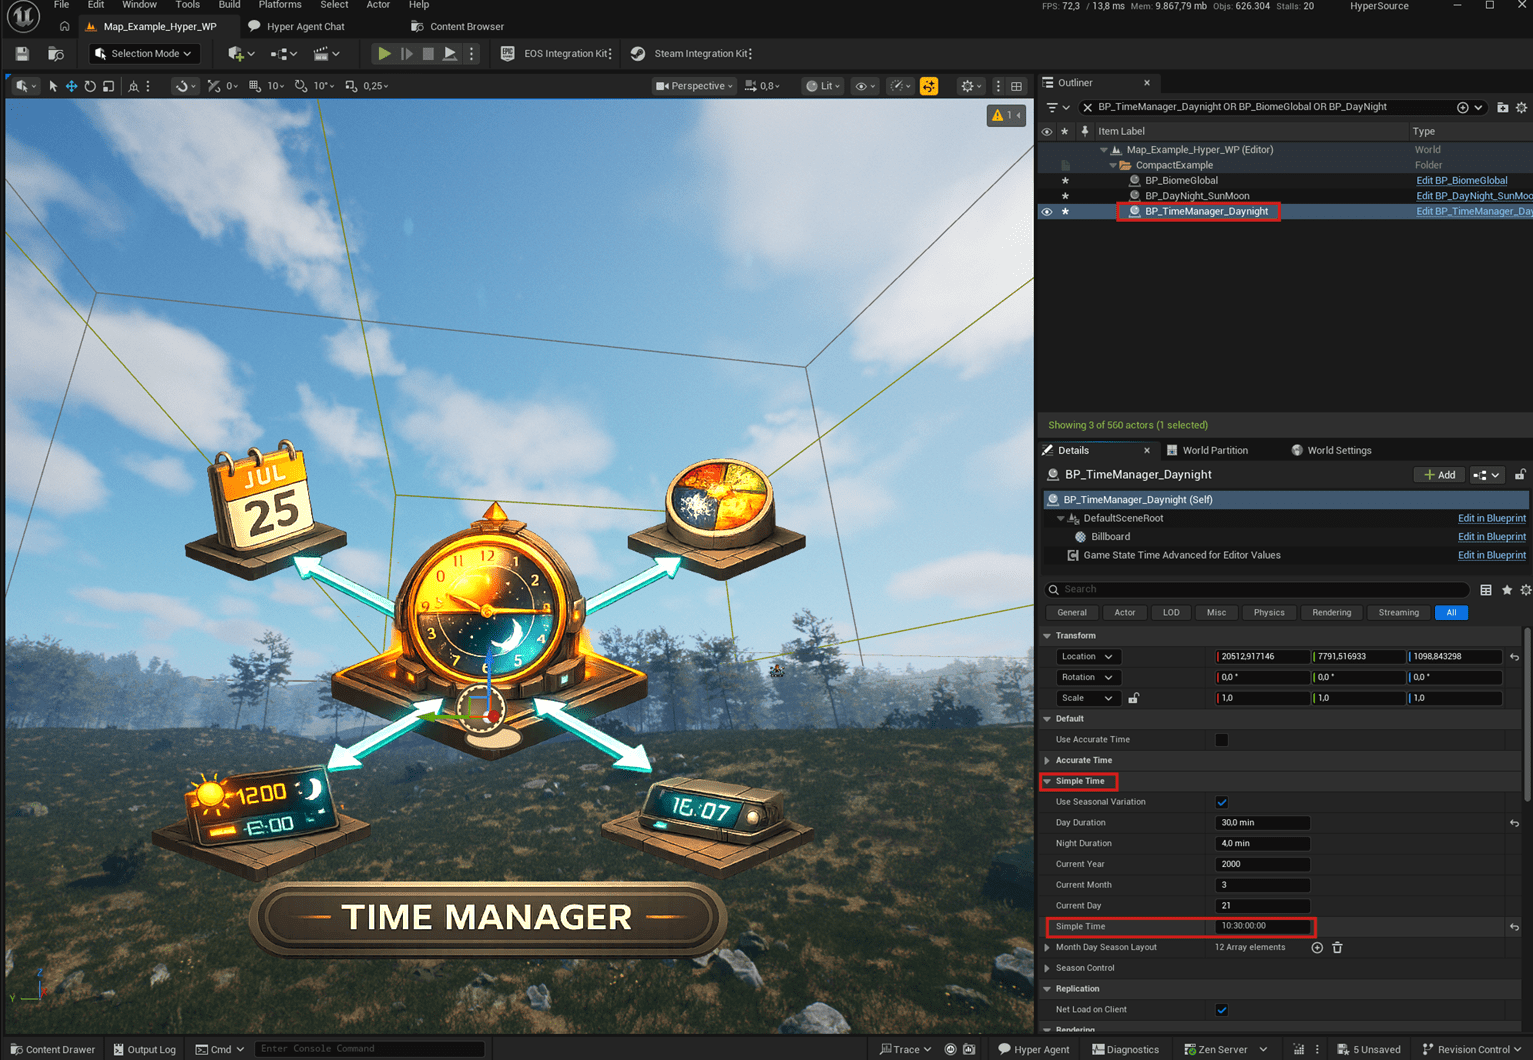
- If you have a weather system, day/night cycle, or time manager, including the routine time manager from NPC behavior, add the required actors:
- Drag BP_BiomeGlobal into the world.
- Drag BP_DayNight_SunMoon into the world.
- If you add the day/night sun and moon actor, remove old directional lights, fog, and similar actors because that setup is included.
- Drag BP_TimeManager_Daynight into the world.
- If you have BP_TimeManager_Daynight, use that version.
- If you do not have the day/night system, use BP_TimeManager.
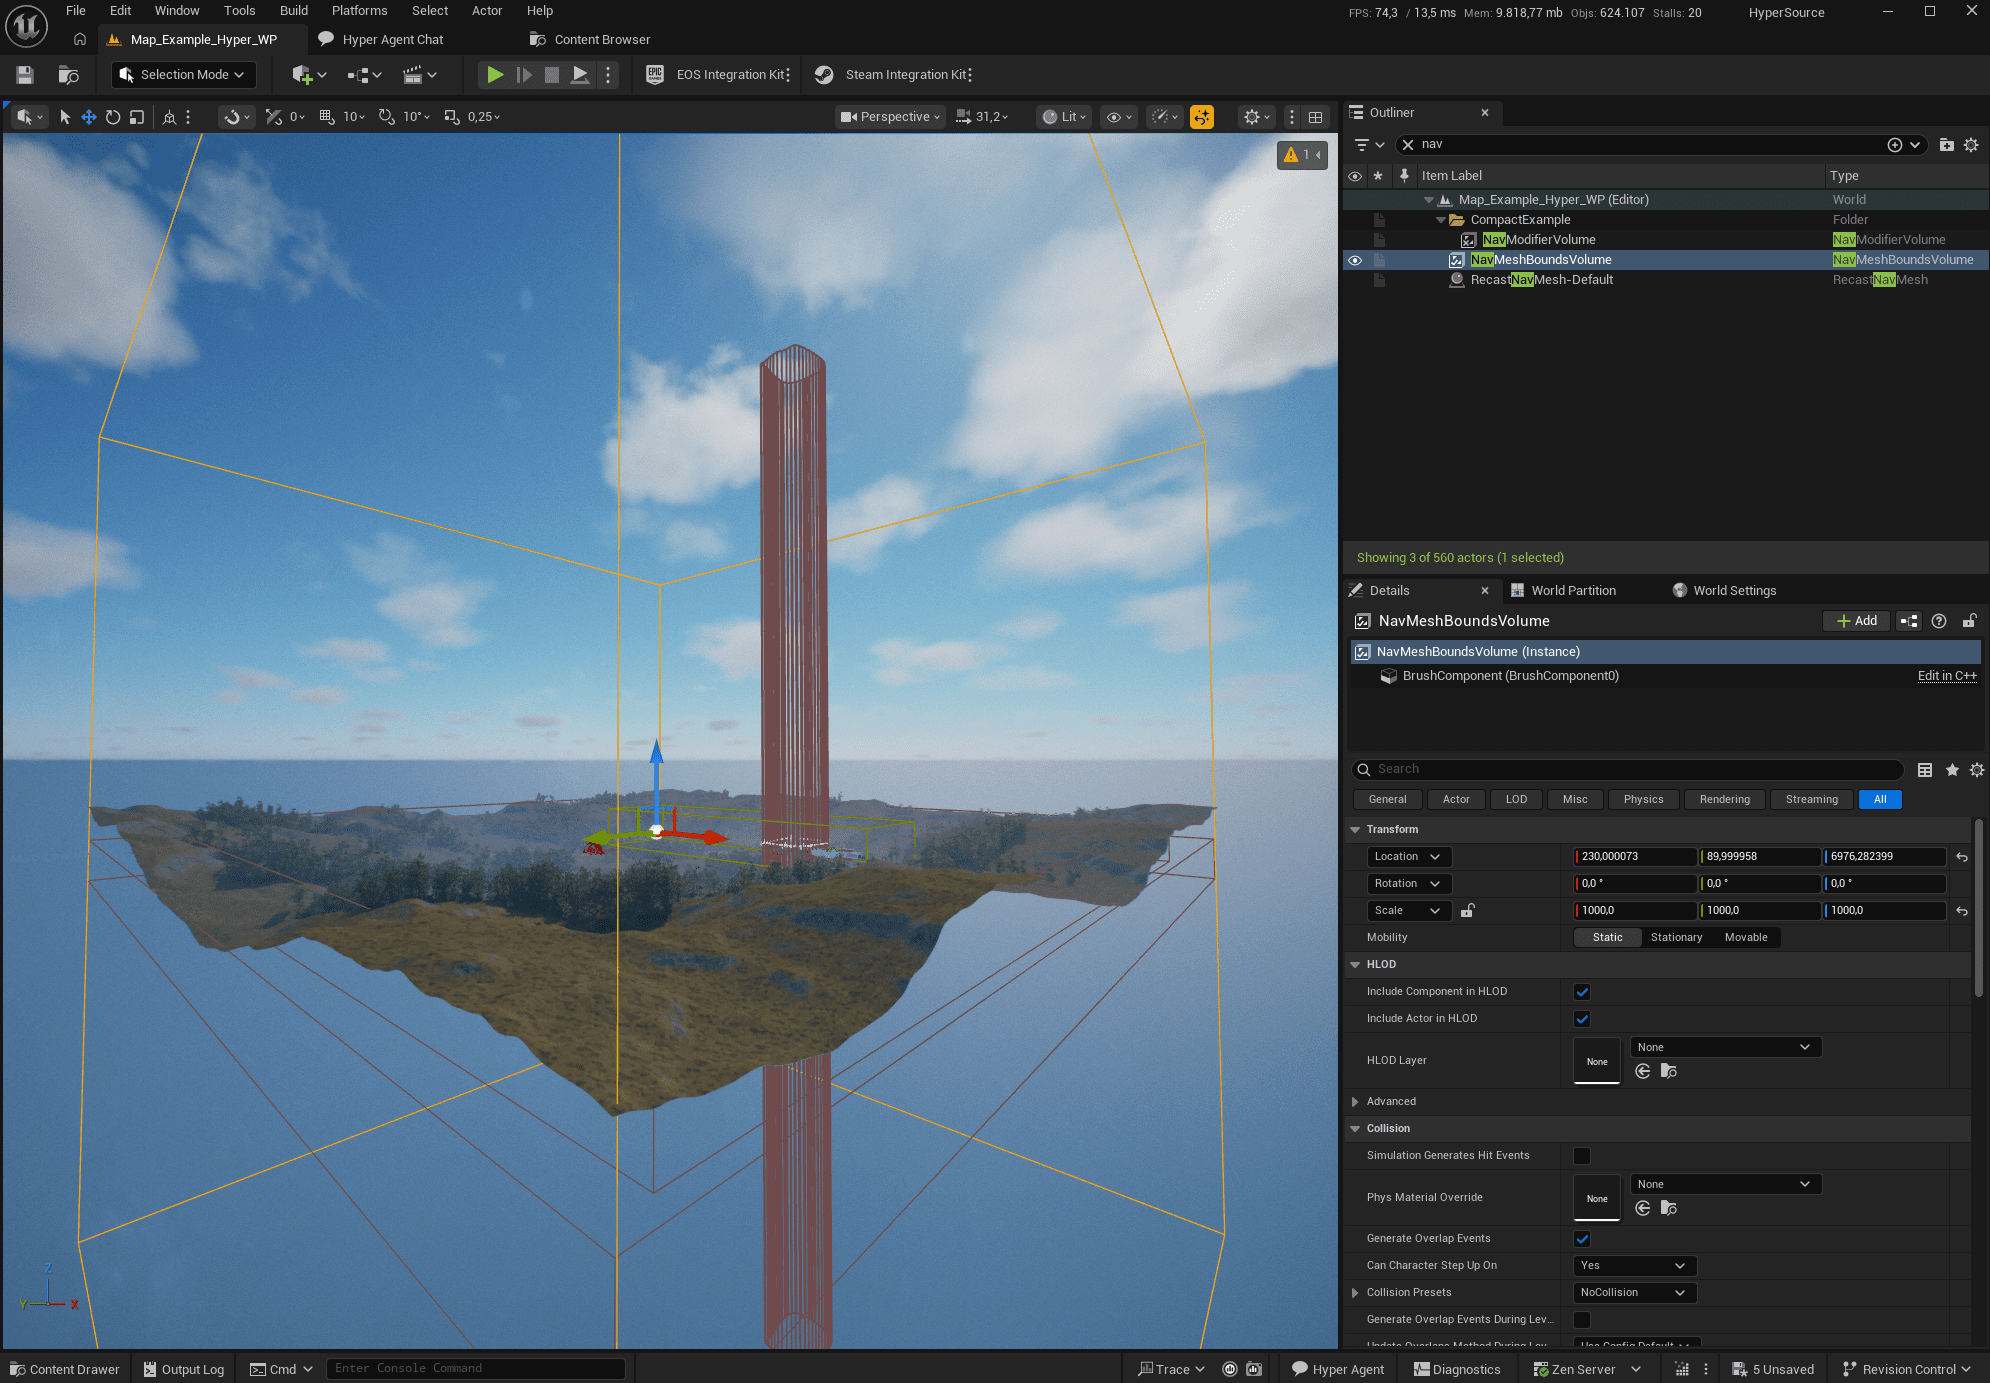
- Most systems use some form of navigation mesh, such as AI systems or random item spawning in a radius.
- Add a Nav Mesh Bounds Volume to the world.
- Make sure it covers the whole playable world.
Set the desired time settings
- To set the desired time settings, navigate to the simple time settings in the time manager.
- Set the desired time and date.
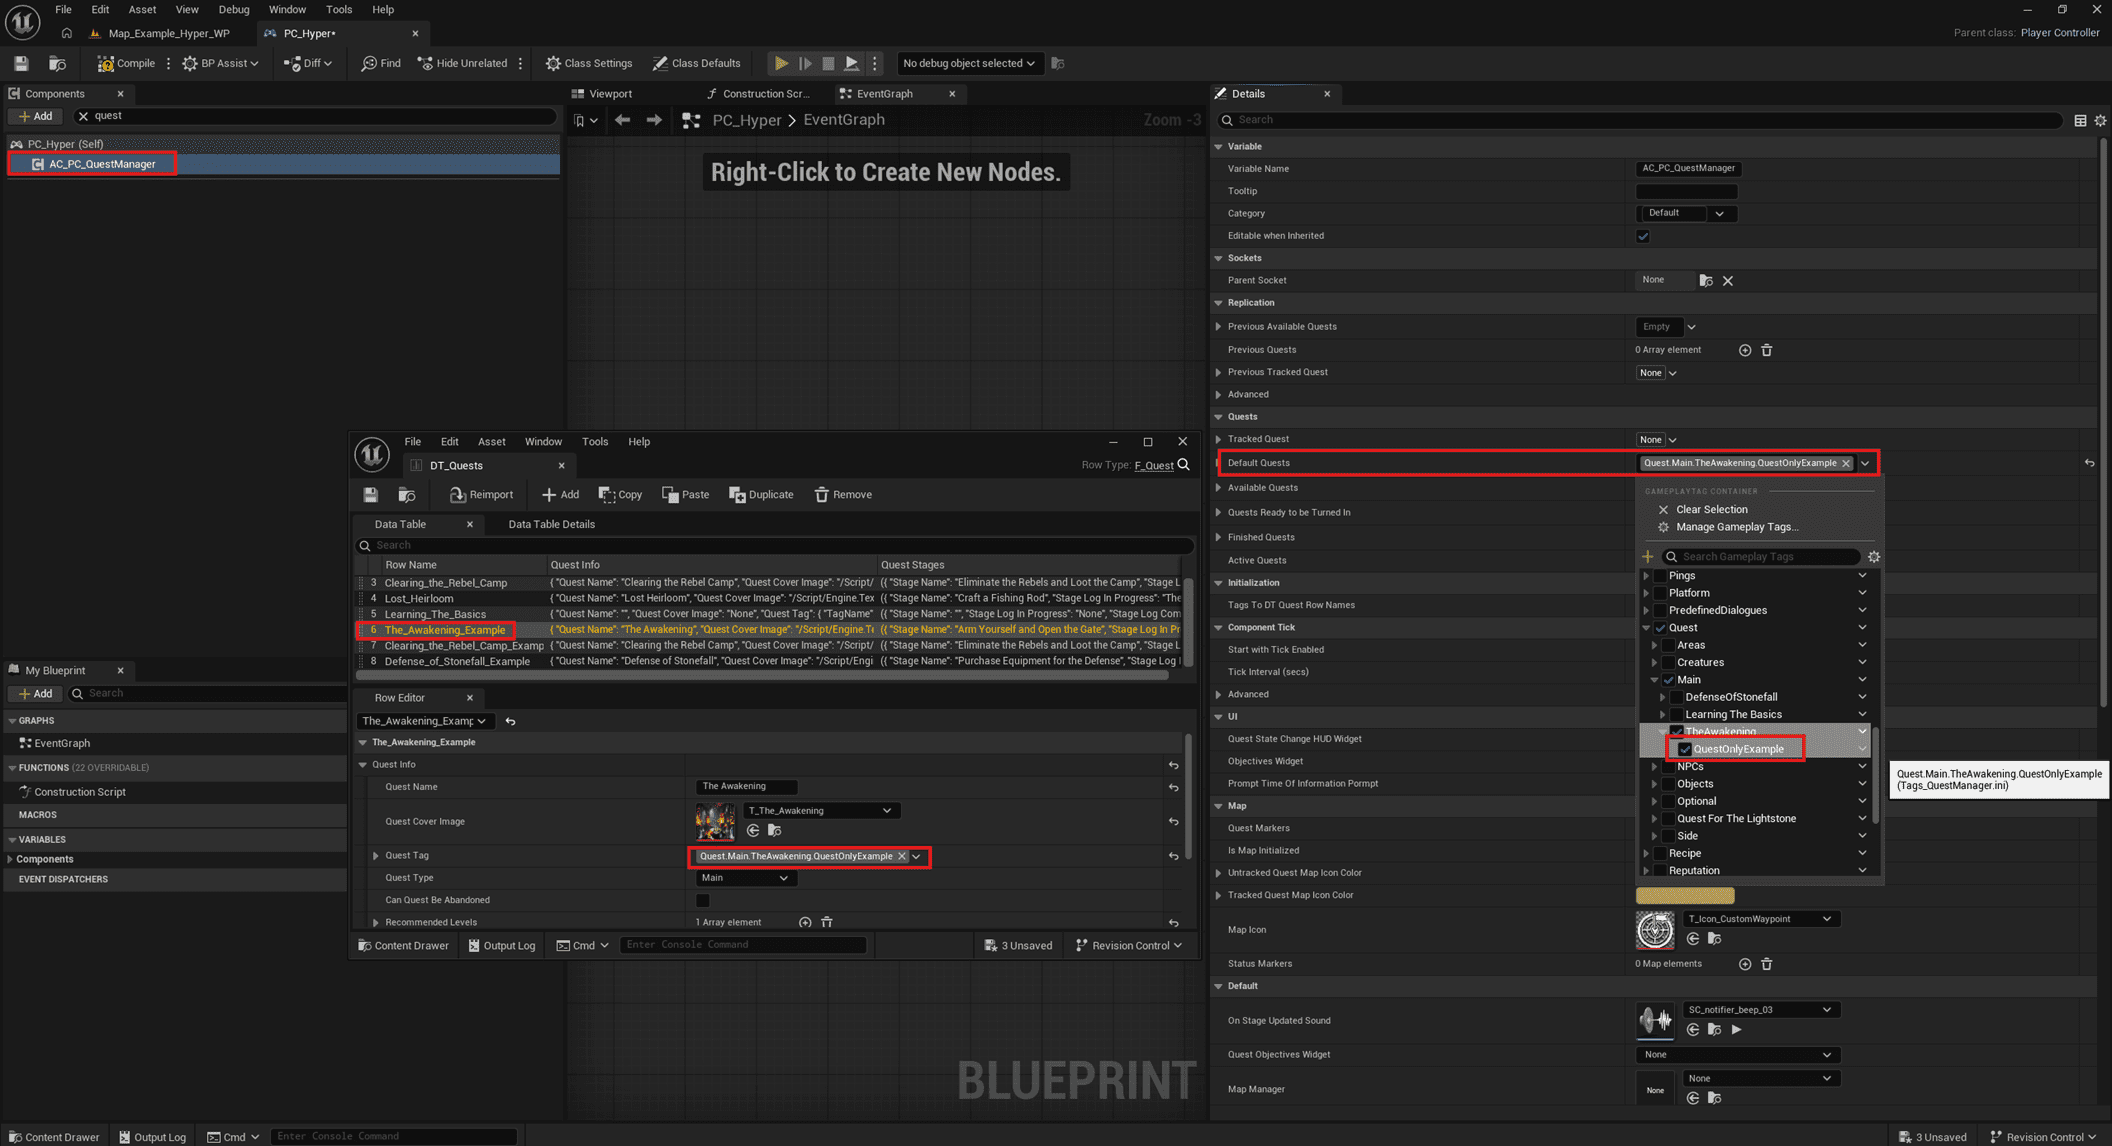
Assign initial quest
If you have a quest system, you may get a script error when the wrong initial quest is assigned.
- Open your Player Controller and select the QuestManager.
- Open DT_Quests and check which quest is available.
- Check the quest tag.
- Assign that tag in Default Quests for the quest you have set up or have available in DT_Quest.