
Online Multiplayer Framework
Updated May 23, 2026
The Online Multiplayer Framework (OMF) is a modular session-management layer for hosting, joining, configuring, and progressing multiplayer games. It handles the session lifecycle around menus, lobbies, game maps, playlists, game settings, and optional online subsystem integrations such as Steam or Epic Online Services.
For shared setup guidance, see the Migration Guide and Integration Guide. Use the System Atlas to look up functions, variables, events, components, and ownership references. Use this page for OMF-specific setup, subsystem integration, and session behavior.
Related Videos
Version note: Some videos may have been recorded before V4. Concepts still apply, but asset names, component names, and folder locations may differ. Treat this written documentation as the source of truth.
Online Multiplayer Framework devlog PlayHost and join lobbies and games with advanced setting management Play
What OMF Handles
OMF provides a reusable multiplayer flow for Games by Hyper assets and projects that need menu-to-lobby-to-game session handling.
- Host, discover, and join multiplayer games.
- Manage players, teams, scores, and game settings.
- Run playlist-based sessions with multiple games and per-game settings.
- Switch between Unreal’s local subsystem, Steam, or EOS through subsystem-specific components.
- Persist selected playlists, active game setup, and configured settings.
The framework focuses on session flow and project-side game configuration. It does not replace Steam, EOS, or their platform setup requirements.
Core Components
| Component | Role |
|---|---|
| AC_SessionManager_Base | Owns the main multiplayer lifecycle: hosting, lobby flow, game transitions, playlist progression, session cleanup, and subsystem selection. |
| AC_Session_Communicator | PlayerController-side bridge that sends client host, join, leave, search, and status requests to the Session Manager. |
| BP_Save_Session_Configuration | Stores current playlist, active game, configured settings, and session setup data. |
| BPI_GameSettingsDistributor | Interface used by actors or components that need to receive game settings. |
Session Flow
AC_SessionManager_Base manages the main flow through the game shell:
- Main Menu to Host Screen or Server Browser.
- Host or join into a Lobby.
- Transition from Lobby to Game.
- Return from Game to Lobby, or progress to the next game in a playlist.
OMF supports lobby-style and session-style games. Game settings can be tied to playlists, maps, game types, and custom rules, then applied dynamically per server or per game entry.
Online Subsystem Support
By default, OMF can use Unreal Engine’s built-in Online Subsystem for local network discovery and direct IP connections. For full online platform functionality, OMF can route session behavior through external integration plugins.
- Steam: Steam Integration Kit (SIK), Steam Integration.
- EOS: Epic Integration Kit (EIK), EOS Integration.
The subsystem layer handles platform-specific login, hosting, session discovery, joining, leaving, and related online calls. The core OMF session flow remains the same regardless of the selected subsystem.
OMF intentionally does not reimplement platform services. It connects the framework to the selected platform integration through compatibility files and subsystem-specific components.
Playlists and Game Settings
A playlist is a sequence of games. Each game can define its own game mode and settings, such as match duration, AI fill, or custom rule values.
To create and use a custom playlist:
- Launch the game and open the Host Game menu.
- Add or remove games in the playlist.
- Select game types for each entry.
- Adjust game settings for the selected game type.
- Apply and save the playlist.
- Select the playlist when hosting a session.
- Let the session progress to the next playlist game after each match when configured.
Add a Custom Game Setting
- Open Project Settings → Gameplay Tags.
- Create a setting tag, such as CustomSetting_YourName, under the game settings parent tag.
- Open the Game Mode defaults for the target game type.
- Select the default settings data asset, such as TeamDeathMatchDefaults.
- Add the custom setting and define its default value.
- Create or open a playlist and confirm that the setting appears for adjustment.
- For enum settings, add the setting to GetEnumValuesBySettingName in BFL Session Manager so values can auto-populate.
- Add BPI_GameSettingsDistributor to any actor or component that needs to receive settings through SendGameSettings.
- In world actors, loop over settings, switch on the gameplay tag, and retrieve the value by tag.
- When no actor instance is available, use the Session Manager’s GetGameSettingFromCachedConfig.
Add a Custom Game Type
- Open Project Settings → Gameplay Tags.
- Create a tag under the GameType parent tag.
- Open SessionManager_Base.
- Add the tag to the Game Types Gameplay Tag Container.
- Open BP_Save_Session_Configuration.
- Find the GameplayTagToPDA map.
- Add the game type tag and assign the data asset that contains default settings.
- Launch the game and confirm that the custom game type appears in the session list.
Playlist Mode vs Single Game Mode
Playlist mode is useful for shooter-style sessions that rotate through multiple games or maps. Single Game mode is better for sessions that host one persistent or save/load-driven game, similar to The Forest-style hosting.
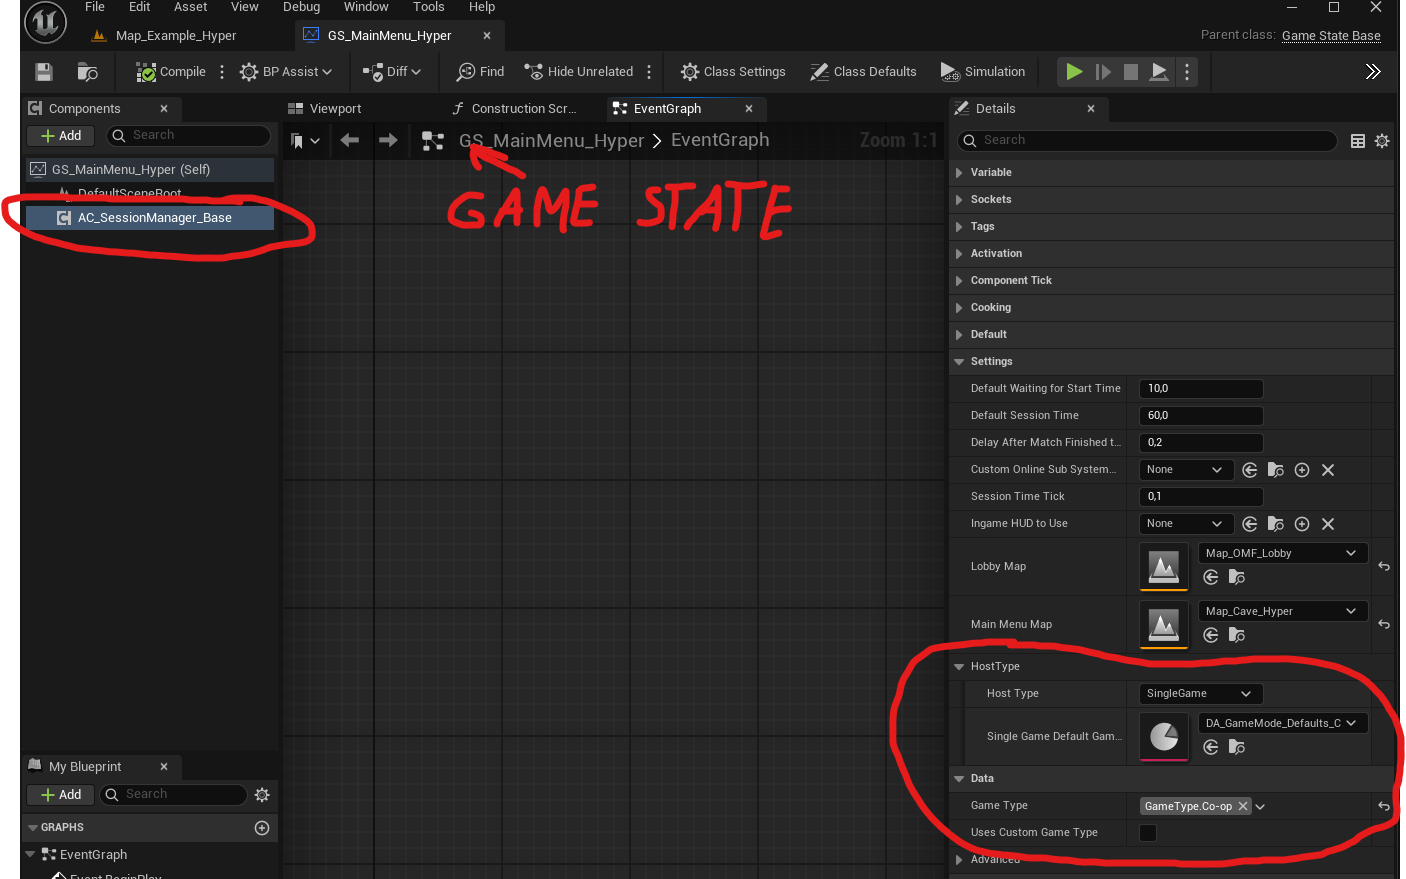
- Open the relevant Session Manager Base in the GameState where session management is placed.
- Find Host Type.
- Select Single or Playlist.
- Apply the same setting in both the main menu GameState and the in-game GameState.
Integrating OMF With MST Pro or Other Projects
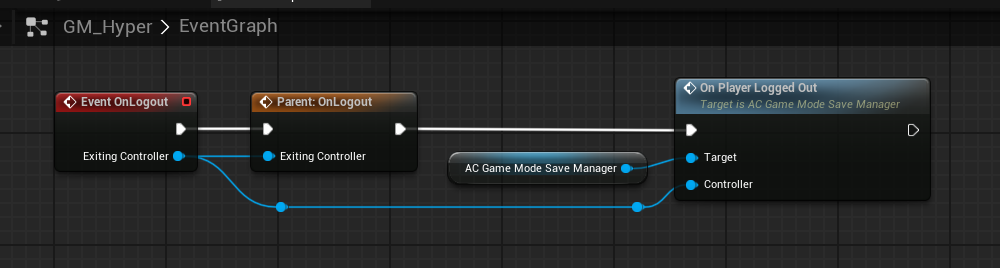
If you are not using the OMF playable map, make sure the playable map uses a game mode that inherits from BP_GameMode_PlayerConnection. The OMF project does this by default; other projects, such as MST Pro, may need to be configured manually.
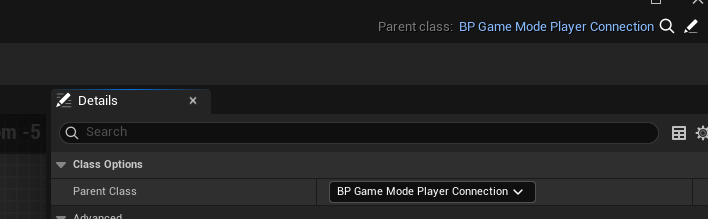
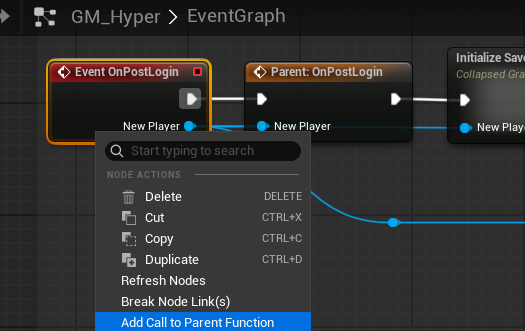
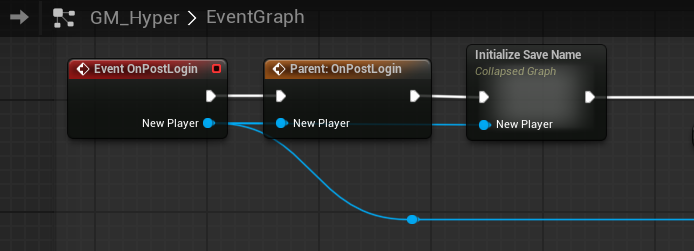
After setting the game mode parent, add calls to the parent function in the Event Graph for OnPostLogin and OnLogout.
Steam and EOS Integration Overview
OMF works out of the box with Unreal’s default local Online Subsystem for LAN and direct IP workflows. For Steam or EOS, install the appropriate Betide Studio plugin and OMF compatibility files.
OMF focuses on session and team management, playlist-based game flow, player and score tracking, and game configuration systems. It does not include the SIK or EIK plugin files directly for licensing reasons.
Official plugin resources:
- EIK documentation: https://eik.betide.studio
- SIK documentation: https://sik.betide.studio
OMF support covers the core OMF systems and the OMF subsystem compatibility layer. It does not cover Steamworks setup, EOS Developer Portal setup, credentials, login failures, package troubleshooting, or plugin installation issues.
Subsystem setup often requires Steam App ID configuration, EOS product and client setup, FIDs, artifacts, environment settings, and testing in packaged or standalone builds rather than PIE.
OMF implements login/logout, hosting, session discovery, joining, and leaving games. Other platform features such as achievements, matchmaking queues, purchases, or voice chat are not implemented by OMF, but the project can extend them in the GameInstance, Session Manager, Session Communicator, custom PlayerStates, or PlayerControllers.
Install Steam or EOS Support
Install either SIK or EIK before configuring OMF for that subsystem.
| Steam | EOS |
|---|---|
| SIK (Steam Integration Kit) | EIK (Epic Integration Kit) |
- Place the plugin in your project’s /Plugins/ folder or install it to the engine.
- Enable the plugin through Edit → Plugins.
- Restart the editor.
- Follow the plugin’s official installation guide for required setup.
The GitHub versions are free but require manual compilation. The Fab versions are precompiled and recommended for most users. OMF does not provide support for compiling these plugins or resolving SDK/build errors.
Install OMF Subsystem Compatibility Files
OMF provides compatibility files that connect OMF to the selected subsystem. These files handle login, session discovery, and join/leave events.
- Purchase OMF from Fab.
- Join the Discord: https://discord.gg/hNe9bha4D6
- Verify the purchase in the verification channel: https://discord.com/channels/829273511822491708/1300489878777106464
- Download the integration files from the forum post.
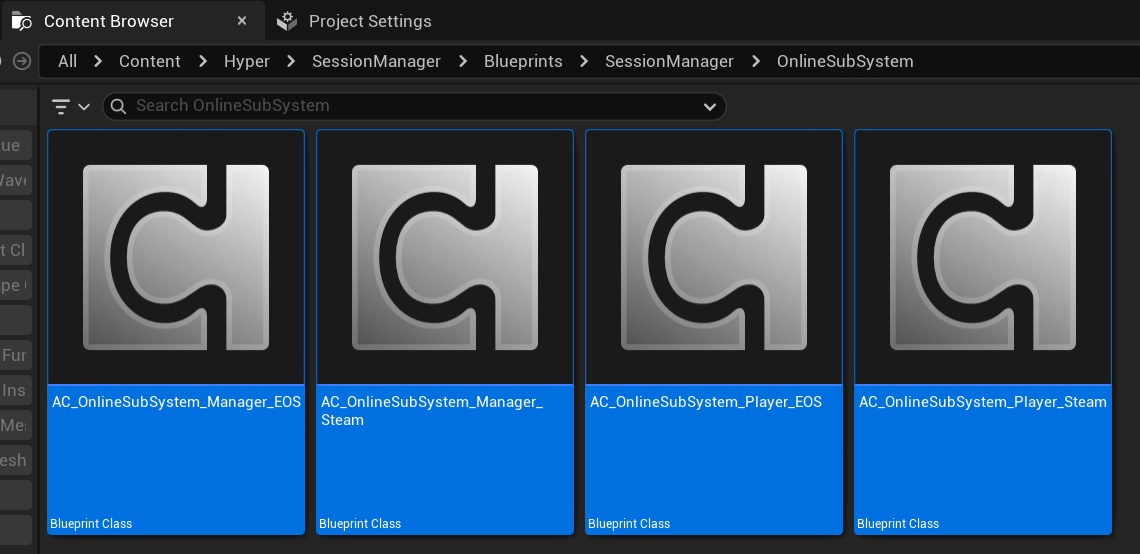
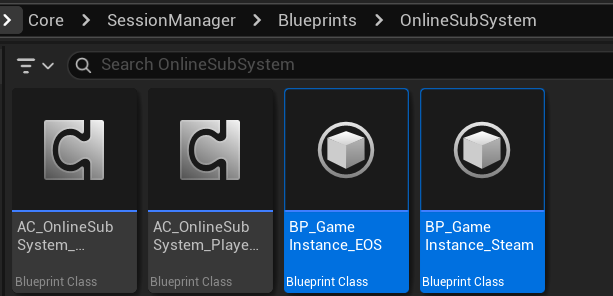
- Add the files to /All/Game/Hyper/SessionManager/Blueprints/SessionManager/OnlineSubSystem.
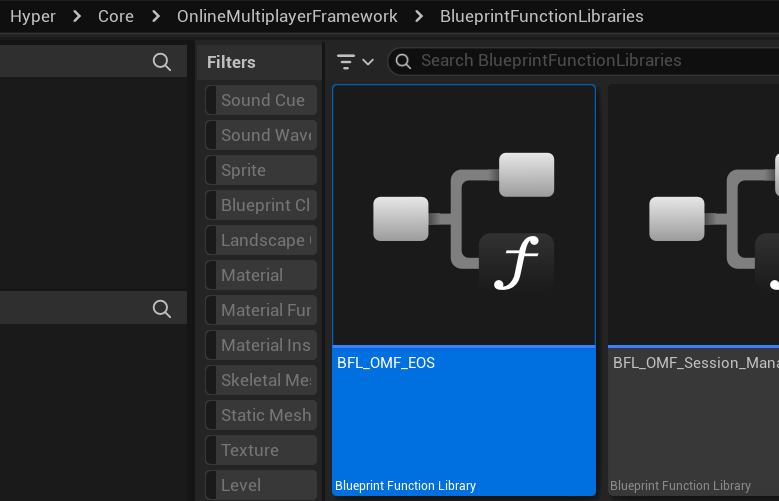
EOS uses its own compatibility files:
Apply Subsystem Components
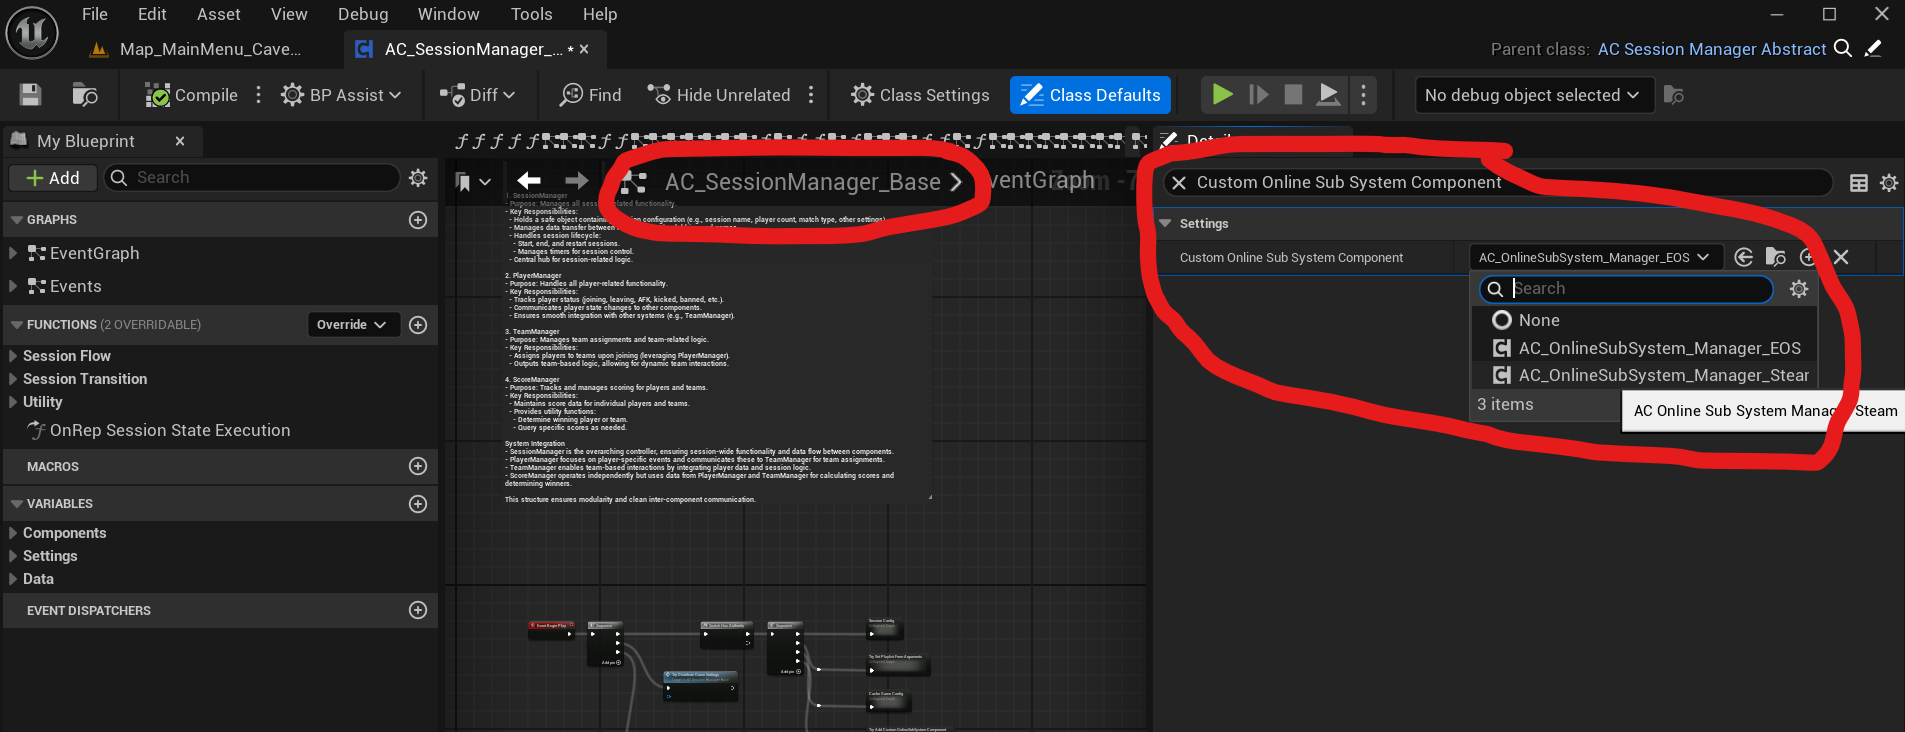
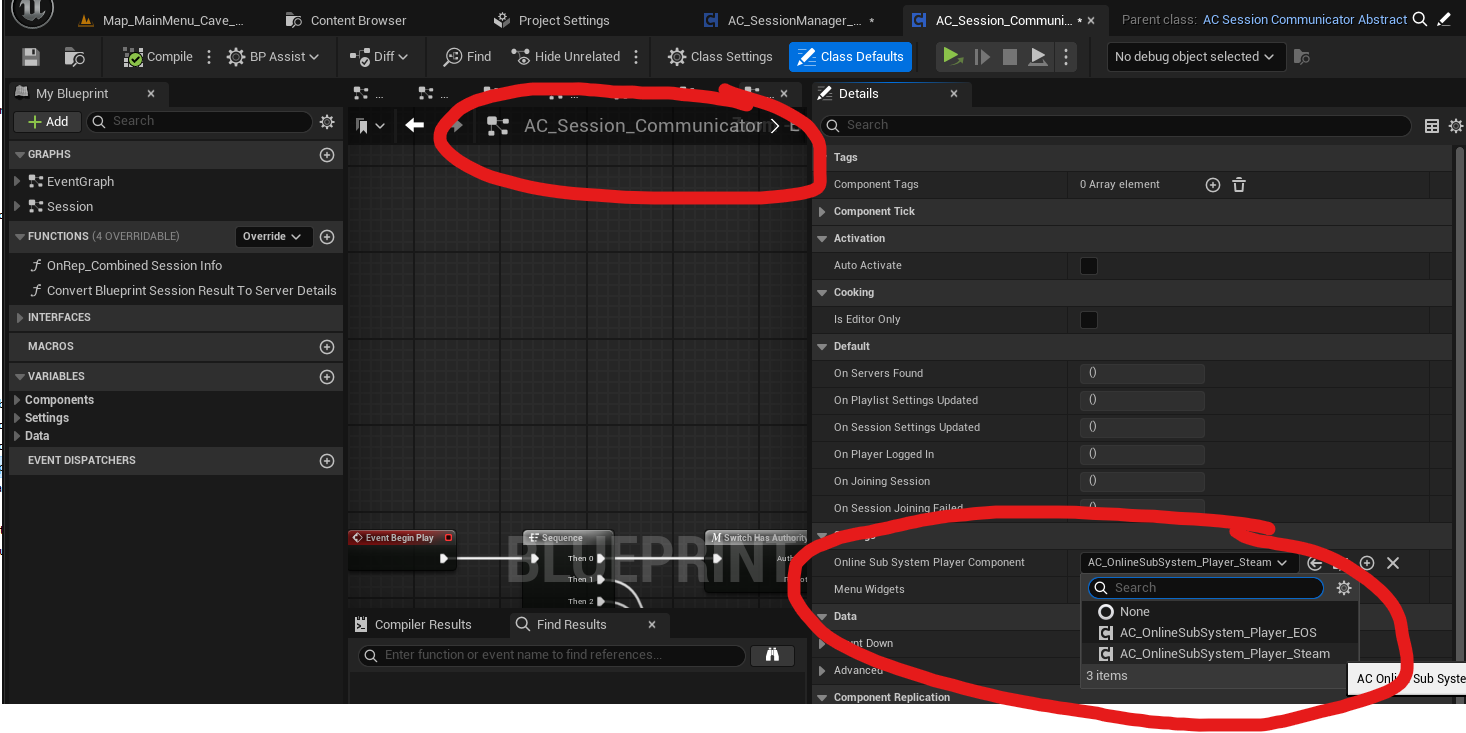
- Open AC_SessionManager_Base.
- In Class Defaults, find Custom Online Sub System Component.
- Select the subsystem component you want to use. If None is selected, OMF uses the default Unreal subsystem.
- Repeat the same configuration in AC_Session_Communicator.
- Confirm that the selected components route subsystem logic through the new integration files.
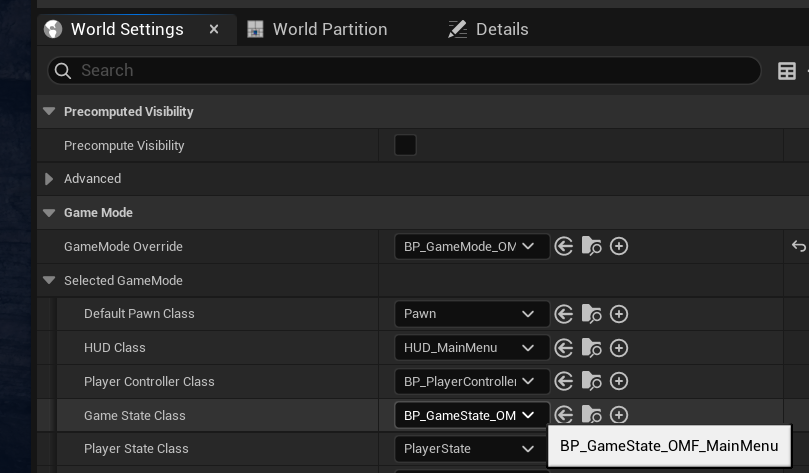
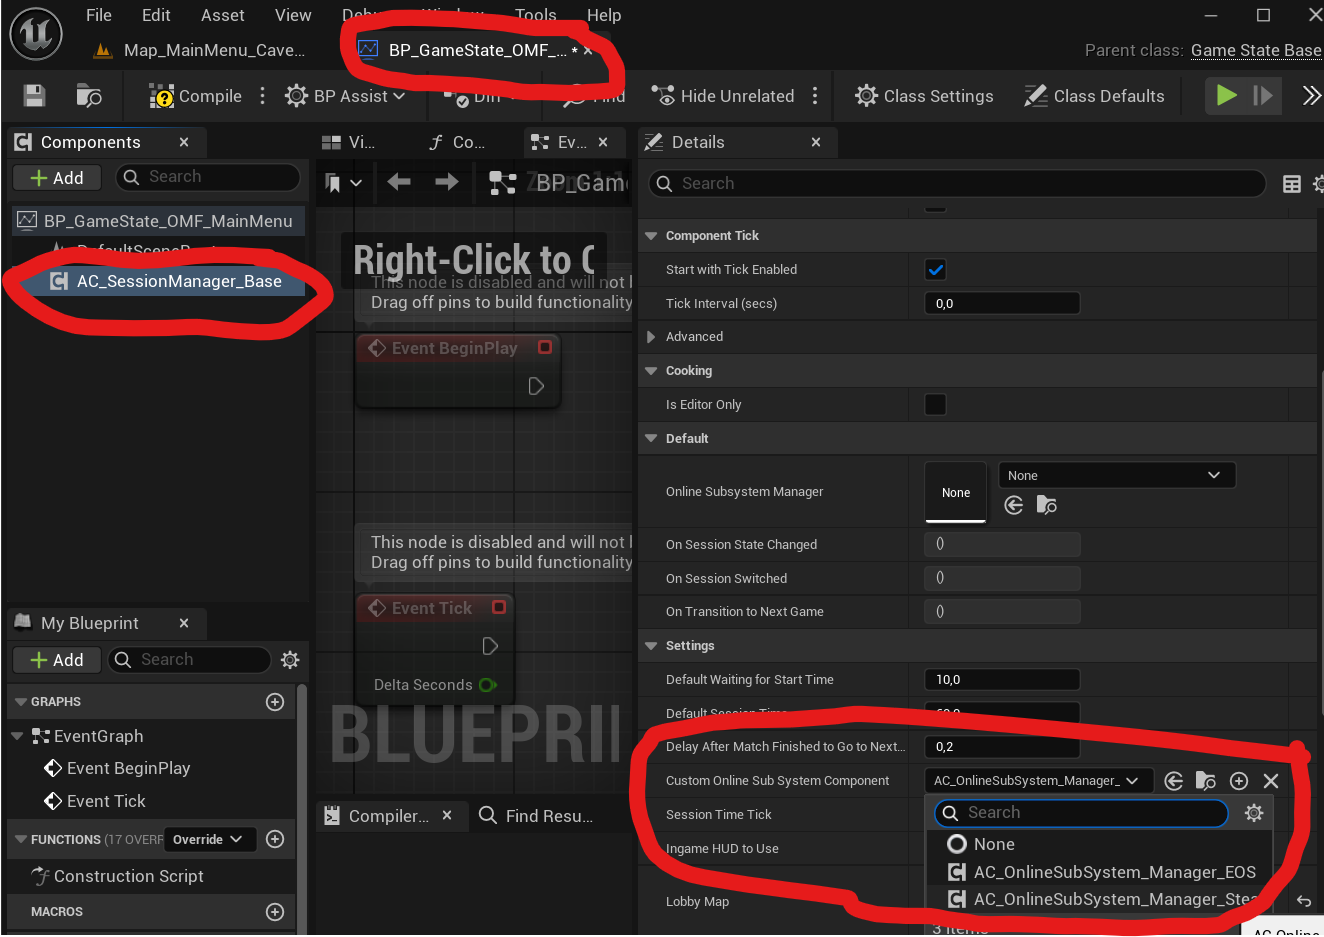
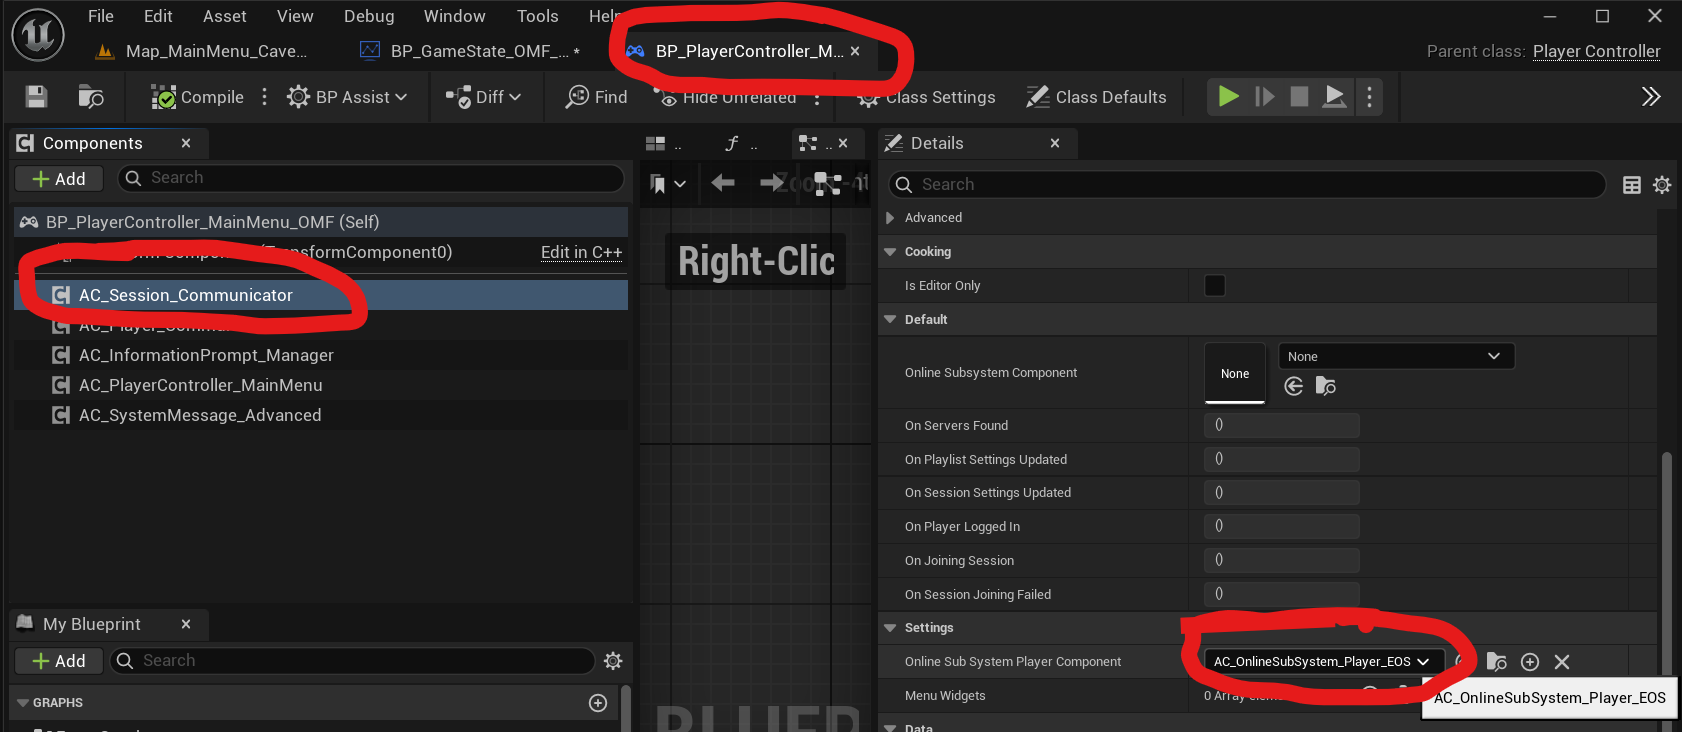
If this does not work through the base classes, check the GameState and PlayerController classes used by every session-managed map, including Main Menu, Lobby, and Game Map. Override the subsystem variable there when needed.
Set the GameInstance
Configure the correct GameInstance for the selected subsystem.
- Go to Edit → Project Settings → Maps & Modes → Game Instance Class.
- Select BP_GameInstance_EOS for EOS via EIK.
- Select BP_GameInstance_Steam for Steam via SIK.
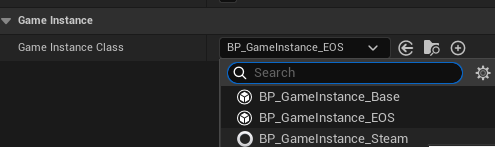
Do not use BP_GameInstance_Base unless the project is offline-only or LAN-only.
EOS via EIK
Before using EOS, complete the shared Steam/EOS prerequisites, install EIK, install the OMF compatibility files for EOS, assign the correct subsystem components, and set the correct GameInstance.
OMF does not replace or modify EIK. Follow the official EIK setup for installation, configuration, and auto-login:
- Plugin installation: https://eik.betide.studio/getting-started/plugin-installation
- Configuration: https://eik.betide.studio/getting-started/configuration
- Auto-login: https://eik.betide.studio/Authentication/autologin
- Betide Studio Discord: https://discord.gg/Jh6FJxjyYm
Configure required EOS values such as Product ID, Sandbox ID, Client ID, optional Client Secret, auto-login behavior, and lobbies when needed. This requires access to the Epic Online Services Developer Portal.
Apply the configuration snippet from configuration steps as described here to the project’s Config/DefaultEngine.ini, or use the EIK auto setup. Replace placeholder values with the actual values from the EOS project.
Test in Standalone Mode, not PIE, or launch the EOS client with YourProject/Bats/OMF/EOS/RunClientEOS.bat. Confirm that login and session creation work.
EOS Dedicated Servers
Advanced users only: OMF does not provide support for dedicated server deployment, internet architecture, port forwarding, Python environments, Linux configuration, source builds, or similar infrastructure issues.
OMF includes helper files for EOS dedicated servers in YourProject/Bats/OMF/EOS:
- Config_eos.py: Defines server and game configuration.
- RunDedicatedServers_EOS.py: Launches one or more EOS-based dedicated servers.
- RunClientEOS.bat: Launches a test client with the correct EOS configuration.
Python 3 is required for the Python scripts. Configure Config_eos.py with server count, ports, playlist or game mode, and EOS authentication data that matches the server artifact.
Required ports for OMF EOS dedicated server hosting:
- UDP 7777-7785: Gameplay traffic between clients and dedicated server instances.
- UDP 15000: Backend communication with EOS services, including authentication and session management.
If the project uses EOS peer-to-peer, voice chat, or relay features outside the default OMF setup, UDP 9000-9999 may also be needed.
Shipping-level EOS dedicated servers, especially on Linux, usually require a custom engine build with EOS SDK support and the required build configuration. See the official EIK dedicated server documentation: https://eik.betide.studio/multiplayer/dedicatedservers/configuration
Steam via SIK
Before using Steam, complete the shared prerequisites, install SIK, install the OMF compatibility files for Steam, assign the correct subsystem components, and set the correct GameInstance.
OMF does not replace or modify SIK. Follow the official SIK documentation:
- Documentation: https://sik.betide.studio/
- GitHub: https://github.com/betidestudio/SteamIntegrationKit
- Fab: https://www.fab.com/listings/0d3b4a43-d7cf-4412-b24d-e3f844277f9c
- Betide Studio Discord: https://discord.gg/Jh6FJxjyYm
Key setup requirements include Steam App ID, Online Subsystem Steam config, a logged-in Steam client, bUseSteam set to true, and the required project settings from the SIK documentation.
After following the SIK setup guide, paste the configuration snippet from https://sik.betide.studio/gettingstarted/Configuration into DefaultEngine.ini, replace placeholder values such as SteamDevAppId, and keep the snippet in the correct section.
Test from Play → Standalone Game, not PIE, with the Steam client running in the background. You can also use YourProject/Bats/OMF/Steam/RunClientSteam.bat. Verify that the Steam overlay opens, player auto-login works, and sessions can be hosted and joined from the in-game menu.
Steam Dedicated Servers
Advanced users only: OMF does not provide support for Steam dedicated server deployment, internet architecture, port configuration, Python environments, Linux builds, SteamCMD, or similar low-level setup.
OMF includes Steam helper batch files in YourProject/Bats/OMF/Steam:
- RunDedicatedServer_Steam_01.bat
- RunDedicatedServer_Steam_02.bat
These files launch dedicated server instances with different ports or parameters. Duplicate and modify them for multiple server instances or project-specific maps, game modes, and session settings.
Steam dedicated servers can also be launched manually with command-line arguments and .ini configuration. Follow the SIK and Steam developer documentation for platform-specific requirements.
Required public server ports:
- UDP 27015-27030
- TCP 27036-27037
Shipping-level Steam dedicated servers, especially on Linux, usually require a custom engine build with Steam SDK support and the required build configuration. For full SIK details, see https://sik.betide.studio/multiplayer/dedicatedserver