
Weapon Attachment System
Updated May 25, 2026
For shared setup
guidance, see the Migration
Guide and Integration
Guide. Use the System Atlas to look up
functions, variables, events, components, and ownership references. Use this
page for Weapon Attachment System-specific setup, runtime behavior, extension
points, and integration notes.
Related setup: Make your own
Equipment.
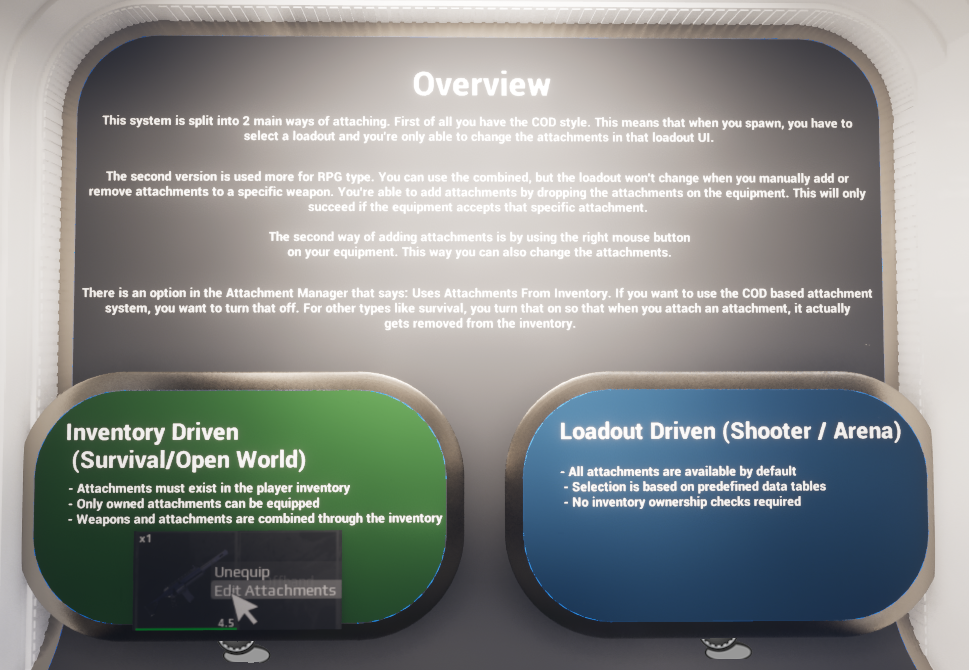
Demo overview board from the level introducing the two
supported attachment workflows.
Related Videos
Version note: Some videos may have been recorded before
V4. The same principles still apply, but asset names, component names, and
folder locations may differ. Use this written documentation and the current V4
names as the source of truth.
Introduction
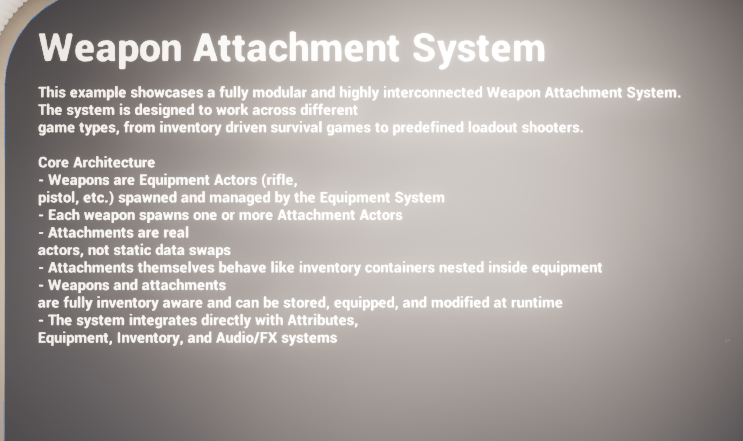
The Weapon Attachment System is a modular framework for
attaching, swapping, previewing, and applying equipment attachments at runtime.
It is designed to support two broad game styles with the same underlying data:
inventory-driven survival/open-world workflows and predefined loadout-driven
shooter/arena workflows.
At the highest level, the system treats attachments as
real runtime actors rather than only cosmetic data rows. Weapons and
attachments are both inventory-aware, equipment-aware, and capable of being
updated during play. The same architecture also supports a loadout menu,
save-backed persistent loadouts, visual attachment actors on the equipped
weapon, and optional attribute payloads defined from data.
The implementation follows Hyper’s usual
abstract/concrete split. Abstract classes define the variables, dispatchers,
and function signatures. Concrete classes hold the gameplay logic. For
attachments specifically, BP_Attachment_Abstract is the abstract parent, while
BP_Attachment_Base is the first concrete implementation that performs real
work. Additional child blueprints extend BP_Attachment_Base when a specific
attachment needs bespoke behaviour.
- Supports both inventory-owned attachments and fully
predefined loadout attachments. - Uses data tables to define attachment metadata, mesh
assets, icon assets, animation references, and assigned attributes. - Lets equipment define which attachments are accepted
per weapon/equipment row. - Separates logical attachment state from the spawned
visual attachment actor. - Includes a loadout manager for save-backed weapon
setups and an attachment manager for live equip/unequip flow. - Supports server-authoritative equip and application
flow with client-side UI and presentation.
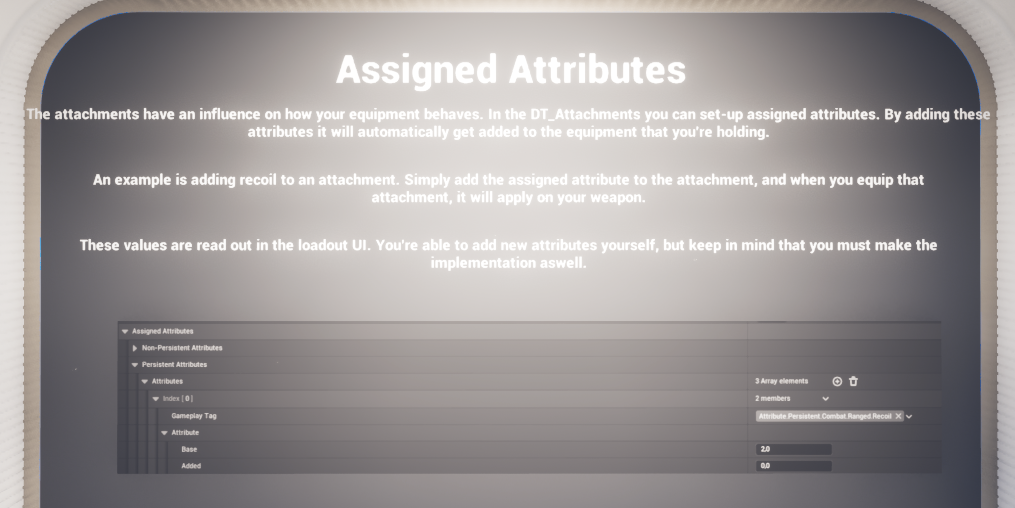
System overview board from the demo level summarising the
modular Weapon Attachment System.
System Overview
The system is intentionally flexible enough to operate in
two different content models. The same weapon can either be customised from
owned inventory items, or it can expose a predefined set of attachment options
in a loadout-style menu.
Inventory-driven mode (Survival / Open
World)
In this mode the attachment must exist in the player’s
inventory before it can be equipped. The runtime manager checks the actual
inventory state, and weapons plus attachments behave like linked
inventory-aware equipment. This is the more RPG/survival-friendly workflow and
is the mode used when a designer wants the player to physically find, loot,
buy, or craft attachments before they become available.
- Attachments must exist in the player’s inventory.
- Only owned attachments can be equipped.
- Weapons and attachments are treated as connected
inventory content. - Right-click or interaction-based editing can be used
to add or remove attachments from equipment.
Loadout-driven mode (Shooter / Arena)
In this mode attachment availability is driven by
predefined data rather than inventory ownership. The player is shown all
attachment options allowed by the relevant loadout definition and accepted
attachment setup. This is the faster shooter-style mode used for predefined
classes, arena kits, or controller-owned loadout screens.
- All allowed attachments can be shown immediately.
- Selection is driven by predefined loadout/equipment
data rather than owned inventory items. - The player can change the loadout before spawning or
while in menu flow. - Loadout application can happen immediately or after
respawn depending on the configuration.
A key toggle mentioned in the demo is the Attachment
Manager setting that controls whether attachments are sourced from inventory.
Disabling that setting enables the more Call of Duty-style loadout flow.
Leaving it enabled keeps the survival/open-world behaviour where attaching an
item removes it from inventory and equipping is restricted to owned items.
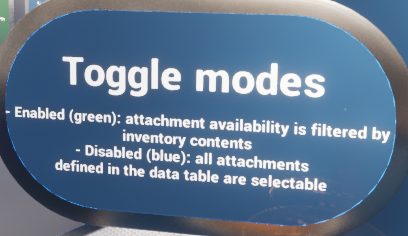
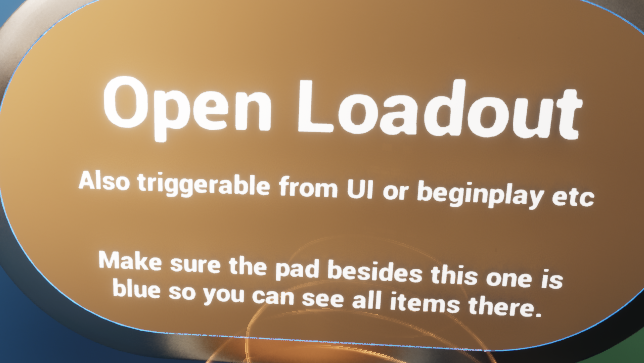
Example demo prompts: toggle mode guidance and an
explicit ‘Open Loadout’ interaction prompt.
Core Architecture and Asset Roles
The Weapon Attachment System is best understood as a
small group of cooperating managers plus a data-driven visual attachment actor.
The concrete implementation shown in the sample revolves around three major
gameplay-facing pieces: the loadout manager, the live attachment manager, and
the base attachment actor.
| Asset / Type | Role in the System | Important Notes |
| AC_PC_LoadoutManager | Owns persistent loadout editing and application flow. | Lives on the controller in the sample. Saves and updates loadouts, translates loadout data into live inventory/equipment state, and supports immediate or respawn-delayed application. |
| AC_PC_AttachmentManager | Owns live runtime attach/unequip behaviour. | Handles validation, animation choice, visual attachment spawning, equipped attachment state, and attachment-changed notifications. |
| BP_Attachment_Abstract | Abstract attachment parent. | Holds the class contract only. No concrete gameplay logic according to the supplied implementation notes. |
| BP_Attachment_Base | Concrete visual attachment actor. | Loads the mesh from attachment data, chooses static or skeletal mesh mode, handles visibility changes, and destroys itself when its owner equipment is destroyed. |
| Attachment child blueprints | Per-attachment custom behaviour layer. | Used when a specific attachment needs bespoke logic beyond the generic base. The provided flashlight example dynamically aligns its spotlight to the player’s aim trace. |
| DT_Attachments | Primary attachment definition table. | Stores type, tag, display name, actor class, mesh references, icon, optional montages, assigned attributes, and custom overrides. |
| DT_Equipment | Equipment acceptance setup. | Each equipment row defines which attachments are accepted by that item. This is the main whitelist that determines what can be mounted to a weapon/equipment actor. |
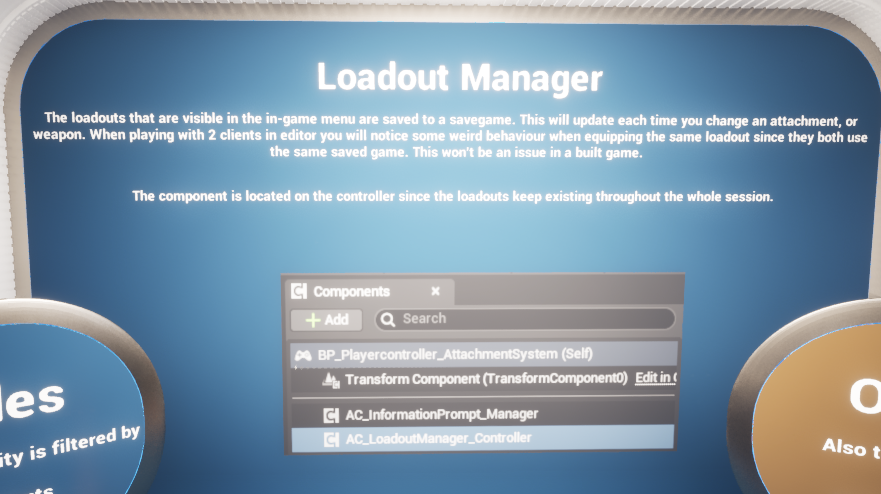
Loadout Manager demo prompt noting that visible in-game
loadouts are saved and that the component is placed on the controller.
Adding the System to a Project
The concrete implementation shown in the sample splits
loadout management from live attachment management. In practice, setup is a
combination of controller-side component ownership, data-table setup, equipment
acceptance setup, and optional UI/menu flow.
1. Add the loadout manager
AC_PC_LoadoutManager is the manager responsible for
creating, validating, and applying loadout data. In the demo it is placed on
the controller, which is appropriate because loadouts persist for the player
across the session and act as a public API for UI, respawn flow, and
save-backed selection.
- Add the concrete loadout manager component, not the
abstract definition. - Configure settings such as whether the loadout
screen should open on BeginPlay, maximum number of loadouts, and whether
the first selection should trigger immediate respawn/application. - Ensure the slot-type-to-equipment-type mapping
reflects the tags used by your project.
2. Add the attachment manager
AC_PC_AttachmentManager is the runtime manager
responsible for equipping and unequipping attachments from the currently
relevant equipment. It tracks temporary equip/unequip state, validates
continuation on the server, and spawns or updates the visual attachment actor.
- Use the concrete component rather than the abstract
definition. - Decide whether the project should use
inventory-owned attachments or fully predefined loadout attachments. - Make sure the manager can access the relevant
equipment and inventory systems in the owning player flow.
3. Populate DT_Attachments
Every attachment that can be shown in the system should
have a row in DT_Attachments. This row is the master definition used by loadout
editing, attachment equip flow, and the base attachment visual actor.
- Set the attachment gameplay tag.
- Choose the attachment type from E_Attachment_Type.
- Assign the actor class used to spawn the visual
attachment actor. - Specify whether the attachment uses a static mesh or
skeletal mesh. - Assign the relevant icon and optional equip/unequip
montages. - Populate Assigned Attributes and Custom Overrides
when needed.
4. Define accepted attachments on
equipment
A weapon or equipment row must declare which attachments
are legal for that item. The supplied screenshots show this as an Accepted
Attachments array on the equipment definition. This is the main per-item
whitelist that prevents invalid mounting.
5. Wire in UI and demo entry points
The demo environment shows several ways to open and test
the system: an explicit ‘Open Loadout’ prompt, begin-play menu opening,
right-click editing from the inventory/equipment UI, and direct pickup/testing
flow. The same runtime managers support all of these as long as the UI or
interaction layer forwards into the public functions and events.
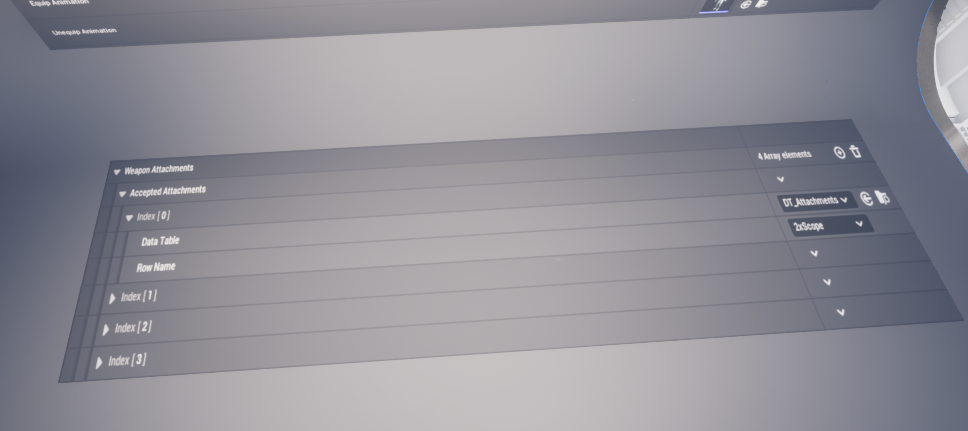
Example of accepted attachment setup on equipment. This
whitelist decides which DT_Attachments rows are valid for a given item.
Details Panel / Important Variables
The live system is highly data-driven, but there are
still a number of key configuration and runtime variables that shape how it
behaves. The tables below focus on the variables visible in the supplied
screenshots and the roles they play in the concrete implementation.
AC_PC_LoadoutManager – key variables
| Variable | Type | Purpose |
| Loadout To Equip After Respawn | Integer | Stores the selected loadout index that should be applied after the next respawn when the project is using deferred application. |
| UI Equipment Actor | BP Equipment Abstract reference | Visual equipment actor used in the loadout UI. The demo notes state this is only a visual representation of the attachment state and is spawned client-side. |
| Is First Loadout | Boolean | Used by the respawn/application logic to handle the first selection differently from later changes. |
| Loadout Currently Equipped | F_Loadout | Current active loadout data cached by the manager. |
| Open Loadout Screen On Beginplay | Boolean | Lets the manager open the loadout UI automatically when the session begins. |
| Max Amount Of Loadouts | Integer | Caps how many custom loadout entries the player may maintain. |
| Respawn On First Loadout Selection | Boolean | Controls whether the first chosen loadout should be applied through an immediate spawn/equip path. |
| Slot Type To Equipment Type | Gameplay Tag mapping | Maps the logical loadout slot tag to the equipment type query used when gathering valid equipment entries. |
AC_PC_AttachmentManager – key variables
| Variable | Type | Purpose |
| Attachment Being Equipped | F Inventory Slot Item | Temporary runtime state holding the attachment currently being equipped. |
| Container For Equipping | BP Inventory Container reference | The target container or inventory item that will receive the attachment. |
| Attachment Being Unequipped | F Inventory Slot Item | Temporary runtime state holding the attachment being removed. |
| Inventory Container To Unequip | BP Inventory Container reference | Inventory or equipment context used during the unequip path. |
| Override Use Equip Animation | Boolean | Per-operation override switch that decides whether the normal animation preference should be ignored. |
| Use Equip Animation | Boolean | Base preference controlling whether equipping should use montages or instant application. |
| Index For Equipping / Unequipping | Integer | Target index values cached while the operation is in progress. |
| Container Attachment Is In | BP Inventory Container reference | The owner/container context of the attachment being processed. |
| Attached Attachments | Array of BP_Attachment_Base | Live list of spawned visual attachment actors currently represented on the equipment. |
| Attached Attachments Map | Map keyed by E_Attachment_Type | Lookup structure for current logical attachment occupancy by slot/type. |
| Attachment Slot Index | Integer | Slot index used during attach operations. |
BP_Attachment_Base – runtime data
| Variable / Concept | Purpose |
| Attachment / AttachmentInfo | The base actor reads attachment data from the backing inventory item and breaks F_Weapon_Attachment to determine mesh type and mesh asset. |
| OwningEquipment | Authority-side BeginPlay binds to the owner equipment’s destroyed event so the attachment actor can destroy itself when the weapon/equipment goes away. |
| MeshComponent | Runtime-cached active mesh component. The actor destroys the unused mesh component and stores the active one for later mesh assignment and visibility calls. |
Structures, Enum, and Data Tables
Explained
The system is built around a concise but expressive data
model. Attachments are primarily defined through a dedicated data table row
structure and are then referenced by the loadout and runtime managers.
E_Attachment_Type
E_Attachment_Type is the high-level category enum used
throughout the system to identify what kind of slot an attachment belongs to.
The supplied enum includes the following values: None, Scope, Stock,
Underbarrel, Muzzle, Magazine, Flashlight, and Laser.
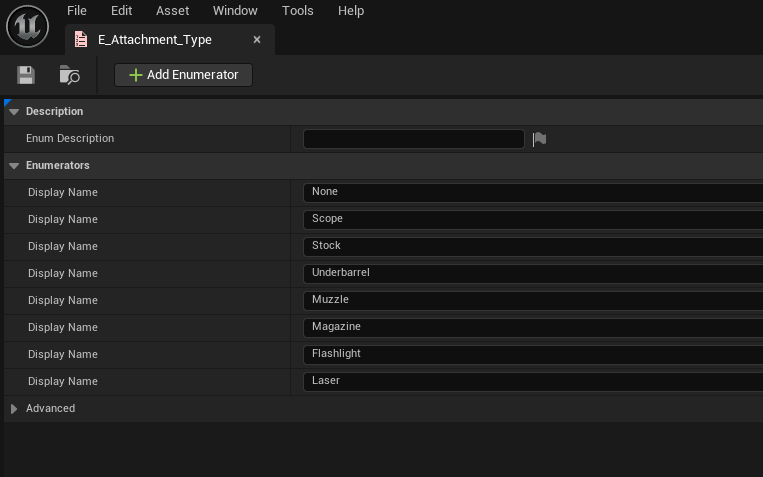
E_Attachment_Type enum values used to group attachment
slots and resolve existing attachments by type.
F_Gameplay_ObjectArray
F_Gameplay_ObjectArray is a helper struct pairing a
gameplay tag with an Object array. In the shown attachment data it is used for
the Custom Overrides collection. The exact interpretation of the objects is
project-specific, but the structure provides a flexible way to hang arbitrary
data or override assets from a gameplay tag key.
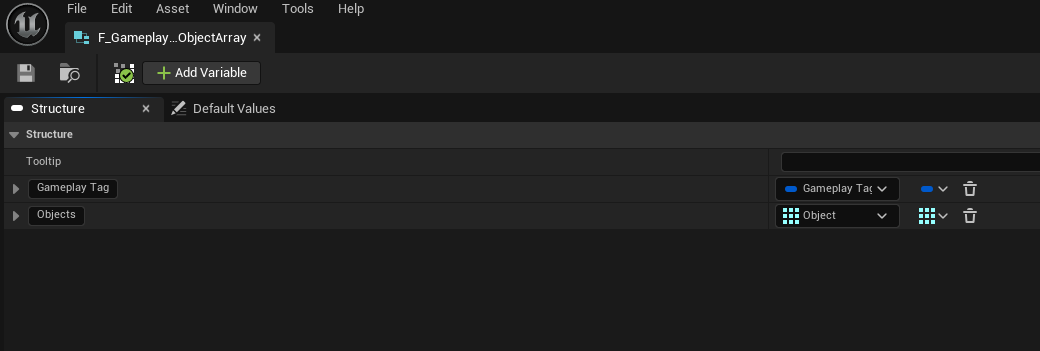
F_Gameplay_ObjectArray structure.
F_Loadout
F_Loadout stores one complete player loadout entry. The
screenshot shows a Name plus four item slots: Primary Weapon, Secondary Weapon,
Lethal, and Tactical. Each slot stores a Starting Inventory Slot Item-type
payload, which means a loadout entry does not merely remember row names; it
remembers full item payloads suitable for translating back into live inventory
and equipment state.
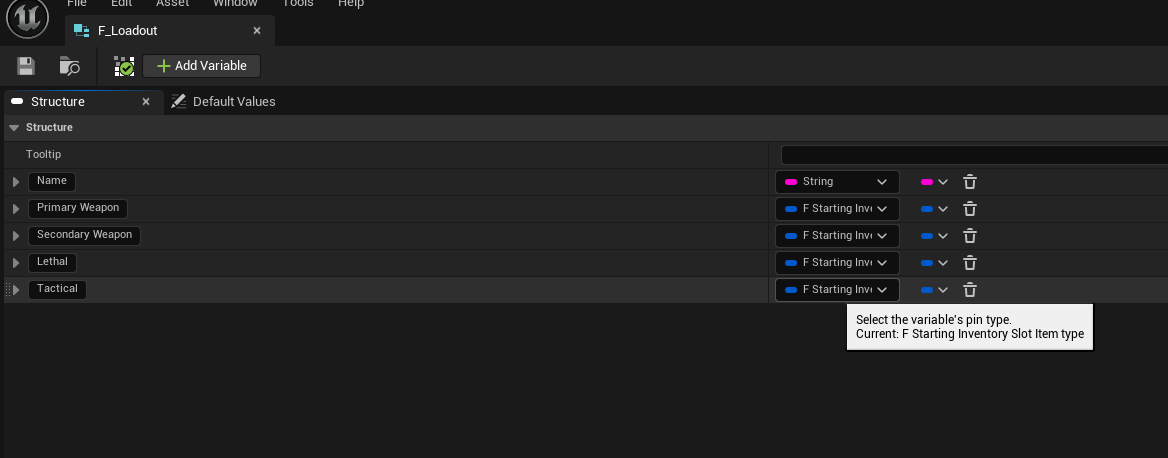
F_Loadout structure with a name and four key item slots.
F_Weapon_Attachment
F_Weapon_Attachment is the central attachment definition
structure and the row type used by DT_Attachments. It combines slot metadata,
visual asset references, optional animation references, attribute payloads, and
extensibility hooks into one reusable struct.
| Field | Purpose |
| Attachment Tag | Gameplay-tag identity for the attachment. Used for lookups, row resolution, and higher-level gameplay integration. |
| Attachment Type | Enum category from E_Attachment_Type. Determines which logical slot the attachment occupies and which existing attachment should be replaced or looked up. |
| Attachment Name | Display-friendly name. |
| Attachment Actor Class | Blueprint class spawned for the visual attachment actor. In the generic case this is a BP_Attachment_Base-derived class. |
| Uses Skeletal Mesh | Selects whether the actor should use its skeletal mesh component or static mesh component path. |
| Static Mesh / Skeletal Mesh | Actual visual asset references assigned from data. |
| Icon | UI icon shown in menus and inventory/loadout displays. |
| Use Equip Or Unequip Animation | Allows the attachment definition to opt into montage-driven attach/detach presentation. |
| Equip Animation / Unequip Animation | Optional montages played during attachment change flow. |
| Assigned Attributes | Array of attribute payloads that should be applied when the attachment is equipped. The sample shows recoil-like attribute injection as one use case. |
| Custom Overrides | Flexible override array using F_Gameplay_ObjectArray for project-specific extensions. |
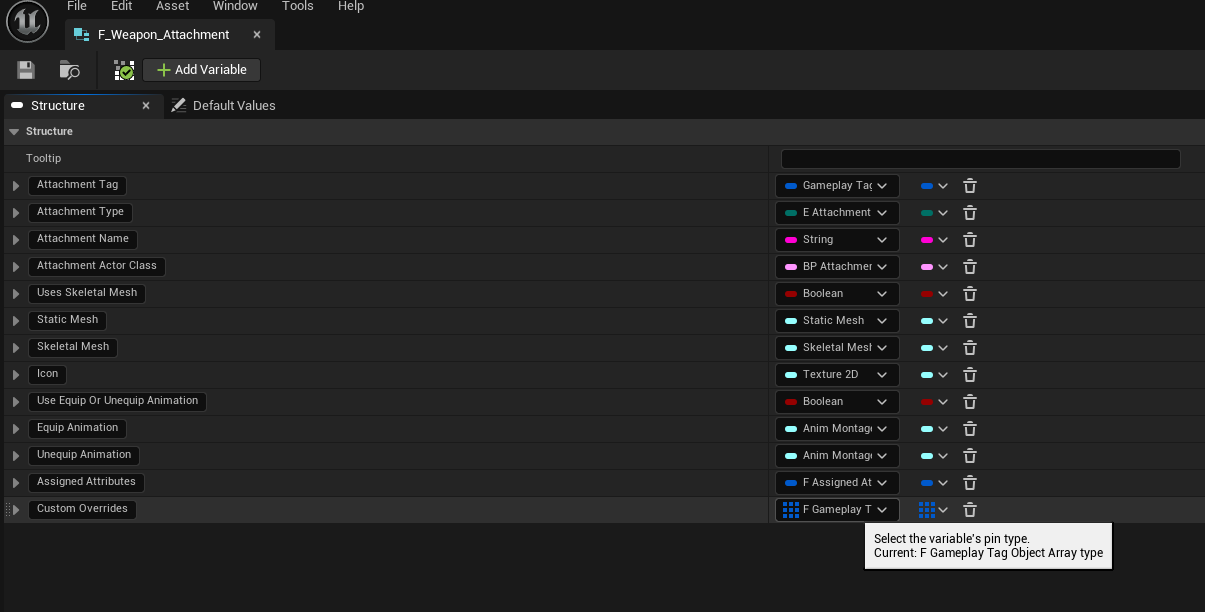
F_Weapon_Attachment row structure used by DT_Attachments.
DT_Attachments
DT_Attachments is the primary attachment definition
table. The supplied screenshot shows example rows such as Empty, BigFlashlight,
SmallFlashlight, and Silencer. Each row defines the attachment type, tag,
display name, actor class, mesh mode, icon, optional animations, assigned
attributes, and custom overrides.
- Empty is a useful placeholder row for representing
‘no attachment’ state. - Flashlight rows demonstrate the same slot type
supporting multiple concrete items. - The Silencer row demonstrates a muzzle slot entry.
- Because the row stores the actor class, the same
data table can spawn either a fully generic base attachment or a
specialised child blueprint such as a flashlight with custom aiming logic.
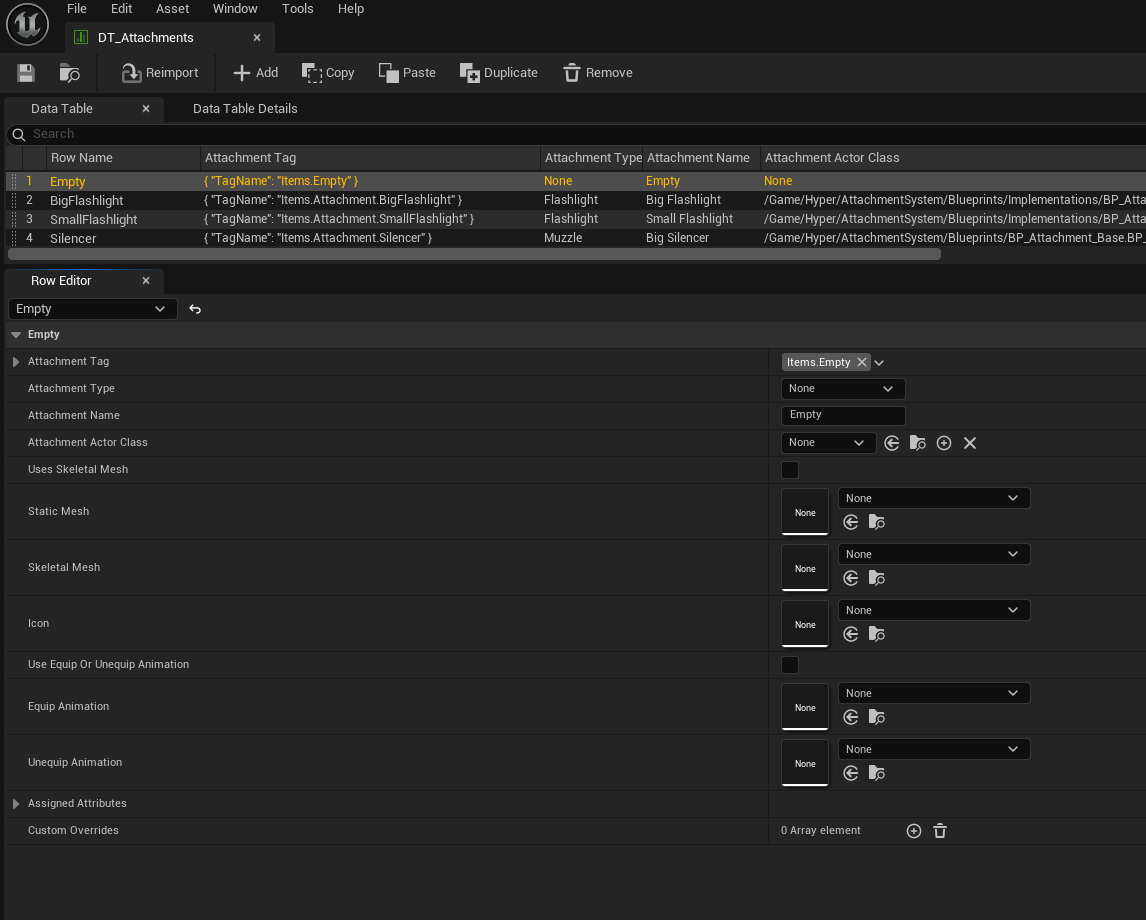
DT_Attachments example rows.
DT_Equipment accepted attachments
The equipment definition table stores the accepted
attachment whitelist for each equipment row. The screenshot shows an Accepted
Attachments array containing DT_Attachments row handles. This is the item-side
validation layer that decides which attachments can be mounted to a given
weapon or equipment entry.
In practice, DT_Attachments answers the question ‘what is
this attachment?’, while the Accepted Attachments array on equipment answers
the question ‘is this attachment legal for this weapon?’.
Assigned Attributes example from DT_Attachments. These
values are added to the equipment or weapon when the attachment is equipped.
Loadout Manager Explained
AC_PC_LoadoutManager is the persistent, player-facing
side of the system. It does not physically spawn visual attachment actors
itself. Instead, it owns the editable loadout data, validates loadouts,
converts that saved data back into live inventory/equipment state, and
coordinates with respawn and UI flow.
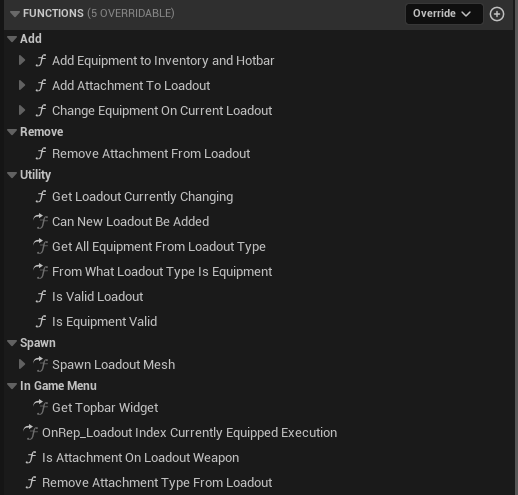
Function groups exposed by AC_PC_LoadoutManager.
Main responsibilities
- Maintain the list of custom loadouts and the
currently equipped loadout. - Add equipment and attachments into the loadout data
structure. - Remove attachments from the current loadout by type
and slot. - Change a weapon/equipment entry inside the currently
edited loadout. - Validate a loadout before applying it.
- Translate loadout slots into equipment-type queries.
- Open and focus the loadout UI tab when required.
- Apply a selected loadout immediately or defer it
until respawn. - Synchronise updates between client and server and
broadcast that the loadout changed.
Important function groups
| Function / Event | Purpose |
| Add Equipment to Inventory and Hotbar | Takes an item payload, injects it into inventory, links it to the hotbar, and returns the slot index used. |
| Add Attachment To Loadout | Finds the local current loadout, updates the correct slot’s weapon attachment list, saves the result, and broadcasts that the loadout changed. |
| Change Equipment On Current Loadout | Replaces the item assigned to a loadout slot. The screenshots note that the result only applies after respawn when using deferred flow. |
| Remove Attachment From Loadout | Removes an attachment category from the selected loadout slot weapon, then saves and rebroadcasts. |
| Get Loadout Currently Changing | Returns a copy of the loadout currently being edited based on Loadout Index Currently Changing. |
| Get All Equipment From Loadout Type | Uses the Slot Type To Equipment Type mapping to gather all valid equipment entries for a given loadout slot tag. |
| Server_Equip Loadout | Validates the chosen loadout, caches it as current, and rebuilds live inventory/equipment by adding the slot items and equipping the primary. |
| Server_Apply Loadout | Routes application through either immediate equip flow or respawn-delayed flow depending on configuration and respawn availability. |
BeginPlay and respawn binding
On BeginPlay the manager does more than just open UI. It
also binds into respawn flow. The supplied event graph shows an authority-side
validation of the respawn manager, then a bind to the respawn event. When that
respawn event fires, the manager calls Server Equip Loadout using the cached
currently equipped loadout and index. This means the selected loadout survives
death and respawn flow and is re-applied automatically when the character comes
back.
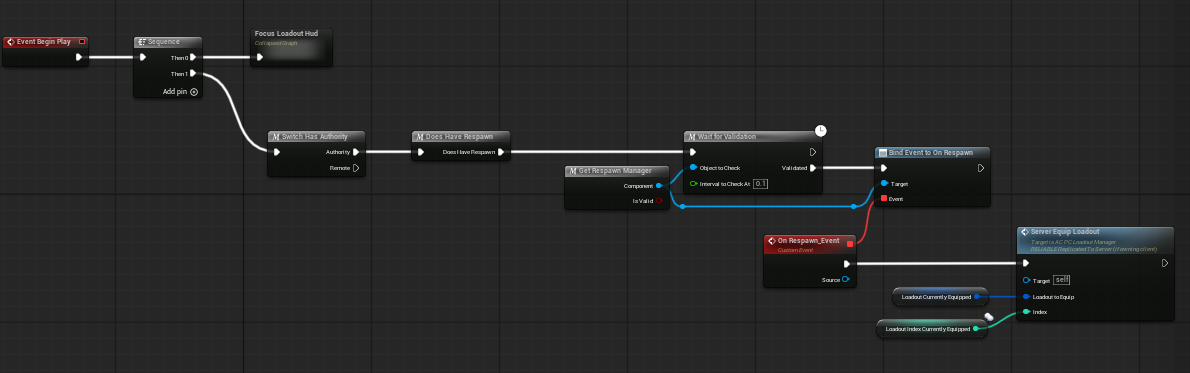
AC_PC_LoadoutManager BeginPlay flow binding to respawn
and re-equipping the current loadout.
Applying a loadout
Loadout application is intentionally split into multiple
paths so the same system can support arcade loadout selection and
survival/open-world progression. The manager first asks whether respawn logic
is available. If no respawn handler exists, it can equip the loadout directly.
If respawn logic is available, it can either defer the application until the
next respawn or force an immediate spawn/equip on the first loadout selection.
- The player or UI chooses a loadout to apply.
- Server_Apply Loadout checks Can Use Respawn Logic.
- If respawn logic is not available, the manager
immediately calls Server_Equip Loadout. - If respawn logic is available, the manager evaluates
Respawn On First Loadout Selection and Is First Loadout. - It then either stores the selected loadout for
application after respawn or triggers the first-spawn path and equips it
immediately.
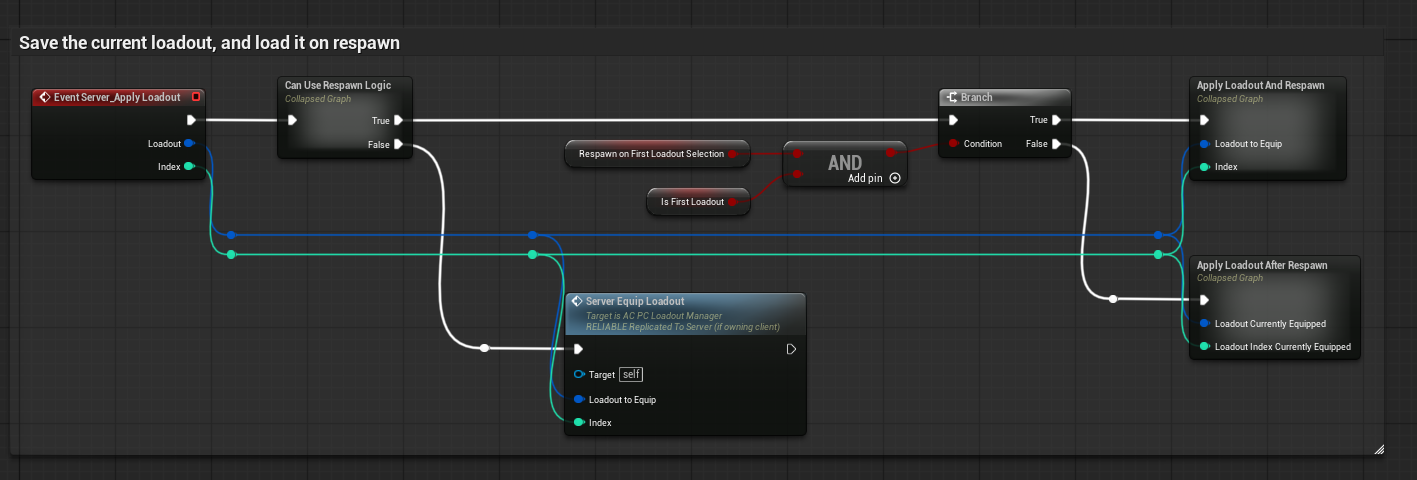
Server_Apply Loadout choosing between immediate and
respawn-delayed application.
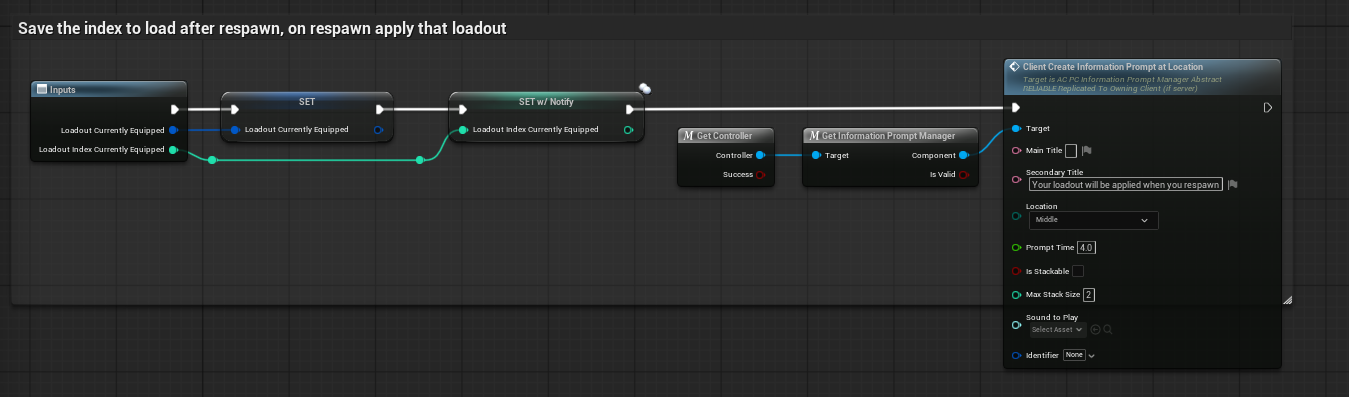
Apply Loadout After Respawn stores the new loadout and
informs the player that it will be applied when they respawn.
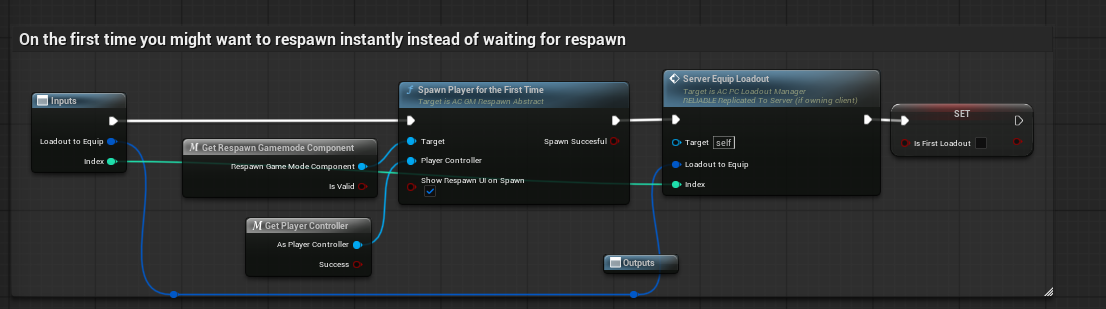
Apply Loadout And Respawn path used for the first
selection when immediate spawn/equip is desired.
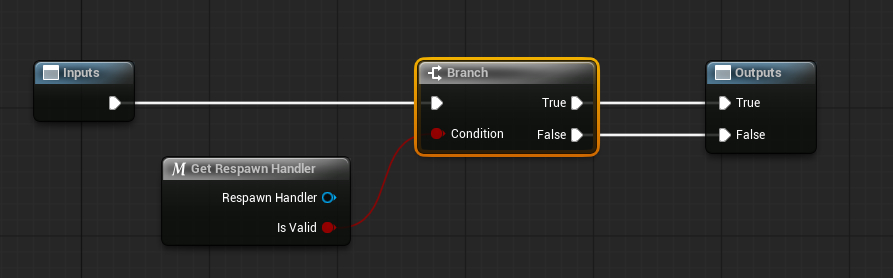
Can Use Respawn Logic simply checks whether a valid
respawn handler exists.
Equipping the selected loadout
Server_Equip Loadout validates the loadout, caches it as
current, and then translates the saved data back into live runtime
inventory/equipment. The graph shows that the F_Loadout is broken into its
Primary Weapon, Secondary Weapon, Lethal, and Tactical entries. The primary
weapon is added to the inventory and hotbar and then equipped, while the other
slots are also added back into the player’s live inventory state.

Server_Equip Loadout rebuilding inventory and equipping
the primary weapon from the selected F_Loadout.
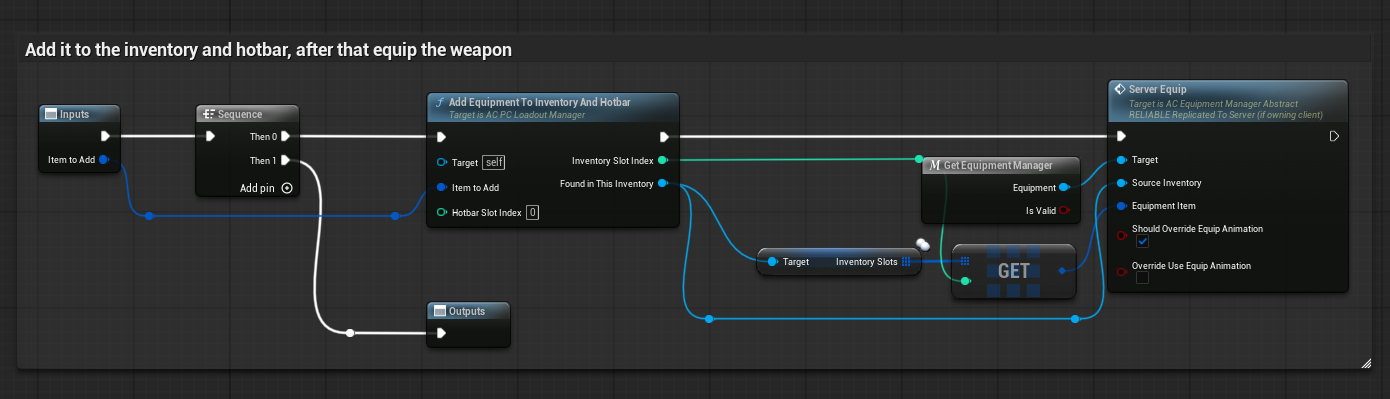
Equip Primary adds the item to inventory/hotbar and then
forwards the relevant slot to the equipment manager for equipping.
Editing loadout attachments
Attachment editing inside the loadout manager works on
the saved loadout struct rather than directly on the live weapon actor. When
Add Attachment To Loadout is called, the manager loads the current custom
loadout entry, chooses the correct slot by tag such as Primary or Secondary,
updates the relevant weapon attachment data, saves the modified loadout back
into the slot array, and broadcasts that the loadout changed.

Add Attachment To Loadout updating the correct weapon
inside the currently edited loadout and saving the result.
Removal is the inverse operation. Remove Attachment From
Loadout loads the chosen loadout entry, identifies the target slot, removes the
relevant attachment type from the selected weapon’s attachment state, saves the
revised loadout, and rebroadcasts the change.

Remove Attachment From Loadout updating the saved loadout
data and then broadcasting the change.
Changing the weapon itself is a separate operation from
changing the attachment list. Change Equipment On Current Loadout replaces the
chosen slot’s equipment item but does not necessarily apply it instantly in the
world; the sample explicitly notes that this path is intended to take effect
after respawn when running in respawn-aware mode.
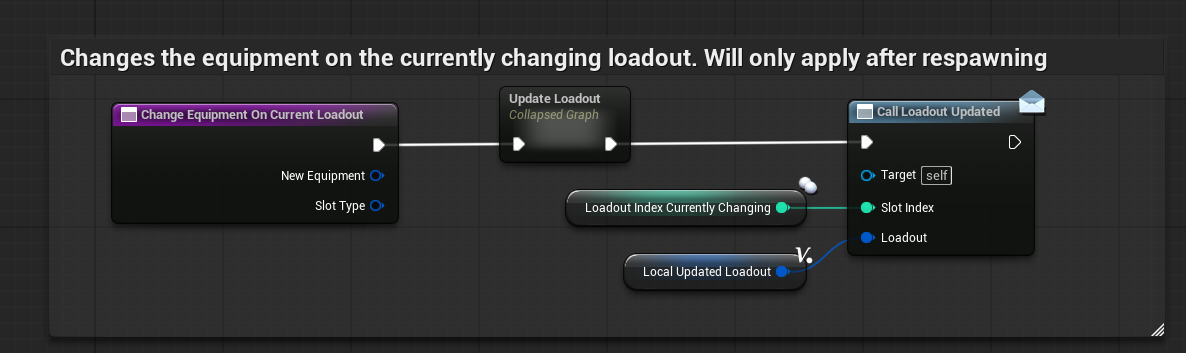
Changing the equipment on the currently edited loadout.
The UI-facing part of the manager can also open and focus
the loadout tab directly. The supplied event graph shows a client event that
gets the HUD, creates the in-game menu, and focuses the Loadout tab.
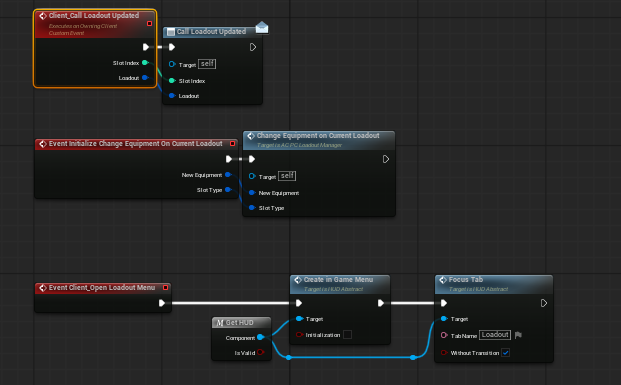
Loadout update, equipment-change, and open-menu entry
events.
Finally, the manager can receive gameplay-tag-based game
settings and disable the loadout menu for specific modes. The supplied example
shows the menu widgets being cleared when a mode-specific loadout setting is
turned off, which is how the sample prevents loadout use in battle-royale-style
flow.
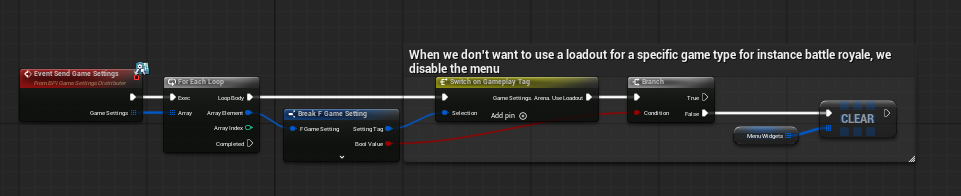
Game settings input being used to disable the loadout
menu for a specific game type.
Attachment Manager Explained
AC_PC_AttachmentManager is the live runtime manager
responsible for attaching and removing attachments from equipment, validating
whether an operation can continue, deciding whether to use animation, spawning
or updating the visual attachment actor, and notifying the rest of the project
when attachment state changes.
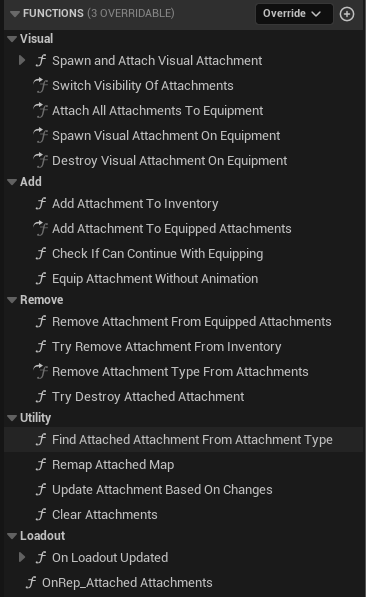
Function groups exposed by AC_PC_AttachmentManager.
Function groups and responsibilities
| Group | Purpose |
| Visual | Spawn, attach, show, hide, and destroy the visual attachment actor on the weapon or equipment. |
| Add | Insert the attachment into logical equipped state, validate continuation, and complete equip flow with or without animation. |
| Remove | Undo the logical attachment state, remove from inventory where required, destroy the visual actor, and clear runtime unequip state. |
| Utility | Find an already attached item by type, remap internal lookup structures, update the attached state after changes, or clear everything. |
| Loadout | React when the active loadout changed and when attached-attachment replication updated. |
High-level equip pipeline
- A client event begins the equip request with the
target inventory, slot index, attachment item, and animation preferences. - If another equip is already in progress, the new
request is ignored until that state is cleared. - The manager caches the target container, slot index,
attachment item, and animation override flags. - A server RPC validates whether the equip can
continue. - If validation fails, the client resets its cached
temporary equip state. - If validation succeeds, the client chooses between
animated or instant application. - Both paths update logical equipped attachment state
and request the server to spawn and attach the visual actor. - Completion fires the attachment-added-or-removed
event or dispatcher and clears transient equip state.
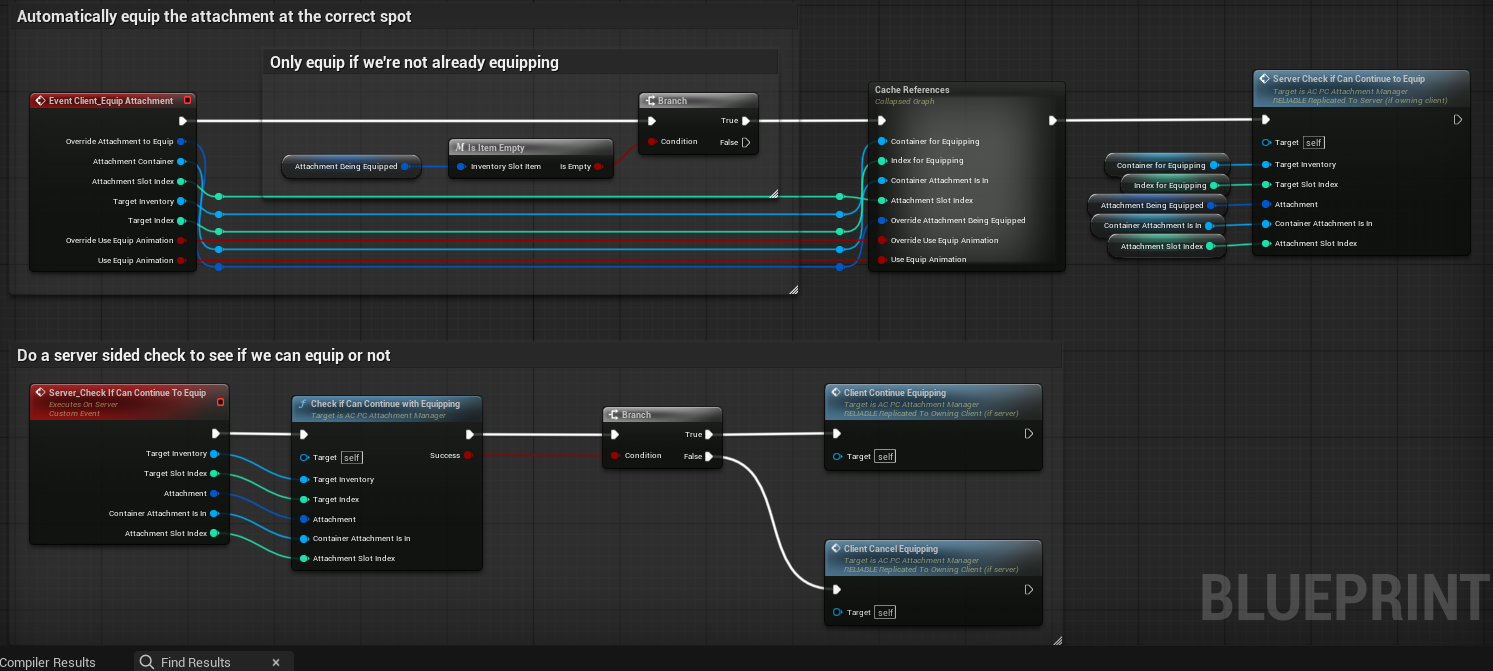
Client entry into the equip pipeline and the server-side
validation gate.
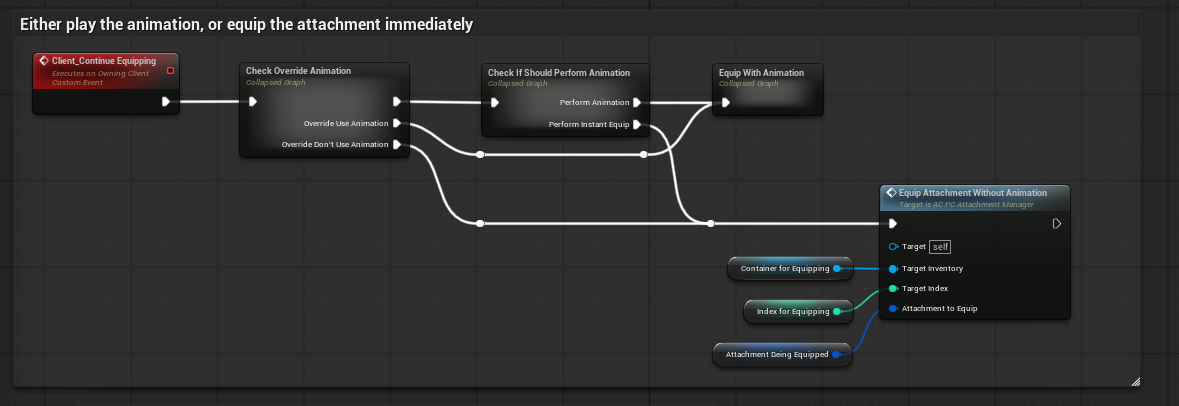
Client Continue Equipping choosing between the animated
path and the instant path.
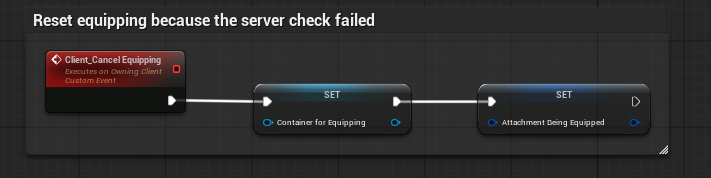
Client Cancel Equipping clearing transient equip state
when the validation gate fails.
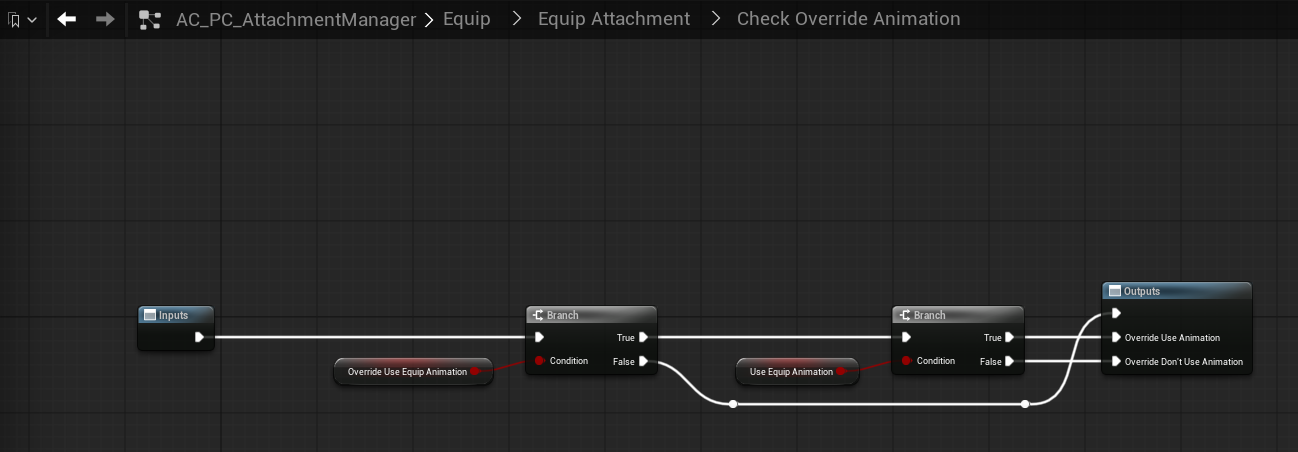
Override animation logic. When override is enabled, the
operation honours the explicit Use Equip Animation flag.
Equip with animation
The animated path is the more presentation-friendly
branch. The manager reads the attachment info, resolves the equip and unequip
montages from F_Weapon_Attachment, async-loads those assets, and plays the
relevant montage through the replication or animation component. Before the
notify fires, it already spawns the visual attachment on the server but with
visibility disabled. This allows the visual actor to exist and be attached in
the correct place without appearing too early.
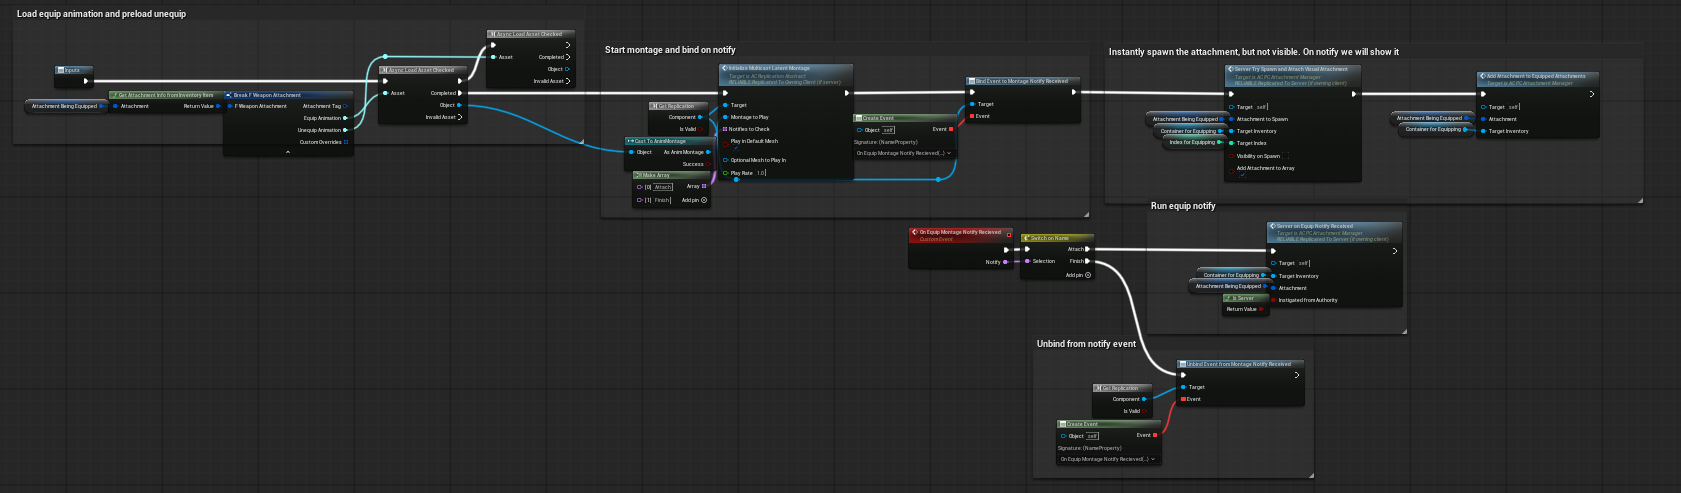
Equip With Animation loading the montage, binding to
notify, spawning the attachment hidden, and waiting for the equip notify.
When the montage notify is received, the manager resolves
the attachment type, finds the attached visual actor by type, switches its mesh
visibility on, and then finalises the operation. This is the key reason the
animated path feels correct in presentation: the logical item can be prepared
ahead of time, but the visible mesh is only revealed at the notify moment.

Server On Equip Notify Received making the mesh visible
and finalising the equip.
Equip without animation
The instant path is intentionally simpler. It adds the
attachment into the equipped state, resolves the owning inventory or equipment
context, spawns and attaches the visual actor with visibility on immediately,
and then calls the same notify-received completion path. This makes the instant
branch fast while still sharing the same end-of-operation logic.

Equip Attachment Without Animation immediately adding
logical state, spawning the visible attachment actor, and flowing into the same
finish path.
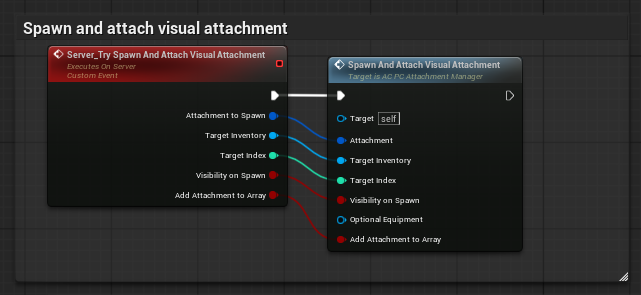
Server wrapper for spawning and attaching the visual
attachment actor.
Finishing and resetting the equip
Once the operation completes, the manager calls its
attachment-added-or-removed event or dispatcher and then resets the cached
equip state. The reset clears the attachment being equipped, the cached target
container, and the target index. This is what allows later equip requests to
proceed cleanly.
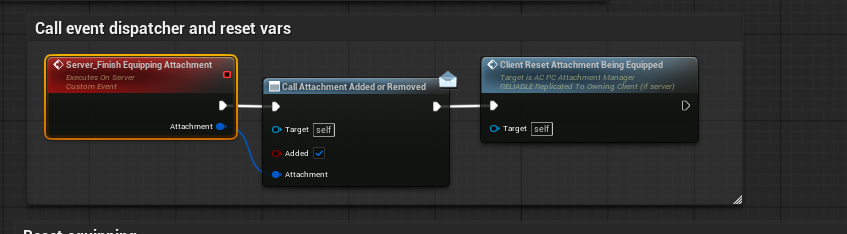
Server Finish Equipping Attachment.
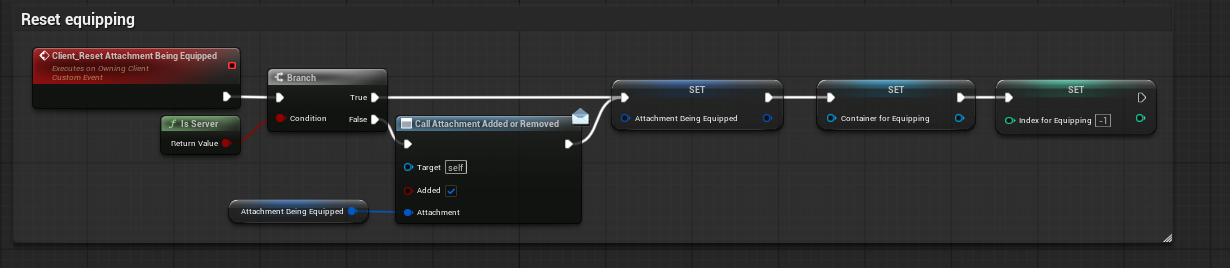
Client reset of the transient equip state once the
operation is complete.
Remove and unequip flow
The remove side was not exhaustively inspected
node-by-node to the same depth as the add side, but the available function and
graph lists make the intended pattern clear. The manager has explicit Remove
Attachment From Equipped Attachments, Try Remove Attachment From Inventory,
Remove Attachment Type From Attachments, Try Destroy Attached Attachment, and
dedicated unequip event graph sections. Based on that structure, the remove
side mirrors the add path: it validates the operation, updates logical attachment
state, cleans up the spawned visual actor, and resets the temporary unequip
variables. This is consistent with the naming, graph groups, and the observed
add-side implementation.
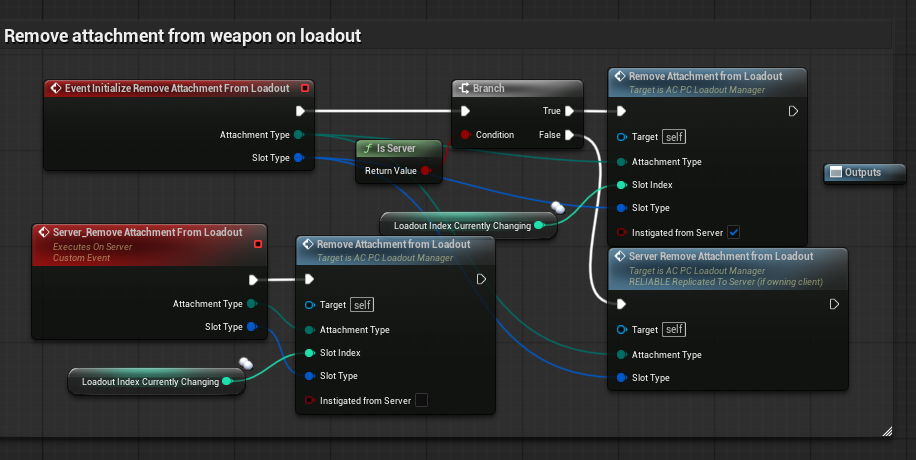
Remove-attachment entry events on the loadout side. The
live attachment manager exposes its own mirrored remove and unequip function
groups as well.
BP_ATTACHMENT_BASE Explained
BP_Attachment_Base is the concrete visual attachment
actor. It is a child of the abstract BP_Attachment_Abstract, which exists only
as the contract and does not hold gameplay logic. The base actor’s job is to
materialise the attachment visually from data, choose the correct mesh mode,
respond to visibility changes, and destroy itself cleanly when the owning
equipment is destroyed.
BeginPlay and owner cleanup
On authority, the base actor binds to the owner
equipment’s OnDestroyed event. If the equipment goes away, the attachment actor
destroys itself. In the same startup flow it reads attachment data from the
backing inventory item, breaks F_Weapon_Attachment, decides whether the
attachment should use the skeletal mesh or static mesh path, destroys the
unused component, and stores the surviving component as the active
MeshComponent.

BP_Attachment_Base BeginPlay selecting the correct mesh
mode and binding cleanup to the owner equipment’s destroy event.
Loading and assigning the mesh
The visual asset is not hard-coded into the blueprint.
BP_Attachment_Base reads the mesh references from the F_Weapon_Attachment data,
async-loads the correct asset, casts the active MeshComponent to the expected
component class, and then assigns the mesh. Static mesh attachments use Set
Static Mesh. Skeletal attachments use Set Skinned Asset and Update.
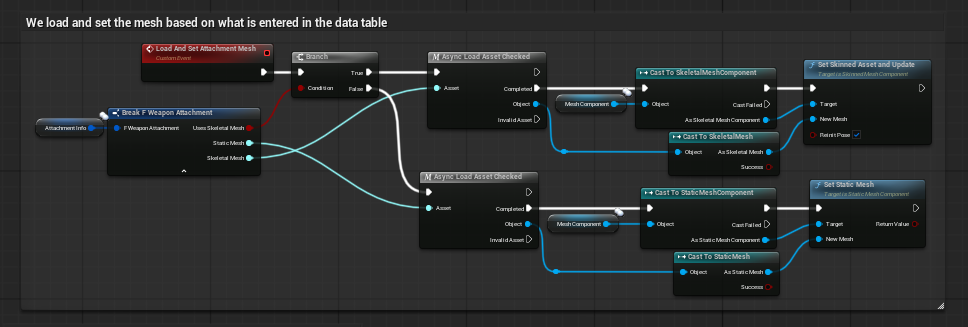
Load And Set Attachment Mesh reading the mesh asset from
data and assigning it to the correct component type.
Visibility replication
The base actor also exposes a visibility path. A local
initialiser sets the mesh visibility immediately on self and, where required,
calls a server RPC so the same visibility state is applied for everyone. This
is the mechanism used by the attachment manager when it spawns an attachment
hidden first for animated equipping and then reveals it at the montage notify.
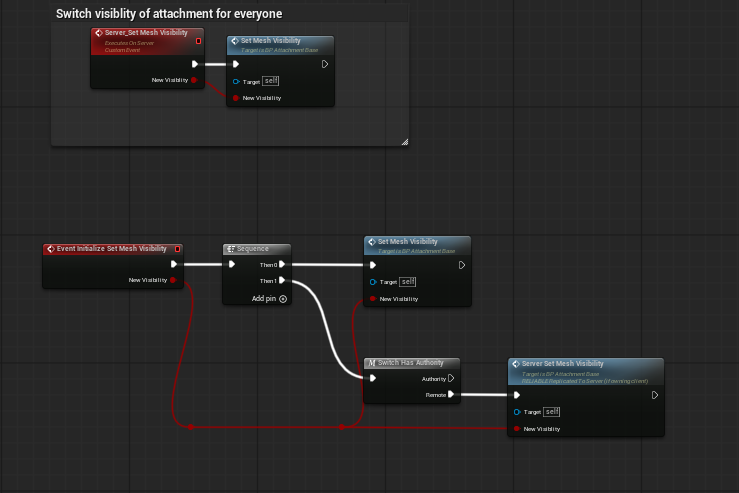
Visibility path for BP_Attachment_Base.
What the base actor deliberately does
not own
BP_Attachment_Base is not the system brain. It does not
decide whether an attachment is legal, whether inventory ownership is
satisfied, or whether a loadout should apply now or after respawn. Those
responsibilities belong to the managers. The base actor’s responsibility is the
visual and local data-facing side: mesh selection, mesh assignment, visibility,
and owner-linked cleanup.
Creating Custom Attachments
A major strength of the system is that the generic base
actor can be extended when a particular attachment needs custom behaviour. The
data table decides what class to spawn, so an attachment row can point either
to the fully generic BP_Attachment_Base or to a specialised child blueprint.
Example: flashlight attachment
The supplied child example shows a flashlight blueprint
that inherits from the base attachment actor. It runs Parent BeginPlay, checks
whether flashlight alignment should be used, enables ticking when needed, and
on Tick traces from the active camera while the weapon is aiming. It then
calculates a look-at rotation from the spotlight location to either the hit
location or trace end and rotates the spotlight component accordingly.
- The generic load, visibility, and owner-cleanup
behaviour still comes from the base attachment actor. - The child adds only the bespoke behaviour specific
to that attachment type. - This pattern is ideal for flashlights, lasers,
scopes, underbarrel devices, or any future attachment that needs custom
runtime logic.
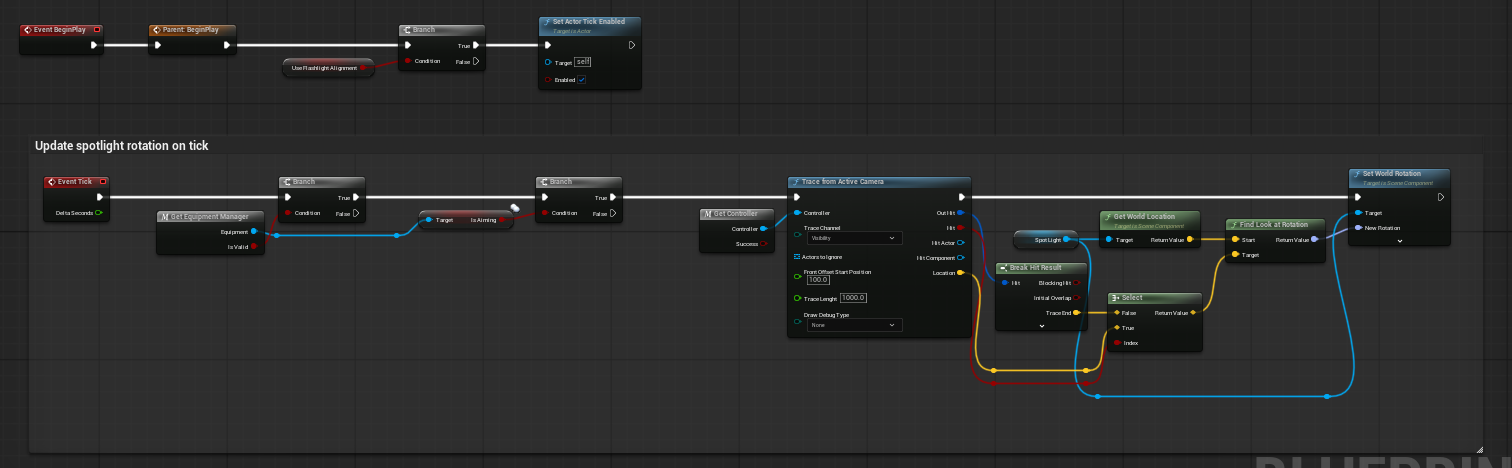
Example child blueprint implementation for a flashlight
attachment, dynamically aligning a spotlight to the player’s current aim trace.
Recommended extension pattern
When building a new specialised attachment, keep the
generic concerns in the base class and only add the behaviour unique to that
item. Examples include laser endpoint calculation, scope-specific camera logic,
suppressor-specific audio or FX overrides, or an underbarrel attachment that
exposes alternate-fire behaviour. As long as the child still respects the same
actor contract and is referenced by the DT_Attachments row, the rest of the
system does not need to change.
Networking and Runtime Authority
The supplied implementation is clearly
server-authoritative in its important gameplay-changing paths. Clients initiate
requests, but validation and authoritative state changes occur through server
RPCs.
- Loadout application uses server events such as
Server_Apply Loadout and Server_Equip Loadout. - Attachment equipping uses server validation before
the client is allowed to continue the presentation branch. - Visual attachment spawning is requested on the
server. - Visibility changes can be forwarded to the server so
they replicate correctly for everyone. - The managers also expose client events for menu flow
and presentation, such as opening the loadout menu or resetting transient
equip state.
One useful distinction in the implementation is the split
between logical state and visual state. The loadout manager and attachment
manager handle logical state. BP_Attachment_Base handles the final visual
actor. This is why the system can spawn a hidden visual actor first, then
reveal it at the correct montage notify without confusing the logical
inventory/equipment state.
Demo Level Notes and Usage Patterns
The demo boards supplied with the system are helpful
because they expose the intended ways a buyer is expected to test the
framework.
- Open the loadout menu directly from UI, from begin
play, or from an interaction prompt. - Toggle between inventory-owned attachment mode and
fully predefined loadout mode. - Walk over the interaction pad to receive a rifle,
then pick up an attachment item and let it equip automatically. - Right-click on the equipment item to open the
edit-attachments screen from the inventory or equipment flow. - Use the loadout screen to swap allowed attachments
and observe assigned attribute differences in the UI.
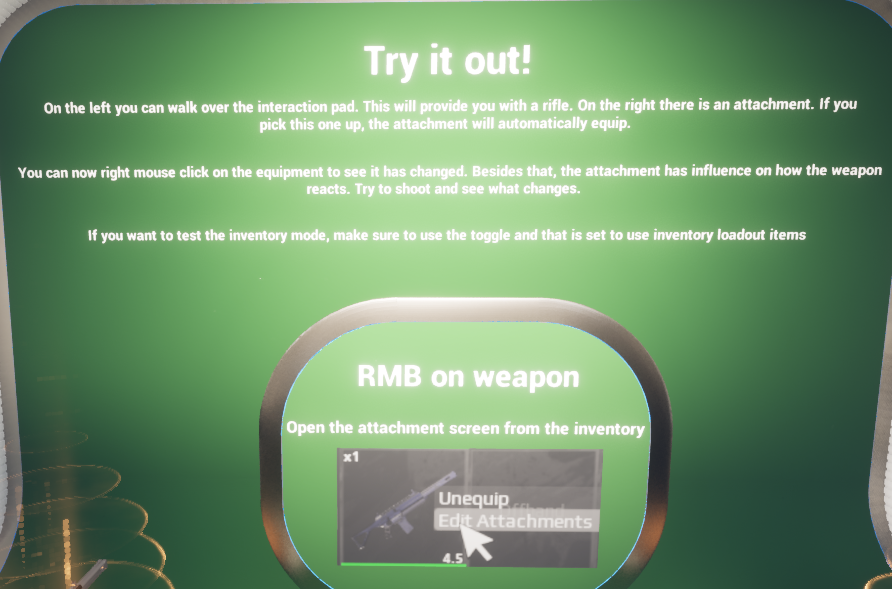
Demo ‘Try it out’ board describing the direct pickup,
right-click editing, and inventory-mode testing flow.
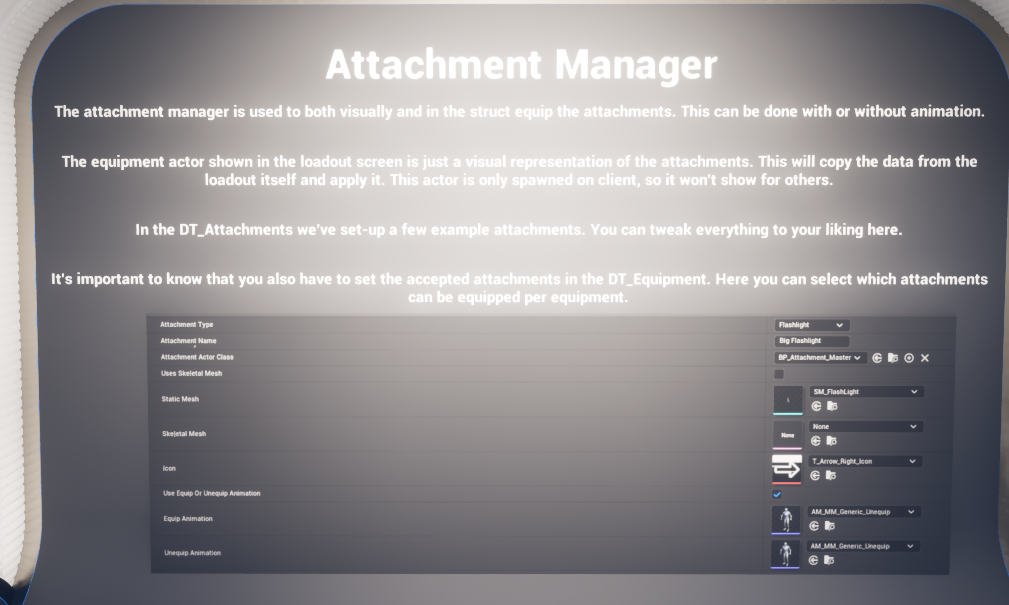
Demo Attachment Manager explanation board.
The demo also calls out one important caveat: in editor,
when testing with two clients that share the same save game, weird behaviour
may appear if both clients equip the same loadout. The board explicitly notes
that this is not expected to be a problem in a built game. In other words, the
strange behaviour is a test-environment save-sharing side effect rather than
evidence that the loadout manager is conceptually flawed.
Implementation Notes and Known
Behaviours
- The attachment abstract class does not hold gameplay
logic; BP_Attachment_Base is the first concrete attachment actor. - The loadout manager is controller-owned in the
sample because loadouts are player-specific and persist across the whole
session. - The loadout UI uses a client-only visual equipment
actor to represent attachments in the menu. - Assigned Attributes are data-driven and are read
into the loadout UI, but a project still needs to implement the actual
receiving-side behaviour for any custom attribute effects beyond the
sample examples. - Loadout changes can be immediate or deferred until
respawn depending on the project configuration. - The live remove and unequip path was not reviewed
node-by-node to the same depth as the add path, so the documentation
describes its mirrored behaviour based on the available function lists and
event structure rather than every exact node. - Mode-specific game settings can disable the loadout
menu entirely for certain game types, such as a battle-royale-style
ruleset.
Final Summary
The Weapon Attachment System is a strong example of
Hyper’s modular pattern. The loadout manager owns saved player choice. The
attachment manager owns live runtime attach and unequip flow. The base
attachment actor owns the visual attachment instance. DT_Attachments and
DT_Equipment provide the data-driven layer that keeps the whole system
extensible.
For a shooter project, the system can behave like a fast
predefined loadout customiser. For a survival or open-world project, the same
architecture can behave like a true inventory-owned equipment customisation
system. Because the visual actor is separated from the logical state and
because child blueprints can extend the base attachment actor, the system also
scales well when a project needs specialised attachment behaviour such as
flashlight aiming, laser logic, or future attachment-specific gameplay.
In practical terms, the system is already divided into
the right responsibilities: definition, validation, save-backed selection,
runtime application, and visual representation. Once a project’s equipment
tables, attachment rows, and UI entry points are wired in, the framework
provides a clean foundation for both menu-driven and world-driven weapon
customisation.